


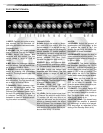
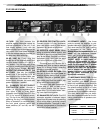

THE FRONT P
ANEL:
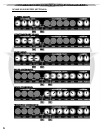
1.INPUT: Connect your guitar or wire-
less receiver into this standard 1/4"
jack using a shielded instrument cable.
CHANNEL ONE:
2.VOLUME: Set the output volume
level of Channel One with this control.
3.LOW: Adjust the bottom end
response with this control. The low
control covers a range of 16dB at
100Hz.
4.MID: Adjust the midrange response
with this control. The mid control cov-
ers a range of 20dB at 700Hz.
5. BRIGHT: Add a biting edge to your
sound by pressing this pushbutton
switch in. The bright switch adds 5dB
at 5kHz.
6.HIGH: Adjust the high end response
with this control. The high control cov-
ers a range of 20dB at 10kHz.
7.CHANNEL: Switch between chan-
nels with this pushbutton switch. The
adjacent green LED glows when
Channel One is selected (switch "out"),
the red LED glows when Channel Two
is selected (switch "in"). When a
footswitch is used for channel switch-
ing, this switch is disabled.
CHANNEL TWO:
8.GAIN: Adjust the overdrive (distor-
tion) level with this control. With the
control towards “0” (to the left) the sig-
nal is relatively clean. As you bring the
control towards “5” (center position)
the distortion increases, along with the
overall output level. Keep turning the
control towards “10” and you’ll
increase the distortion even more.
9.BOOST: Add a third channel (sort-
of) by pressing this pushbutton switch
in. The boost switch adds 8dB at 1kHz.
10. LOW: Adjust the bottom end
response with this control. The low
control covers a range of 8dB at
100Hz.
11. MID: Adjust the midrange response
with this control. The mid control covers
a range of 12dB at 1kHz.
12. HIGH: Adjust the high end
response with this control. The high
control covers a range of 14dB at
10kHz.
13. LEVEL: Set the output signal level
of Channel Two with this control. At the
"0" position (full left) very little or no
signal will be heard; as you bring the
control up (towards center) the output
level of Channel Two increases. Use
this control along with your guitar's vol-
ume and the Gain control (#8) to pro-
duce a wide variety of sounds.
MASTER:
14. REVERB: Adjust the amount of
reverberation with this control: at the
"0" position the signal is "dry" (no
reverb). As you bring the control up,
the amount of reverb increases.
15. PRESENCE: Increase the level of
upper harmonics with this control. The
presence control allows a boost of up
to 5dB at 10kHz.
16. STANDBY: This switch activates
the amplifier (providing the On/Off
switch, #17, is at the ON position), and
should always be turned on last. The
switch is ON in the up position. The
amp should be left in the Standby
mode (switch down) during set breaks.
NOTE: When you first power up this
amplifier, leave the Standby switch
OFF for at least 20 seconds. This
gives the power tubes a chance to pre-
pare themselves for action.
17. ON/OFF: This switch applies AC
voltage to the amplifier in the UP posi-
tion, and should always be turned on
first. The Active Lamp (#18) lights up
when the AC power is on.
18. ACTIVE LAMP: This domed lamp
lights when the amplifier is powered
up, indicating it is ready to be played.
(The lamp stays on regardless of the
setting of the Standby switch, #16.)
4
TTVV--6600//112200//66221100//66221122 GGUUIITTAARR AAMMPPLLIIFFIIEERRSS