


32
33
DESCRIPTION
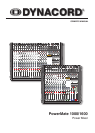
First of all, we would like to thank you and congratulate you to your purchase of a DYNACORD power
mixer.
The PowerMate compact power mixers incorporate profound know-how, based on our research, development and
inter-communication with our customers in the professional audio market, for decades. With a PowerMate you own a
power mixer that offers a wide range of functionality in a very compact frame. Forget about the troubling experiences
with cabling and matching mixers, ampliers, FX units, and equalizers. You now own a device with optimally matched
components. The mixer’s ergonomic console shape and clearly structured controls provide perfect overview for
instant access at all times. A gooseneck litlight can be easily plugged into the provided socket to compensate
for insufcient lighting conditions. Also during the transport you will quickly learn to appreciate the PowerMate’s
superiority: recessed handles on the sides, compact dimensions and low weight, plus the sturdy cover that protects
the controls from being damaged. However, if you would rather like to install your PowerMate 1000 in a 19” rack shelf,
no problem. The only thing you have to do is to replace the plastic side panels by a pair of metal rack mount ears.
Through its multiple functions, its high dynamic capacity, and extremely low-noise design in combination with its 24-
bit Dual-Stereo effect unit and the high-performance power amplier, the PowerMate is best equipped for universal
use. No matter, whether on-stage, in a home recording environment or in a permanent installation, your PowerMate
is the ideal partner to meet your expectations of a professional audio device – effective and reliable. Of course, you
want to install and operate your new PowerMate as quickly as possible. Nevertheless, please take the time to do
this by means of this user’s manual. Starting with input channels, effects and master areas up to the power amp,
every section is explained systematically and in detail within this owner’s manual. Through the careful perception
of the manual you will learn about all functions and nd some useful and practical tips for the daily operation of the
PowerMate. Even more important, you will nd some adjustment guidelines that should be painstakingly carried
out; plus the description of a typical sound reinforcement installation, a block diagram, specications, connection
guidelines, etc.… So, take your time and keep on reading.
Unpacking and Warranty
Open the packaging and take out the PowerMate. Remove the FX unit displays’ protective foil. In addition to this
owner’s manual you will nd the mains supply cord and the warranty card. Please check, if the warranty registration
form is lled out correctly. Only when this form is completed, you will be able to apply for warranty claims.
DYNACORD grants 36 months of warranty, starting with the date when you received the appliance from your local
dealer. Therefore, we would like to ask you to also keep the original certicate of purchase together with the warranty
certicate.
Keeping all papers and the original packaging of the device is generally recommendable, since they come in
handy re-selling an appliance.
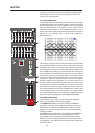
Installation and Connections
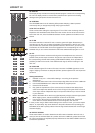
Do not cover the ventilation louvers in the bottom plate of the appliance. Always place the PowerMate on an even
surface to allow for sufcient airow during the operation. The device is equipped with electronically controlled
ventilators to protect the power amplier against thermal overload. The direction of the airow is front-to-rear. Fresh,
cold air enters the mixer at its lower front side and warm air leaves the device through the ventilation louvers in the
rear panel. Do not cover the frontal or the rear ventilation louvers. Otherwise the PowerMate automatically enters
protect mode to prevent thermal overload. While the protect mode prevents that the device is being damaged,
regular operation is impossible during the period of time it is activated. In case the PowerMate is installed in a 19”
rack system (vertically), you have to allow at least 2 HU of free space above and 1 HU below the mixer. Of course
you can cover the empty space with special blind plates that also have ventilation louvers. Before establishing the
mains supply connection, please make sure that the device matches the voltage and frequency of your local mains
supply. Check the label next to the mains switch. When switching the power on, the internal fans will run for about 2
seconds at full speed to give you an acoustical signal that the PowerMate is ready to be operated. In addition dust
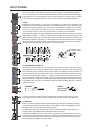
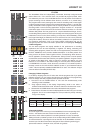
particles that might have gotten into the device get blown out. For a secure connection the SPEAKER OUTPUTS
on the rear panel of the PowerMate are provided through professional standard high-performance SPEAKON
connectors. The pin assignment of these sockets is 1+ (hot) and 1- (cold).