


18
2
Applied Technique
3
Appendix
Situation Practical
Use Technique
1
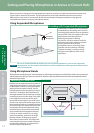
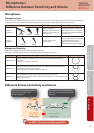
Deleting Unnecessary Parts
There are many cases when you’ll want to edit the sound after recording, for example to erase the rst ve seconds that
aren’t needed.
In these cases, you can use the Windows version of the Cakewalk SONAR7 series (sold separately) to edit sound recorded
with the R-44.
Unnecessary sounds can be easily deleted by selecting them and erasing them as shown below. (For details on operations,
see the owner’s manual or help for the software that you are using.)
Cakewalk SONAR7 Producer Edition
Cakewalk SONAR7 Producer Edition Screen
Deleting Unnecessary Parts
Although this software is music creation software, it has plenty of editing features for sound les, too. For example, you
can easily create a non-stop melody by connecting several edited passages.
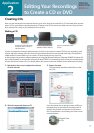
Creating 5.1 Channels
If you use the 4-channel recording as described in “Recording with Surround Sound” on p. 15, you can convert the sound
to the 5.1 channel surround sound used by DVD software.
And if you then synch it to video, you will have a piece with the impact and realism of a movie.
We introduce the procedure to convert 4 channels to 5.1 channels below. We use the Windows-compatible “Cakewalk
SONAR7 Producer Edition” (sold separately) for conversion. (For details on operations, see the owner’s manual or help for
the software that you are using.)
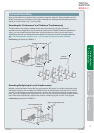
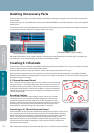
5.1 Channel Surround Sound
The 5.1 channel surround sound system creates a realistic sound environment
using 6 channels in a rectangle con guration. The six channels are in front of
the listener (Center), to the right in front (Front R), to the left in front (Front L),
to the right in back (Rear R), to the left in back (Rear L), and the low frequency
channel. The low frequency channel is counted as 0.1 channel because it has
a limited sound range.
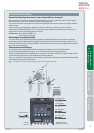
Recording Settings
Set Rec Mode to STEREO X 2. If this setting is used to convert to 5.1 channel
surround sound, you can manipulate two bits of data in two-channel units
to make the conversion operation easier. Also, set the microphones so that
channel 1 is the front left, channel 2 is the front right, channel 3 is the rear left,
and channel 4 is the rear right. See the illustration at right for how the area
recorded by four channels corresponds to the area for 5.1 channels.
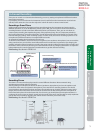
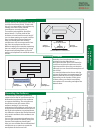
Converting to 5.1 Channel Surround Sound
Load the data for the two projects (sound data recorded in stereo) to the PC, and convert
to 5.1 surround sound using the surround pan feature of “Cakewalk SONAR 7 Producer
Edition.” First, display the screen shown in the illustration. Set the direction of sound for
Front L, Center, and Front R with the project that recorded with channels 1 and 2.
Determine the direction of sound for Rear L and Rear R with the project that recorded
channels 3 and 4. (For details on operations, see the owner’s manual or help for the
software that you are using.)
After making these settings, the exported sound data is the 5.1 channel surround sound data.
Front L
Center
Front R
Rear L
Rear R
Listener
1CH
2CH
3CH 4CH
Low
frequency
Low
frequency
Front L
Center
Front R
Rear L
Rear R
Listener
1CH
2CH
3CH 4CH
Low
frequency
Low
frequency