


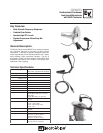

Frequency Response:
12000 Portland Avenue South, Burnsville, MN 55337
Phone:952/884-4051, Fax:952/884-0043
www.electrovoice.com
© Telex Communications, Inc. 3/2005
Part Number 38110-436 Rev A
U.S.A. and Canada only. For customer orders, contact Customer Service at:
800/392-3497 Fax: 800/955-6831
Europe, Africa, and Middle East only. For customer orders, contact Customer Service at:
+ 49 9421-706 0 Fax: + 49 9421-706 265
Other International locations. For customer orders, contact Customer Service at:
+ 1 952 884-4051 Fax: + 1 952 736-4212
For warranty repair or service information, contact the Service Repair department at:
800/553-5992 or 402/467-5321
For technical assistance, contact Technical Support at: 800/392-3497 or 952/736-4656
Specifications subject to change without notice.
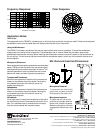
Polar Response:
Application Notes:
Mic Removal/Insertion/Dimensions:
270°
300°
330°
0°
30°
60°
9
0°
120°
150°
180°
210°
240°
@1kHz
-5dB
-10dB
-15dB
-20dB
-10
20 50
0
dB
+10
500
FREQUENCY IN HERTZ
100 1K 5K 10K 20
K
Cable Clips:
The gooseneck on the RE920Tx includes a pair of soft vinyl clips to hold the microphone cable. These can be adjusted
as needed to make sure the cable does not interfere with the use of your instrument.
Using the Windscreen:
The RE920Tx includes a windscreen that can be used anytime wind noise is a problem. To install the windscreen,
simply press it on the top of the microphone. The windscreen has an internal frame that includes a stop to help
positioned the windscreen correctly. When installing the windscreen, make sure to push it down on the microphone as
far as it will go. This will ensure that the frame inside the windscreen doesn’t cover any of the acoustic side ports on
the microphone.
Microphone Placement:
Some suggested microphone placements are described
below. The tone of the instrument can be varied a great
deal depending on the exact placement of the mic. The
optimum placement is the one where the mic sounds
best and is mostly a matter of personal preference.
Trumpets and Trombones
Mount the microphone on the bell of the instrument as
shown on the reverse side of this sheet. Pointing the
mic towards the center of the bell will result in a
brighter sounding tone.
Saxophones
Mount the microphone on the bell of the instrument as
shown on the reverse side of this sheet. Pointing the
mic towards the center of the bell will result in a
brighter sounding tone.
Woodwinds
For a bright sound, clamp the microphone on the bell of
the instrument and point it towards for the center of the
bell. For a mellower sound, reverse the mic clamp so
that mic points towards the instrument keys.
Microphone Removal:
To remove the mic from its clip,
gently twist it upward as shown
while grasping the plastic clip.
Microphone Insertion:
To insert the mic into its clip,
push the mic straight down as
shown until it snaps into place.
Make sure the grove in the mic
engages the internal ribs in the
clip .