


407750-EN v2.2 07/13
4
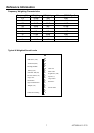
Operation
Quick Start
1. Power the meter by pressing the ON/OFF key.
2. The meter’s LCD will count down to zero (99.9, 88.8, 77.7, etc.) and then begin measuring
sound levels. If the LCD does not switch on after pressing the ON/KEY check the 9V battery.
3. Point the microphone toward the source of the sound level to be measured and view the reading
on the meter’s LCD.
‘A’ and ‘C’ Frequency Weighting
Select ‘A’ or ‘C’ weighting via the C/A key. The LCD will reflect the currently selected frequency
weighting. Use ‘A’ weighting to have the meter respond as the human ear would with regard to
frequency response (the human ear boosts and cuts amplitude over the frequency spectrum). ‘A’
weighting is used for environmental measurements, OSHA regulatory testing, law enforcement, and
workplace design. Select ‘C’ weighting for flat responding measurements (less amplitude boost or
cut across the frequency spectrum). ‘C’ weighting is used in applications where hearing
conservation is not an issue; for example, in the diagnosis of malfunctions in electrical, electronic
and mechanical devices.
FAST/SLOW Response Time
Select either FAST (125ms response) or SLOW (1 second response) measurements by pressing
the F/S key. The LCD will reflect the currently selected mode. Selection of ‘Fast’ or ‘Slow’ is
determined by the application and any directives or standards related to that application. For
example, most hearing conservation or OSHA related testing is done using SLOW and A weighting.
MAX HOLD
The meter is capable of taking continuous measurements and only updating the LCD when a higher
reading (than the one presently on the display) is detected. The bargraph display continues to
change while the main LCD waits for a higher reading. Press the MAXHLD key to activate the MAX
HOLD mode. The LCD will reflect the MAX HOLD function. Press the MAXHLD key again to return
to normal operation.
Record (REC) Function
To Record the Maximum and Minimum sound level measurements over a programmable period of
time, press the REC key. The REC indicator will appear on the LCD. Once the REC key is pressed,
the meter begins tracking the highest (MAX) and lowest (MIN) readings. Press the REC again and
the MIN indicator will appear on the LCD along with the lowest sound level reading since the REC
key was pressed. Press the REC again and the MAX indicator will appear along with the highest
reading the meter has encountered since the REC key was first pressed. Press and hold the REC
until the REC indicator extinguishes to exit the RECORD mode.