


wwwwww
..
ffeennddeerr..ccoomm
✧
wwwwww
..mmrrggeeaarrhheeaadd..nneett
8
SS
SS
tt
tt
aa
aa
gg
gg
ee
ee
™™
™™
DD
DD
SS
SS
PP
PP
AA
AA
mm
mm
pp
pp
ll
ll
ii
ii
ff
ff
ii
ii
ee
ee
rr
rr
ss
ss
PP
PP
aa
aa
nn
nn
ee
ee
ll
ll
FF
FF
uu
uu
nn
nn
cc
cc
tt
tt
ii
ii
oo
oo
nn
nn
ss
ss
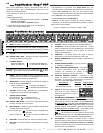
Your new Stage™ 100/100H/160 DSP amplifier delivers
world–class Fender
®
tone and world–standard Fender
®
DSP
technology:
• 160W output power @ 4 ohms (100W @ 8 ohms)
• Digital Signal Processing
• Simultaneous use of Reverb and Effects tone tools -
16 REVERB TYPES and 16 FX SELECTIONS
• Separate LEVEL and FX TIME/RATE controls
• Selectable Normal and Drive Channels with independent
volume and tone controls
• MORE DRIVE pre-amp boost for instant gain saturation and
harmonically rich leads
• MID CONTOUR button for “scooped” mid–range tones;
especially effective for achieving modern metal distortion
• Impedance balanced XLR LINE OUT jack
• PRE AMP OUT and POWER AMP IN jacks
• 4-button FOOTSWITCH (included) enables remote activation of:
(1) Channel Select, (2) Drive/More Drive, (3) Effects, (4)Reverb
Thank you for choosing Fender
Thank you for choosing Fender
®
®
—T
—T
one, T
one, T
radition and Innovation—since 1946
radition and Innovation—since 1946
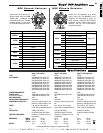
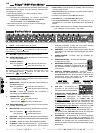
A. INPUT - Plug your guitar in here.
The Normal channel controls (B-E) are operational when the
CH SELECT button is out, or footswitch
is off.
B. VOLUME - Adjusts the loudness of the amplifier.
CDE.
TREBLE / MID / BASS - Adjusts the tone in the
high / middle / low frequency ranges respectively.
F. CHANNEL SELECT -
Button OUT selects the Normal Channel
Button IN selects the Drive Channel
The Drive channel controls (D–F), are operational when the
CH SELECT button is in, or footswitch
is on.
G
.
DRIVE - Adjusts the distortion level. Use together with
the Drive Channel VOLUME control (I) to adjust the
overall loudness of the amplifier.
H. MORE DRIVE - Boosts the intensity and range of the
DRIVE control (G).
Button OUT selects the Drive Channel
Button IN selects the More Drive Channel
I. VOLUME - Adjusts loudness of the amplifier together
with the DRIVE control (G).
J. DRIVE CHANNEL INDICATORS -
Yellow LED ON
Drive Channel is active
Red LED ON
More Drive Channel is active
KLM.
TREBLE / MID / BASS - Adjusts the tone in the high
/ middle / low frequency ranges respectively.
N. MID CONTOUR - Mid-frequency cut; enhances the
bass and treble tones.
Button OUT bypasses Mid-Contour
Button IN activates Mid-Contour
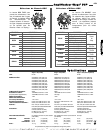
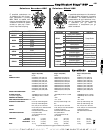
O. REV LEVEL - Adjusts the level of the active Reverb.
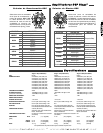
P. REV TYPE - Selects the active Reverb (see next page).
Q. FX LEVEL - Adjusts the level of the active effect.
R. FX SELECT - Selects the active effect (see next page).
Each position defaults to a preset time/rate parameter
to allow for quick auditioning of a common variation of
each effect.
S. TIME/RATE - Once this knob is nudged, it adjusts the
interval length / modulation speed of the active effect (see
next page).
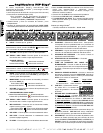
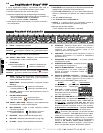
T. POWER INDICATOR - Illuminates when the amplifier is ON.
U. POWER SWITCH - Switches the amplifier
ON or OFF.
V. POWER CORD SOCKET - Connect the
included power supply cord in accordance
with the voltage and frequency ratings listed
on the rear panel.
W. PARALLEL SPEAKER OUTPUTS - Connect a single 8Ω
speaker (internal or external) to the MAIN SPKR jack.
Connect an additional 8Ω speaker (internal or external)
to the EXT. SPKR jack. 4Ω minimum total.
Speaker(s)
Use Load / Output
One 8Ω speaker MAIN jack 8Ω / 100W
Two 8Ω speakers both jacks 4Ω / 160W
X. LINE OUT - Connect this XLR
output jack to the input of sound
reinforcement or recording
equipment.
Y. PRE AMP OUT / POWER AMP IN - (1) Ef
fects Loop -
Connect PRE AMP OUT to an effects device input, then
connect the effects device output to PWR AMP IN.
(2) Multiple Amps
- Connect the primary unit’s PRE
AMP OUT to the auxiliary unit’s PWR AMP IN. The
primary unit is used to control all auxiliary units.
(3) Recor
ding or Reinforcement - Connect PRE AMP
OUT to the input jack of sound equipment.
Use TS (Tip-Sleeve) standard type plugs with
both of these jacks. PRE AMP OUT signal includes
onboard tone shaping and DSP effects processing.
Z. FOOTSWITCH - Connect the 4-button Fender
footswitch (included) at this jack to enable remote
switching of CH SELECT, MORE DRIVE, EFFECTS, and
REVERB. When plugged in, the footswitch buttons
override the corresponding front panel controls.