Page 3
Introduction
Congratulations on purchasing the Gemini BPM-1 automatic beat counter.
This state of the art beat counter is backed by a three year warranty. Prior
to use, we suggest that you carefully read all the instructions.
Features
• 4 Stereo Channels
• Ultrafast Beat Counter Can Read Up to 180 BPM (beats per minute)
• 4 Phono/Line Convertible Inputs
• BPM Displays and Beat Offset Indicators
Cautions
1. All operating instructions should be read before using this equipment.
2. To reduce the risk of electrical shock, do not open the unit. There are
NO USER REPLACEABLE PARTS INSIDE. Please refer servicing to a
qualified service technician.
In the U.S.A., if you have any problems with this unit,
call 1-732-738-9003 for customer service. Do not return
equipment to your dealer.
3. Do not expose this unit to direct sunlight or to a heat source such as a
radiator or stove.
4. This unit should be cleaned only with a damp cloth. Avoid solvents or
other cleaning detergents.
5. When moving this equipment, it should be placed in its original carton
and packaging. This will reduce the risk of damage during transit.
6. DO NOT EXPOSE THIS UNIT TO RAIN OR MOISTURE.
7. DO NOT USE ANY SPRAY CLEANER OR LUBRICANT ON ANY
CONTROLS OR SWITCHES.
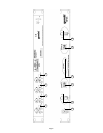
Connections
1. Make sure that the POWER (13) switch is in the off position. The
POWER LED (14) will be off. This unit comes supplied with a 15 volt
AC adaptor. Plug the adaptor into the rear panel power jack. Then plug
the adaptor into a proper power source.
2. Use the 4 stereo PHONO/LINE (2, 5, 8, 11) inputs on the rear panel to
connect to the output of your sources. The PH1/LN1 (12) switch
enables you to set the CHANNEL 1 (11) input sensitivity to Phono or
Line. The PH2/LN2 (9) switch enables you to set the CHANNEL 2 (8)
input sensitivity to Phono or Line. The PH3/LN3 (6) switch enables you
to set the CHANNEL 3 (5) input sensitivity to Phono or Line. The PH4/
LN4 (3) switch enables you to set the CHANNEL 4 (2) input sensitivity
to Phono or Line. Note: When using turntables, don’t forget to connect
the ground wire from your tuntable to the ground screw of your mixer.
3. The BPM-1 is supplied with 4 sets of OUTPUT (1, 4, 7, 10) jacks. If you
are using a turntable and have the input set to phono, the
corresponding output must be connected to phono inputs on your
mixer. If you have the input set to line, the corresponding output must
be connected to line inputs on your mixer. Use the CHANNEL 1
OUTPUT (10) jacks to connect to the appropriate inputs on your mixer.
Use the CHANNEL 2 OUTPUT (7) jacks to connect to the appropriate
inputs on your mixer. Use the CHANNEL 3 OUTPUT (4) jacks to
connect to the appropriate inputs on your mixer. Use the CHANNEL 4
OUTPUT (1) jacks to connect to the appropriate inputs on your mixer.
Operation
1. POWER ON: Once you have made all the equipment connections, press
POWER (13). The power will turn on and the POWER LED (14) will
glow RED. When you turn on the BPM-1, the unit will run through an
initialization period in which the BPM DISPLAYS (17, 19) and the BEAT
OFFSET INDICATORS (18) will flash. When the flashing stops, the unit
is ready for use.
2. The ASSIGN (16, 21) buttons allow you to select which channel will be
displayed on each side of the BPM-1. Press the ASSIGN (16) button to
select channel 1, 2, 3 or 4 to be displayed on the left BPM DISPLAY
(17). The ASSIGN LED (15) will indicate the channel you selected.
Press the ASSIGN (21) button to select channel 1, 2, 3 or 4 to be
displayed on the right BPM DISPLAY (19). The ASSIGN LED (20) will
indicate the channel you selected.
3. BPM DISPLAY: There are BPM DISPLAYS (17, 19) for each side of the
BPM-1. They update approximately every 2.5 seconds and digitally
display the Beats Per Minute allowing you to match the beats visually.
BPM DISPLAY (17) reflects the Beats Per Minute of the channel
assigned to the left side of the unit, and BPM DISPLAY (19) reflects
the Beats Per Minute of the channel assigned to the right side of the
unit.
NOTE: A [- -] reading will appear on the BPM DISPLAY if the
track has unclear beats. The [- -] reading will also appear if
there is no signal present.
4. The BEAT OFFSET INDICATORS (18) light when the tracks of the two
channels assigned to the BPM-1 are within 11 BPMs of each other and
display how aligned the beats of the two channels are. When the RED
LEDs light, the beats are not aligned. When the YELLOW LEDs light,
the beats are almost aligned. When the GREEN LED lights, the beats
are aligned perfectly.
NOTE: If the difference between the two channels beats
exceed 11 BPM, the BEAT OFFSET INDICATORS will not
light.
SUGGESTION: You can use the BPM DISPLAYS to determine which
tracks have similar or the same Beats Per Minute. When mixing two tracks
with similar Beats Per Minute, you can use one source’s pitch control to
align the Beats Per Minute with the other source’s BPM. The BPM
DISPLAYS and the BEAT OFFSET INDICATORS update every 2.5
seconds and will reflect the change in BPM and indicate when the beats
are aligned.
NOTE: Beat mixing is a skill that requires practice. Not
every track has a strong beat, and beat mixing works best
with tracks that have clear and strong beats.
Specifications
INPUTS:
Phono......................................................................................3 mV 3 Mohm
Line.....................................................................................150 mV 3 Mohm
OUTPUTS:
Input/Output Resistance..................................................................<0.1 Ohm
GENERAL:
BPM Range.............................................................................60 - 180 BPM
Power Adapter...........................................................115V/15V AC 500 mA
230V/15V AC 500 mA
Dimensions......................................19”w x 1.75”h x 3”d (483 x 44 x 78 mm)
Weight.....................................................................................3 lbs (1.5 kg)