


Page
66
8
APPENDICES
ASSEMBLY INSTRUCTIONS
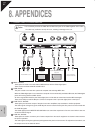
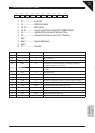
PARTS PROVIDED
Before attempting to assemble the CN33 digital piano unit, ensure that all parts are included. A Phillips-head
screwdriver will also be required to assemble the unit (not included).
(A) Piano (x 1)
(B) Pedal board (x 1)
(C) End panel (x 1 each for left and right)
(D) Back panel (x 1)
(E) Adjuster bolt (x 1)
(F) Screw:
I
4 x 16 (x 4) (Silver)
(G) Screw:
I
4 x 20 (x 4)
(H) Screw:
I
4 x 30 (x 4)
(I) Screw: M6 x 25 (x 4)
(J) Cord clamp (x 2)
(K) Headphone hook and screws (x 1 set)
(L) Power cord (x 1)
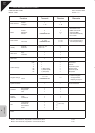
ASSEMBLY SEQUENCE
1. Screw the adjuster bolt (E) into the threaded screw hole
provided in the base of the pedal board.
2. Attach the pedal board (B) and end panels (C), sliding the front
of the pedal board into the notch in the end panels. Ensure the
metal bracket on the base of the end panel slides beneath the
pre-attached screw in the pedal board.
3. Hold the pedal board (B) and end panels (C) together, then
tighten the pre-attached screws on the left and right sides.
Attach two additional screws (F) on each side, ensuring all
screws are fastened tightly and that there are no large gaps
between the assembled parts.
4. Unfasten and extend the pedal connection cable attached to
the bottom of the pedal board.
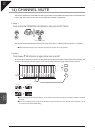
5. Attach the back panel (D) to the stand assembly using screws
(G) and (H) in the prepared holes. Loosely tighten the screws
with the * symbol.
Caution
y Ensure that this instruction manual is read thoroughly before attempting to assemble the CN33
digital piano, and that two or more people work on assembly.
y It may be necessary to tilt the unit by 90 degrees while assembling the CN33 digital piano.
During this time, ensure that hands are not caught in the piano, keyboard lid, or score stand,
and that the piano is not dropped on an individual’s feet.
Caution
y Be careful not to scratch or damage the floor,
piano, or stand at the time of assembly.
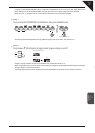
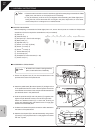
(E)
1
(B)
(C)
(F)
(F)
Pre-attached screw
2 y 3
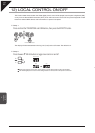
(K)
Headphone hook and screws
(J)
Cord clamp
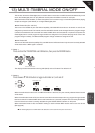
(E)
Adjuster bolt
(F)
I
4 x 16
(G)
I
4 x20
(H)
I
4 x30
(I)
M6 x 25
Screw
(x 2)
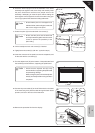
(H)*
(G)
(G)
(G)
(H)*
4 y 5
(D)
Unfasten and extend the pedal cable
(G)
(H)*
(H)*