


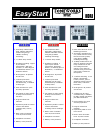
AX10-Series EasyStart
2
NOTE: The following procedures work for all 3 of the AX10-series effect units!
Audio Connections and Tuning
1. Lower the MASTER level. If connecting headphones or powered monitors, select “LINE” with the LINE/AMP switch on the rear panel.
Select “AMP” if connecting to a guitar amplifier.
2. If using headphones, mixer, or amplifier, connect to the OUTPUT jack on the rear panel. After making audio output and AC connections,
connect your guitar to the INPUT jack on the rear panel. Raise the MASTER level to adjust the volume.
3. Tune up! Step on the program select switches simultaneously, to activate bypass mode, and the auto- chromatic tuner will be active. Play
a note and watch the meter to tune your guitar or bass. To return to the previous mode, step on either of the select switches again.
Restoring the Factory Preset Programs
1. While holding down the WRITE button, switch on the power. The display will indicate Ld. Release the WRITE button.
2. Press the WRITE button once again. The factory programs will be loaded into the user area (o.1~9.4). When loading is complete, the
display will blink, and then program number 0.1 will appear.
Note: If you reload the preset programs, all previously stored programs will be overwritten.
Note: Never turn off the power while this operation is in progress.
Selecting and listening to the AX10’s Preset Programs
The AX10 pedals each have 80 program locations in 20 banks with 4 programs in each bank (20x4=80).
Use the program UP or DOWN select switches to step through the programs of all banks. Once you find a sound
that you like, you can use the knobs and selectors of the amp and effects section to tweak the sound easily.
1. To select any of the 3 Pre FX, press both the VALUE UP/DOWN arrow buttons simultaneously (the LED will light). Use the UP or DOWN
buttons to select the desired effect. Repeat this procedure to turn the Pre FX off.
2. To select Modulation Effects (AX10G/B), simultaneously press both the DEPTH UP/DOWN Arrow Buttons that correspond to the Modulation
Effects. Repeat this procedure to turn the Modulation Effects off.
3. To select the Ambience Effects, simultaneously press both the DEPTH UP/DOWN Arrows. Repeat this procedure to turn the Ambience
Effects off.
4. Once the LED corresponding to an Effect section is lit red, (ON), the DEPTH UP/DOWN Arrows will increase or decrease either the amount
of Effect or Depth depending on the effect chosen. While holding down the Function button and pressing either the UP/DOWN Arrow
buttons that correspond to an effect section, you can edit additional Effect parameters. For example, you can edit the speed of a
modulation effect by holding down the Function button, and pressing either of the MODULATION UP/DOWN arrow buttons.
5. TAP BUTTON: You can set the delay or reverb time of the Ambience effect by tapping this button at the desired interval. The LED located
at the left will blink to indicate the tempo.
6. To assign the Effects to the Expression pedal, press the FX/BANK HOLD button. Each time you press this button, the LED will change color
to indicate the specific pedal Effect that will be controlled.
-WAH (orange): Pedal Wah (AX10G and AX10B) (Note: For AX10A, this setting allows you to eliminate feedback by position of the pedal)
-MOD (red): The Effect selected by Modulation
-AMB (green): The Effect selected by AMBIENCE
-VOLUME (unlit): Volume Pedal
7. Using the Pedal to switch the Effects on and off: By advancing the Pedal all the way forward you can switch the selected PEDAL FX Effect
on/off. When the Effect is on, the LED at the left of the PEDAL will light. If VOLUME is selected as the PEDAL FX, the LED cannot be turned
off.
Saving a Program
You’ve tweaked and turned some knobs, and you like the changes that you’ve made – now to save your program:
1. Press the WRITE button, The Program number will blink in the display, and the AX10 will be in “write ready” mode.
2. Use the Program Select switches to select where you would like to store the program. (You must use USER Programs; you may not store
patches in the PRESET Programs).
3. Press the WRITE button once again, and your program will be stored.