


KP3 EasyStart
2
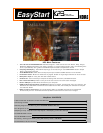
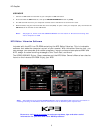
A Quick Overview of Buttons, Knobs and Switches
Some buttons and knobs are dual function. KP3 functions printed in a box above a button or
knob can be accessed by first holding down the SHIFT button.
INPUT VOLUME – This knob sets the level of the input signal that is fed to the effect from the MIC or
LINE inputs.
INPUT SELECT MIC/LINE– This switch selects the input source for the KP3.
FX DEPTH – This knob controls the wet/dry amount of effects. On drum or synth programs, it controls
the overall volume.
PROGRAM MEMORY – These eight buttons are used to store your favorite programs. These buttons also
access function settings. To access functions printed above the buttons, press and hold the SHIFT button
while pressing the PROGRAM MEMORY button. PROGRAM MEMORY buttons are also used in conjunction
with loop samples and turn the eight sample slices on and off.
PROGRAM/BPM – Use this knob to select different effect programs and to set the BPM. This knob can
be PRESSED to toggle between Program and BPM.
TAP/RANGE ALIGN – Tap this button three or more times to set the tempo. This button is also used to
“set the downbeat” when using AUTO BPM detection features.
AUTO BPM – Press this button to turn on AUTO BPM detection to detect tempo from an input source.
PAD MOTION REVERSE - Pushing this button prior to using the TOUCH PAD, triggers PAD MOTION
recording and plays back a PAD MOTION recording. A PAD MOTION can also be played back in reverse by
holding the SHIFT button, then pressing the PAD MOTION [REVERSE] button.
FX RELEASE LEVEL – Press and hold the SHIFT button while moving the FX RELEASE fader to adjust the
FX Release depth. Also used to adjust the playback LEVEL of a sample.
HOLD – Pressing this button will hold the last state of the Touch Pad and any SAMPLE BANK button that
is pressed.
MUTE - Holding down the MUTE button will momentarily cut the input signal, but the effected signal will
continue to play. A DJ style “Transformer Effect” can be achieved by rapidly tapping the MUTE button.
SAMPLE BANK A B C D – Pressing one of these buttons will playback the sample that was recorded to
that bank. If no sample is recorded, the button will be unlit. If a sample loop is present the bank LED will
be lit GREEN. ORANGE indicates a loop sample playing back. A RED LED indicates a one shot sample.
SAMPLING RESAMPLING – Use this button to record samples to the SAMPLE BANK buttons.
PHONES VOLUME – This knob controls the level of volume for the 1⁄4” headphone jack.
MIC TRIM – This knob sets the level for the 1⁄4” microphone input.