


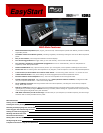

M50 EasyStart
7
Now to save your work:
3. Touch the “Save” tab.
4. Touch the drop-down menu in the upper-right corner of the display, and select “Save SEQ”.
5. Touch the “T” to type in a name, then touch “OK” twice, and you’re done!
You can also use this “Save” tab to save changes you’ve made to Programs, Combis, and Global settings.
Computer Connections- Plug-In and Standalone
The M50 ships with The M50 Editor, which is a great way to access all of the parameters using your computer. You can save
and load sound data, visually edit LFOs and envelopes, and much more. The best thing about the software is that it runs as a
VST, RTAS, and Audio Units plug-in so you can do all this from within your current music project!
1. Install the software as described in the M50 Operation Manual.
You can install only the standalone editor, only the plug-in, or both
Make sure you install the Korg MIDI driver, if applicable
Pay attention to your plug-in directory! Your host program will need to know where to look for the plug-in
2. Plug the M50’s USB port into a free USB port on your computer.
3. Load either the standalone Editor, or start your host DAW and load the M50 Editor as a plug-in.
a. No need to open 16 of them to control all 16 sounds- One instance of the plug-in does all the work!
4. When you save your work, you’ll also be saving the M50 settings… so the next time you work on that project, the M50
will set itself up just the way you left it!
You can use the editor to save your own custom Programs, Combis, and Global settings. This is great for backup purposes. Here’s
how to do a complete backup, and save the entire state of the M50:
1. Make sure the M50 is connected via USB before you start your DAW or the editor software.
2. In the editor software, click on the UTILITY menu on the upper right, and select “Receive All” > Click “OK” when
prompted.
3. The editor will receive all the data from the M50. Wait until this finishes.
4. Click on the UTILITY menu again, and this time click “Save”.
5. Choose a location, give the file a name, and then click “Save”.
Here’s another VERY useful function for that data file… You can set the editor to automatically load a specific data file
when it starts! This is VERY useful if you’ve customized the sounds for a specific project you’re working on!
1. Go to GLOBAL mode (either press the GLOBAL button on the keyboard, or click on GLOBAL in the upper-right corner of
the editor).
2. Click on the UTILITY menu, and choose “Select Auto Load file”.
3. Browse to the location of your saved file, and click “Open”.
4. In the “Software Setup” tab, uncheck the “All” box in the upper left, if it is already checked.
5. Now put a check in the “Load data file automatically at starting up” box near the bottom. You should see the data
file you selected right below it.