


Attaching the metronome
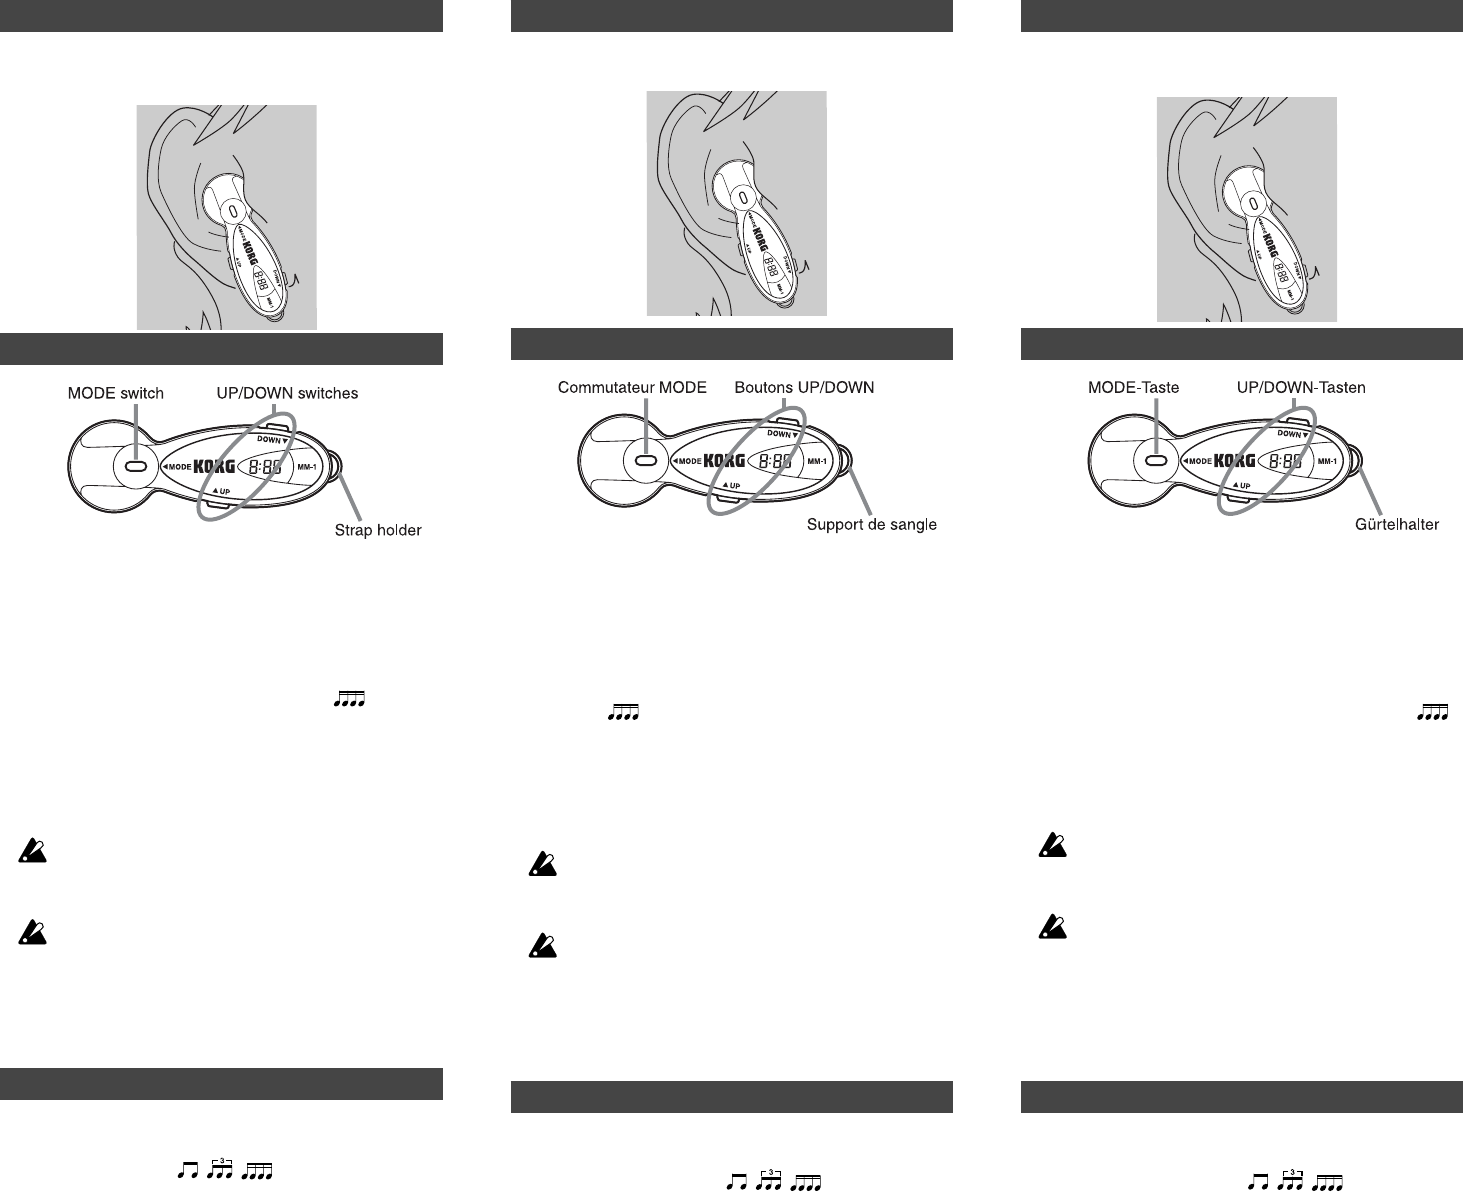
1. Open the clip, and place the rounded portion at the end against
the depression that surrounds the ear canal.
2. Close the clip to attach the metronome to your ear.
Operation
1. Press and hold the MODE switch for two seconds to turn on the
power.
The metronome will be in Tempo mode.
2. Use the UP/DOWN switches to set the desired tempo (40–208
BPM).
3. Press the MODE switch once again to enter Beat mode.
4. Use the UP/DOWN switches to set the beat (0– ).
5. Press and hold the MODE switch for two seconds to turn off the
power.
* The Tempo and Beat settings are remembered even when the
power is turned off. When you change the battery, however,
these settings will return to the default values (Tempo = 120,
Beat = 4).
Since the MM-1 is intended for use while practicing an
instrument, you may find the volume somewhat loud. If the
volume is too loud, position the metronome slightly away
from your ear canal when attaching it.
To safeguard your hearing, avoid using the metronome for
extended periods.
If there appears to be something wrong with the display, open
the battery tray, hold down the MODE switch for one or two
seconds, and then close the battery tray again. If the display
does not indicate anything, the battery may need to be replaced.
Replace it with a new battery.
Specifications
Tempo (38 steps): = 40, 42, 44, 46, 48, 50, 52, 54, 56, 58, 60, 63, 66,
69, 72, 76, 80, 84, 88, 92, 100, 104, 108, 112, 116, 120, 126, 132, 138,
144, 152, 160, 168, 176, 184, 192, 200, 208/minute (BPM)
Beat: 0, 2, 3, 4, 5, 6, 7 beats, , ,
Tempo accuracy: +/-2 %
Speaker: Piezo speaker
Power supply: 3V lithium battery CR1216 x 1 piece (included)
Battery life: Approximately 500 hours
(continuous use at Tempo
= 120, Beat = 4)
Dimensions (W x D x H): 16.2 x 46.5 x 16.8 mm
Weight: Approximately 6 g (including battery)
Specifications and appearance are subject to change without notice for improvement of
the product.
Mettez le métronome en place
Ouvrez l’attache et placez le bout arrondi dans le creux de votre
conduit auditif. Refermez l’attache pour fixer le métronome à votre
oreille.
Utilisation
1. Pour activer le métronome, pressez et maintenez le commuta-
teur MODE enfoncé pendant deux secondes.
Le métronome est alors en mode Tempo.
2. Réglez le tempo voulu avec les boutons UP/DOWN (40~208 BPM).
3. Appuyez à nouveau sur le commutateur MODE pour activer le
mode Beat.
4. Choisissez le nombre de battements avec les boutons UP/
DOWN (0~ ).
5. Pour couper le métronome, pressez et maintenez le commuta-
teur MODE enfoncé pendant deux secondes.
* Les réglages de tempo et du nombre de battements (Beat) sont
mémorisés quand vous coupez le métronome. En revanche,
quand vous remplacez la pile, ces réglages retrouvent leur
valeur par défaut (Tempo = 120, Beat = 4).
Vu que le MM-1 est conçu pour s’entraîner avec un instru-
ment, son volume pourrait vous sembler trop élevé. Dans ce
cas, après avoir mis le métronome en place, ressortez-le
légèrement de votre conduit auditif.
Pour ménager votre ouïe, n’utilisez pas le métronome
pendant de trop longues sessions.
Si l’écran ne fonctionne pas correctement, ouvrez le comparti-
ment de la pile, maintenez le commutateur MODE enfoncé
pendant une ou deux secondes et refermez le compartiment. Si
l’écran n’affiche rien du tout, la pile doit être remplacée. Insérez
alors une nouvelle pile.
Fiche technique
Tempo (38 pas): = 40, 42, 44, 46, 48, 50, 52, 54, 56, 58, 60, 63, 66, 69,
72, 76, 80, 84, 88, 92, 100, 104, 108, 112, 116, 120, 126, 132, 138, 144,
152, 160, 168, 176, 184, 192, 200, 208/minute (BPM)
Beat: 0, 2, 3, 4, 5, 6, 7 battements, , ,
Précision de tempo: +/-2 %
Haut-parleur: type piézo
Alimentation: pile 3V au lithium (CR1216) fournie x 1
Autonomie de la pile: environ 500 heures (en utilisation continue,
avec les réglages Tempo = 120 et Beat = 4)
Dimensions (L x P x H): 16.2 x 46.5 x 16.8 mm
Poids: environ 6 g (avec la pile)
En vue d’améliorations éventuelles, les caractéristiques techniques et l’aspect de ce
produit sont susceptibles d’être modifiés sans préavis.
Anbringen des Metronoms
Öffnen Sie die Klemme und ordnen Sie das Ende der abgerunde-
ten Partie in der Ohrmuschel an. Schließen Sie die Klemme, um
das Metronom an Ihrem Ohr zu befestigen.
Bedienung
1. Halten Sie die MODE-Taste ca. zwei Sekunden gedrückt, um
das Metronom einzuschalten.
Das Metronom ruft nun automatisch den Tempo-Modus auf.
2. Stellen Sie mit den UP/DOWN-Tasten das gewünschte Tempo
ein (40–208 BPM).
3. Drücken Sie die MODE-Taste noch einmal, um den Beat-Modus
aufzurufen.
4. Stellen Sie mit den UP/DOWN-Tasten die Taktart ein (0– ).
5. Halten Sie die MODE-Taste noch einmal zwei Sekunden
gedrückt, um das Gerät wieder auszuschalten.
* Das Tempo und die Taktart werden beim Ausschalten gespei-
chert. Beim Auswechseln der Batterie werden jedoch wieder die
Vo rgaben gewählt (Tempo= 120, Beat= 4).
Da das MM-1 vor allem zum Üben mit einem Instrument
gedacht ist, erscheint Ihnen die Lautstärke vielleicht etwas
übertrieben. Am besten ordnen Sie das Metronom dann
etwas weiter von der Ohrmuschel entfernt an.
Um sich nicht unnötigerweise einen Hörschaden zuzuziehen,
sollten Sie das Metronom niemals längere Zeit verwenden.
Falls die Anzeige des Displays gestört scheint, öffnen Sie das
Batteriefach, drücken Sie die MODE-Taste für ein oder zwei
Sekunden und schließen Sie das Batteriefach anschließend
wieder. Wenn überhaupt nichts im Display erscheint, muss die
Batterie wahrscheinlich ausgewechselt werden. Legen Sie also
eine neue Batterie ein.
Technische Daten
Tempo (38 Schritte): = 40, 42, 44, 46, 48, 50, 52, 54, 56, 58, 60, 63, 66,
69, 72, 76, 80, 84, 88, 92, 100, 104, 108, 112, 116, 120, 126, 132, 138,
144, 152, 160, 168, 176, 184, 192, 200, 208/Minute (BPM)
Taktarten: 0, 2, 3, 4, 5, 6, 7 Schläge, , ,
Tempo-Genauigkeit: ±2 %
Lautsprecher: Piezo-Lautsprecher
Stromversorgung: 3V-Lithiumbatterie, CR1216 x 1 (liegt bei)
Lebensdauer der Batterie: Ca. 500 Stunden (bei kontinuierlicher
Ve rwendung mit Tempo= 120, Beat= 4)
Abmessungen (B x T x H): 16.2 x 46.5 x 16.8 mm
Gewicht: Ca. 6 g (inklusive Batterie)
Änderungen der technischen Daten und des Designs zielen auf weitere Produkt-
verbesserungen ab und bleiben ohne Vorankündigung jederzeit vorbehalten.