Pa1X / PA1X Pro EasyStart
7. Play the PADS! There are four PADS and a STOP PAD above the keyboard. Each one is assigned a different
sound or sound effect. New and different sounds can be assigned to any PAD.
See the Pa1X/PA1X Pro Owner’s Manual pages 76-98 and for more details on Style Play mode.
U
U
s
s
i
i
n
n
g
g
t
t
h
h
e
e
T
T
C
C
-
-
H
H
e
e
l
l
i
i
c
c
o
o
n
n
V
V
o
o
c
c
a
a
l
l
P
P
r
r
o
o
c
c
e
e
s
s
s
s
o
o
r
r
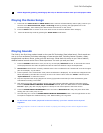
Inside the Pa1X is a powerful TC-Helicon Vocal processor! It’s possible to add effects such as reverb,
delay and compression to your vocals as well as produce four part harmonies with selectable gender per
part. There are even optional upgrades for pitch correction and vocal modeling.
1. Press the STYLE PLAY button then press the “Mic” tab in the display.
2. Uncheck all the “master” switches (Harm/Mod,Lead,V1,V2, etc.) in the display.
3. Make sure the MIC/IN1 switch is set to MIC then connect a microphone to the MIC input.
4. Sing into the microphone and adjust the rear panel MIC GAIN knob, so that the AUDIO IN LED (to the
right of the TEMPO/VALUE DIAL) is lit GREEN while you sing. If the LED is a constant RED, turn it down.
5. Adjust the MASTER VOLUME and the AUDIO IN / ACC1 SLIDERs to the desired volume.
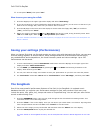
6. In the display, press the VP Preset: X popup and select “002 –Moving Vocals!”. Play some chords on the
lower part of the keyboard while singing to hear the harmonies.
7. To remove one of the four harmony parts, uncheck the “switches” labeled V1, V2, etc.
8. Try some of the other presets by pressing the VP Preset: X popup and selcting other presets.
See the Pa1X/PA1X Pro Owner’s Manual Pages 62-65 and 214-224 for more on the Vocal Processor.
(
(
Q
Q
u
u
i
i
c
c
k
k
R
R
e
e
c
c
o
o
r
r
d
d
)
)
U
U
s
s
i
i
n
n
g
g
t
t
h
h
e
e
B
B
a
a
c
c
k
k
i
i
n
n
g
g
S
S
e
e
q
q
u
u
e
e
n
n
c
c
e
e
r
r
The Backing Sequencer (Quick Record) function let’s you record a Style with all its elements and real-
time tracks quickly and easily. This is a great feature for getting ideas down quickly, as well as taking
advantage of the wonderfully programmed Styles for writing songs. Why reinvent the wheel?
1. Press the STYLE PLAY button and select the desired Style.
2. Press the SEQUENCER button. The upper part of the DISPLAY will read “New Song”.
3. Press the RECORD button (the red button to the left of the DISPLAY).
4. Press the “Backing Sequence(Quick Record)” radio button in the display then press “OK”.
5. Press the big, red, START / STOP button. There will be a one bar count-off before recording begins.
6. Start Playing!
7. Press the Sequencer 1 PLAY / STOP button to end the sequencer recording. (Pressing the Start/Stop
button will NOT stop the sequencer!)
8. Press PLAY / STOP button again to hear your sequence. Ta – Da! You and the Pa1X have created a SONG!
One of the great features of the Backing Sequencer is the ability to change what you’ve recorded easily.
For instance, if you like the progression but want to use a different style or you want to change a
chord(s) in your progression it can be quickly done without having to re-play the parts…
9. Press the red RECORD button to the left of the DISPLAY then select “Step Backing Sequence” and press
“OK”.
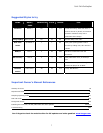
10. In the lower part of the display you can move one event, measure or step at a time and change the Style,
Tempo, Chord, etc. of your song with out having to re-record it.
5