


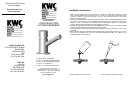

Components
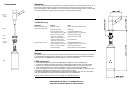
Operation
The pump is worked by a single full movement; by pressing the dispenser head downwards a 1/30 fl. Oz. of
liquid will be expelled. When first used it may be necessary to prime the pump with several movements.
Note: This dispenser is NOT designed for use with soaps which contain suspended particles. If these soaps
are used it will affect the working parts of the dispenser and will negate the warranty
.
Trouble Shooting
Symptom Cause Cure
No Soap is expelled when PUMP not primed Prime PUMP with several movements
Dispenser HEAD pressed
Soap BOTTLE Empty Refill Bottle
Soap Congealed in PUMP Lift DISPENSER BODY from
(Likely if dispenser has not been CONNECTOR and run hot water thro’
used for a number of weeks) tube while operating PUMP
Hole in end of FLEXIBLE Realign hole using a needle
TUBE not in line with SPOUT
FLEXIBLE TUBE is broken. Contact Distributor
(Soap seen to leak from body)
PUMP is difficult to move Soap Congealed in PUMP Lift DISPENSER BODY from
(Likely if dispenser has not been CONNECTOR and run hot water thro’
used for a number of weeks) tube while operating PUMP
PUMP is damaged Replace PUMP (see Service Section)
Service
It is unlikely that any components will fail in normal use, but should it be necessary, parts are replaceable
in the assemblies illustrated and are available from your local KWC DISTRIBUTOR. Before attempting to
replace any parts it is important the instructions below are read and understood.
PUMP replacement
1. To replace the PUMP firstly remove assembled BODY, PUMP unit from the CONNECTOR.
2. Remove the TUBE from the base of the pump by holding BODY,PUMP unit firmly and pulling TUBE.
3. Unscrew the 3 screws securing the BOTTOM LOCATING RING to the body and pull the ring away.
4. Again holding the BODY firmly, remove the PUMP by pulling it from the internal PLUNGER.
5. Insert new PUMP by pushing it into the PLUNGER. It is important that the PUMP is pushed fully home
otherwise the dispensing action will be impaired and/or leakage may occur.
6. Replace the BOTTOM LOCATING RING and secure with the SCREWS, take care not to over tighten,
then push TUBE back into PUMP and lower assembled UNIT into CONNECTOR.
Failure to follow above instruction will cause damage to the internal flexible tube.
WE RESERVE THE RIGHT TO CHANGE PRODUCT
AND SPECIFICATIONS WITHOUT PRIOR NOTICE
Bottle
Connector
Assembly
Spacer
Washer
Dip Tube
Body and
Pump
Assembly