7
why it sounds so good. No wall wart can
provide this kind of sophisticated power.
• Wall warts are inconvenient, radiate huge
hum fields, hog extra jacks on your power
strip and get in the way when you move.
• The thin cable coming out of a wall wart
breaks easily, especially on the road. And
then you need a whole new wart. If the
rugged MS 1202 cord ever wears out, you
can get a new one at any electronics,
music, or computer store.
• By now you’ve probably gathered that we
really hate wall warts.
Plug the MS 1202 into any standard
grounded AC outlet or power strip of proper
voltage.
WARNING: Disconnecting the plug’s ground
pin can be dangerous. Please don’t do it.
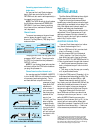
Fuse
The MS 1202 is fused for your (and its own)
protection. If you suspect a blown fuse discon-
nect the cord, pull the FUSE drawer out and
replace the fuse with a 315mA slo blo,
5x20mm (Littlefuse #218.315), available at
electronics stores or your dealer (or a 160mA
slo blo 5x20mm — Littlefuse #218.160 — if
your MS 1202 is a 220V/240V unit).
If two fuses blow in a row, something is
very wrong. Please call our toll-free number
and find out what to do.
Power Switch
If this one isn’t self-explanatory, we give
up. You can leave this switch on all the time;
the MS 1202 is conservatively designed, so
heat buildup isn’t a problem even in 24-hour-
a-day operation. There’s nothing that will
burn out or get used up. You may notice that
the MS 1202 feels warm in the upper right
corner. This is perfectly normal.
Or, just plug everything to a good quality
power strip for one-button turn-on.
If you leave this switch off, you won’t hear
anything.
Phantom Power Switch
The Phantom Power Switch controls the
phantom power supply for condenser micro-
phones as discussed at the start of this
section. When turned off, the phantom
power circuitry takes a moment for voltage
to bleed to zero. This is normal. Do not at-
tempt to adjust your sets.
NOTE: Phantom power will not harm
standard dynamic mics. See item 1 page 4.
advance it for best levels with a typical
sound source.
Engineers who fry their ears find them-
selves with short careers.
Tape Output
These unbalanced (RCA) connections
tap the main outputs to make simultaneous
recording and PA more convenient. Connect
these to your recorder’s inputs.
Tape Input
These are designed to work with semi-pro as
well as pro recorders. There’s definitely enough
gain to accommodate almost any source.
Connect your tape recorder’s output here,
using standard hi-fi (RCA) cables. When you
push the TAPE IN button, it will be connected
in place of STEREO AUX RETURN 2. You can
then use the AUX RETURN knob to control
level to the main and headphone outs.
WARNING: Pushing TAPE IN can create a
feedback path between TAPE IN and TAPE
OUT. Make sure your tape deck is not in
record, record-pause or input monitor mode
when you engage the TAPE IN switch or…
make sure the AUX RETURN 2 knob is fully
counterclockwise (off).
The circuit details are identical to the
AUX Returns discussed above. Only the jacks
have been changed to make things easier.
• Use these jacks for convenient tape
playback of your mixes. You’ll be able to
review a mix, and then rewind and try
another pass, without repatching or
disturbing the main mixer controls.
• You can also use these jacks with a
portable tape or CD player to feed music
to a PA system between sets. The micro-
phone and line inputs will still be live
unless you turn them down at the input
GAIN controls.
Power Connection
Just in case you lose the cord provided
with the MS 1202, its power jack accepts a
standard IEC cord like those found on most
professional recorders, musical instruments,
and computers.
At the other end of our cord is — get this —
a plug! Not a black cube or, as we’re fond of
calling them, a “wall wart”. We did this for
some very good reasons:
• The MS 1202 has separate regulated
supplies for the audio, meter, and micro-
phone phantom circuits. That’s part of
9
10
11
12
13
14
PATCH
BAY


