


32
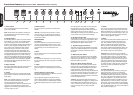
1. Power Switch
This is the On/Off switch for the mains electric
power to the amplifier.
Note: Please ensure the amplifier is switched off
and unplugged from the mains electricity supply
whenever it is moved!
2. Standby Switch
The Standby Switch is used in conjunction with the
Power Switch (1) to ‘warm up’ the amplifier before
use and to prolong the life of the valves. When
powering up the amplifier always engage the Power
Switch (1) first, leaving the Standby switch in the
‘OFF’ position. This enables the heater voltage,
allowing the valves to come up to their correct
operating temperature. After approximately two
minutes the valves will have reached their correct
operating temperature and the Standby Switch can
be engaged, enabling the HT. In order to prolong
valve life, the Standby Switch alone should also be
used to turn the amplifier on and off during breaks in
a performance. Also, when switching the amplifier
off, always disengage the Standby Switch prior to
the main Power Switch.
3. Mains Indicator
This purple LED indicator will light up whenever the
amp is plugged into the mains and the Power
Switch (1) is on.
4. Reverb
This controls the level of the internal studio quality
plate emulation reverb that is mixed with the direct
guitar signal.
Note: If the supplied footswitch is not connected,
the reverb is always enabled and can only be
turned off by setting this control fully
counterclockwise if the reverb is not required. If the
footswitch is connected then the reverb can be
toggled on and off allowing the reverb level control
to remain where you set it.
5. Master Volume
This control sets the overall output volume of the
amplifier.
Tonal tip: It is practical to set this first to suit the
venue in which you are playing as the position of
this volume largely dictates the optimum positions
for the other controls.
Tone Controls
6. Presence
This control operates in the power amp section of
your amp and adds high frequencies to your tone,
creating crispness and bite. As you turn this control
up (clockwise), your sound will become more
cutting.
7. Bass
This controls the amount of low frequencies (bottom
end) in your tone.
8. Middle
This controls the mid-range of your sound. Turning
this up (clockwise) will make your guitar sound fatter
and fuller.
9.Treble
This control determines the amount of treble and
gives your guitar tone a defining edge as it is turned
up.
Dynamic Ranges: Low and High
This single channel amplifier has provision to switch
between two dynamic ranges.
The low dynamic range is synonymous with our
classic vintage amplifiers in terms of the available
gain. In this mode clean to mild/moderate overdrive
is attainable depending where your guitar volume is
set.
The high dynamic range adds an extra valve gain
stage enabling a lot more overdrive capability
coupled with a dynamically realistic volume boost
with the guitar volume on full. The clean to
mild/moderate overdrive tones are still there but will
now be found at lower guitar volume settings.
10. Dynamic Range LEDs
These LEDs serve as a visual representation for the
current status of the dynamic range selection. Blue
indicates the lower dynamic range is active and
white indicates the higher range is active.
11. Dynamic Range push button
This button is used to toggle between the dynamic
ranges if the supplied footswitch is not used. When
the footswitch is used this button still remains
functional.
12. Mid Boost push button
This button adds a significant boost to the middle
frequencies in your guitar tone. Use it to fatten thin
single coils or just because you want to anyway!
See which position you prefer.
‘Body’ and ‘Detail’Preamp Volumes
These two controls are the dual preamp volumes
serving to set your preferred gain and allow more
extensive tone shaping possibilities for individual
guitars and styles. They both work together
irrespective of which dynamic range is selected and
can be set to whatever positions sound right for you,
including one of them completely off if that is your
sound. Balancing of these two controls is the secret
to a great fundamental tone.
Tonal Tip: as the Body & Detail controls offer so
m
uch tonal fle
xibility, we suggest you initially set the
Bass, Middle, Treble and Presence controls at 12
o’clock - and then use them to fine tune your tone
once y
ou’
re happ
y with y
our Body and Detail
settings.
13. Detail
This controls the upper mid and treble frequencies
of your sound bringing an edge to your tone which
defines the identity of your instrument. You can set
just the right amount of transient detail to allow your
guitar to cut through with all the subtle information
that your playing dynamic requires.
14. Body
This controls the lower mid and bass frequencies of
your sound bringing fatness and weight to your
tone. This is ideal for making single coil pickups
deliver a humbucker style bottom end without
destroying their inherent higher frequency detail.
This control coupled with the Mid Boost button (12)
can enable a real rock solid beefy grind for those
who choose to truly feel it as they play it!
Tonal tip: Bear in mind there is much dynamic
versatility to be had at your fingertips when varying
the volume/s and/or tone/s on your guitar rather
than leaving them on full. Please take the time to
fully investigate their impact on the sound as well.
This amp is optimised for this interaction between
playing dynamics and guitar volume/tone settings.
Try setting the amp so that high gain, medium gain
and clean can all be accessed from the guitar
volume alone.
15. Input Jack Socket
This high impedance input is where you plug your
guitar into the amp. You must use a screened
(shielded) guitar cable. Never use an unscreened
(unshielded) speaker cable because you will find it
very noisy to the point of annoyance. The input to
any guitar amplifier is a very sensitive part of the
signal path and is therefore susceptible to air born
radio interference, hence the need for a screened
guitar cable.
This screened cable should preferably
be of good quality. If you are in any doubt regarding
this, your Marshall dealer will be more than happy to
help, advise and supply you.
ENGLISH
ENGLISH
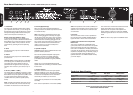
Front Panel Features (panel shown is 2466 - 2266C Combo panel is reversed)
1 2 3 4 5 6 7 8 9 10 11 12 13 14 15