


PASSIVE
ACTIVE
Input
GAIN
010+15 -15 +15 -15
COMP
010 010
-15dB
Active
+15dB
0
100 Hz
250 Hz
500 Hz 1 KHz 2.5 KHz
LIMITER
VOLUME
FX
SEND
FX
RETURN
LINE
OUT
B65
E.Q.
BASS TREBLE
Power
POWER
ON
PASSIVE
ACTIVE
Input
GAIN
010+15 -15 +15 -15
COMP
010 010
-15dB
Active
+15dB
0
100 Hz
250 Hz
500 Hz 1 KHz 2.5 KHz
LIMITER
VOLUME
FX
SEND
FX
RETURN
LINE
OUT
B65
E.Q.
BASS TREBLE
Power
POWER
ON
PASSIVE
ACTIVE
Input
GAIN
010+15 -15 +15 -15
COMP
010 010
-15dB
Active
+15dB
0
100 Hz
250 Hz
500 Hz 1 KHz 2.5 KHz
LIMITER
VOLUME
FX
SEND
FX
RETURN
LINE
OUT
B65
E.Q.
BASS TREBLE
Power
POWER
ON
010 010 010 010
Input
E.Q.
BASS
GAIN
MIDDLE TREBLE
FX SEND FX
RETURN
LINE OUT
HEAD
PHONES
B30
Power
POWER
ON
010 010 010 010
Input
E.Q.
BASS
GAIN
MIDDLE TREBLE
FX SEND FX
RETURN
LINE OUT
HEAD
PHONES
B30
Power
POWER
ON
010 010 010 010
Input
E.Q.
BASS
GAIN
MIDDLE TREBLE
FX SEND FX
RETURN
LINE OUT
HEAD
PHONES
B30
Power
POWER
ON
ENGLISH
6
ENGLISH
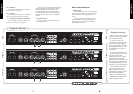
Suggested Settings
Before we look at some suggested settings there
are a couple of points that you should remember;
1- Taste in sound is a very personal thing. What
might sound great to one bass player might not appeal
to another bassist. Therefore these suggested settings
may need some alterations to suit your own personal
taste.
2- One of the main influences on your sound will
be your bass.
Each bass displays certain tonal characteristics,
some for example will sound brighter than others
while others may sound bassier.
For this reason again you may find that these
suggested settings need some alteration to give the
required sound.
Here then follows three simple settings for both
the B30 and the B65 suitable for Slap, Fingers and
Plectrum styles.
We hope that these settings provide you with a
useful starting point to develop your own killer bass
tones.
Slap
Fingers
Plectrum
Slap
Fingers
Plectrum
B30
B65
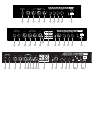
B150: 150 Watt Combo
Front Panel Features
1. Active Input
This input is designed to take the signal from an
active bass. If your bass guitar is active plug in here.
We recommend that you always use a high quality
screened cable to help prevent noise, interference and
unwanted feedback.
2. Passive Input
This input is designed to take the signal from a
passive bass. If your bass guitar is passive plug in
here. We recommend that you always use a high
quality screened cable to help prevent noise,
interference and unwanted feedback.
- Though the above inputs were designed
around the signal from an active bass and a passive
bass guitar respectively, you should experiment to
see which input best suits your style. Don’t worry,
connecting your bass to the ‘wrong’ input will not
harm your Bass-State™ or your bass guitar.
3. Gain
This controls the amount of input from your bass
and the amount of input from the pre-amp to the
power amp. If you require a clean bass sound turn
this control up until your bass just starts to distort and
then back it off slightly. If on the other hand you
would like a distorted sound, simply turn up the Gain
control until the required amount of distortion is
achieved. Another tip, for those of you who have got
active basses who want a distorted tone, is to try
plugging your bass into the Passive Input. This will
cause no harm and may provide the sound you are
looking for.
4.Blend
With the B150 it is possible to blend your signal
between a valve and/or solid-state input pre-amp
section. Each type of pre-amp produces a different
character of sound, valve pre-amps for example tend
to give a very warm tone while solid-state pre-amps
give a harder, snappier response, ideal for more
percussive styles of bass playing. As these circuits
are blendable, it is possible to have degrees of both
types of pre-amp in your signal, to combine the best
of both worlds.
5. Bass
Turning the Bass control will effect the amount
of low frequencies or bottom end in your bass guitar
tone. Rotating this clockwise will increase the
amount of lower tones generally making your bass
sound deeper. Turning this control anti-clockwise
will reduce the bass frequencies in your tone
producing a reduction in bottom end thud.
6. Deep Switch
Push switch to add extra bottom to the low end
of the primary EQ.
7. Treble
By adjusting the Treble control you can add or
take away the higher frequencies in your bass tone.
By increasing the amount of treble you will make
your tone brighter, ideal for percussive styles of
playing.
8. Bright Switch
Push switch to add brightness and attack to the
top end of the primary EQ.
9. Compressor
The Compressor smoothes out your bass sound.
As you increase the amount of compression, so you
flatten out the peaks in the signal.
10. Compressor Active LED
Indicates whether the Compressor is in
operation.
11. 7 Band Graphic
To allow you to further tailor your sound, with
the Graphic it is possible to cut or boost 7 specific
frequencies. If you do not want to alter the shape of
your sound with the Graphic simply leave the sliders
set to 0.
12. Limiter
Traditional amplifiers when run at high volumes
will begin to clip or distort. The Limiter facility
when in use will prevent the power amp clipping at
high volumes and at low volumes will have no effect.
13. Volume
Controls the overall volume of the B150.
- Effects Loop-
An effects loop is used for connecting an
external effects processor or floor pedal. The effects
loop on the Marshall B150 is compatible with the
output level of either type (processor or floor pedal)
to ensure that a perfect match is made.
14. FX Send
For connection to the input of an external effects
processor or floor pedal.
B150
5