


3
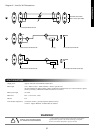
1. Mode Select
To access the Clean channel (if the foot controller is NOT connected) -
release the Clean - OD1/OD2 pushswitch. If the footswitch IS connected
both mode switches MUST be pushed in, and then press the Clean
pushswitch on the foot controller. The Clean LED (green) on the front
panel and the clean LED on the footswitch should now both be
illuminated.
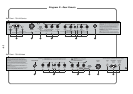
As you can see, the controls available in the ‘Clean’ mode are: Gain,
Volume, Treble, Middle, Bass rotary controls and Mid Boost pushswitch
(preamp) and Reverb, FX Mix, Presence rotary controls and Deep
pushswitch (at master level).
Two more pushswitches are available, but remember these affect the
whole amplifier as well (these are marked PowerAmp V.P.R. and Output
Mute).
FUNCTIONS
2. Gain Control
As with most amplifiers, this controls the sensitivity of the input section
of the preamp. At low settings the preamp will be ultra clean with a very
bright character. As you turn the control up, the sound will become
fuller and warmer (some may say ‘fatter’), with a more pronounced
bottom end. Set at the top end of the control’s range (depending on the
type of guitar and pickups, etc) a very warm sustaining breakup will start
to occur, depending on the EQ settings, as described below.
3. Volume Control
This sets the amount of signal generated by the preamp out into the
power amp section. When using very clean ‘Gain’ settings, you may
want to turn this up higher than when using higher ‘Gain’ settings to
achieve a suitable stage sound level. The FX loop comes after this
control, which will help you balance the FX level with the other
channels.
NOTE : Many different ‘clean’ amp textures can be created by balancing
the ‘Gain’ and ‘Volume’ controls.
4. Mid Boost Pushswitch
This works in conjunction with the passive EQ controls by disconnecting
the Mid control from the circuit, then reconfiguring the way the Treble
and Bass controls work. One way of using this function is to set the
Gain control high, Treble and Bass midway and with sufficient output
volume setting, you will be rewarded with a very singing, sustaining
Blues / Jazz Rock lead type tone, as characterised by many Chicago,
Texan and Californian players, particularly those using more vintage
type amps. This tone can then be modified by using the Treble, Bass and
Presence controls.
5. Treble, Middle, Bass Controls
These are the time honoured passive type of network that help make a
guitar amp what it is. By being before the gain stages these controls
work in a slightly different way to being after the gain stages, as you
would normally find on a distortion type preamp (and as pioneered by
Marshall). By instead of processing an already formed sound, the EQ
helps form the voice of the sound. For instance, turning the Mid control
down will clean up the body of the tone and help give the characteristic
‘twang’ of country music (coupled with a Txlxcaxter of course !).
Also turning the Mid down will help when undertaking funkier rhythm
work, to enable the treble to cut through and not muddy up the
frequencies needed for the lead instrument(s). Obviously, altering the
Treble and Bass controls will have the affect of tailoring the high and
low frequencies in your tone. When playing at high levels (gain as well
as volume) turning the Bass down will help maintain note definition and
aid projection. Try turning the Treble down and Mid up a bit for the solo
in that warm romantic ballad, with the right amount of gain, you will be
rewarded with some sweet clean sustain.
Master Section Controls
At the other end of the panel you will find the ‘Clean’ master section
with the following controls :
6. Reverb Control
This will vary the inbuilt Accutronics spring reverb from a faint shimmer
to deep and luxurious, this will affect the ‘Clean’ channel only.
7. FX Mix Control
When using the extensive FX looping facility on the rear panel, this
control will adjust the FX mix for the clean channel only, from totally
dry (0) through varying degrees of parallel mix (1-9) to a full series
connected loop (10). For more information see FX Loop section
8. Presence Control and Deep Switch
The presence control will boost the upper mid / lower treble part of the
tone giving it more up-front brilliance, great for cutting through
overactive cymbals. The Deep switch gives the tone a very resonant
texture as it interacts with the low frequencies of the loudspeakers. This
is great for filling out the bottom end at low volumes but will also give a
resonant but controlled growl to the tone at high volumes.
9. V.P.R. and Mute Pushswitches
Please see later section.
ENGLISH
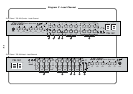
1. Mode Select
To access the crunch channel (if the foot controller is NOT connected) -
front panel pushswitch marked ‘Clean - OD1 / OD2’ should be
depressed and the one marked ‘OD1 / OD2’ should be released. If the
foot controller IS connected both switches MUST be pushed in and then
press the Crunch switch on the foot controller. The Crunch LED
(yellow) on the front panel and the Crunch LED on the foot controller
will now be ON.
The controls available in the ‘Crunch’ mode are Gain, Volume, Treble,
Mid, Bass rotary controls and Tone Shift push-button (on the preamp
section), Reverb, FX Mix, Presence rotary controls and Deep pushswitch
on the master. These are also shared with the ‘Lead’ channel.
FUNCTIONS
2. Gain Control
Again this controls the input sensitivity of the channel but with the effect
of being capable of much more gain and hence more dramatic distortion.
At low settings, the channel is relatively clean (although darker in tone
than the clean channel) and makes a good alternative for gentler, bluesy
style solos. With a bit more gain the tone becomes more aggressively
traditional Marshall rock with the emphasis on chunky power chords.
Take the gain control to the limit and we enter modern high gain crunch
territory, with probably more gain and dynamics than other
manufacturers would put on their lead channels!
3. Volume Control
Again this controls the balance and level of the crunch channel against
the rest of the TSL.
4. Tone Shift Pushswitch
This takes the traditional, slightly middly Marshall passive post
distortion EQ network and reconfigures it to produce a more mid
scooped tone. Whilst mid-scooped tone is usually associated with
‘Metal’, please do not be afraid to experiment with the shifted tone
settings even if metal is not your thing, as it is very useful in deepening
the tone at low volumes.
5. Treble, Middle, Bass Controls
As stated above, these are the traditional Marshall post distortion EQ
controls and as such affect the character of the distorted signal. It is
suggested that initially you set the controls midway and experiment from
there, rather than the ‘everything on 10’ method favoured for the earlier
non-master Marshall amps. Remember, increasing the treble is going to
make the distortion more ‘fizzy’ and ‘cutting’, whereas increasing the
mid will make the distortion more fluent and sustaining but probably not
as dynamic (in the modern sense). Try what you will, there are many
textures to discover.
6. Master Section Controls
As with the Clean channel the Reverb, FX mix, Presence, and Deep
functions can be adjusted independently of the Clean channel but
remember these controls are also used in conjunction with the Lead
channel.
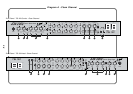
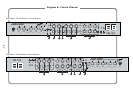
CRUNCH CHANNEL
(Please refer to diagram B, Page 27)
CLEAN CHANNEL
(Please refer to diagram A, Page 26)