FRONT CONNECTIONS
5
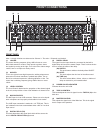
FRONT pANEL
Note: 1 through 5 below are referenced to Channel 1. The other 7 Channels are identical.
(2) (1)
(3) (5)(4)
(6c) (6a)
(9)
(1) LOW EQ
The control shelving response giving 15dB of boost or cut at
80Hz. Add warmth to vocals or extra punch to guitars, drums
and synths by turning to the right. Turn to the left to reduce stage
rumble, hum or to improve a mushy sound.
(2) HIGH EQ
Turn to the right to boost high frequencies, adding crispness too
percussion from drum machines, cymbals and synths. Turn to
the left to cut these frequencies, reducing sibilance or hiss. The
control has a shelving response giving 15dB of boost or cut at
12kHz. .
(3) LEVEL CONTROL
The Level Control determines the proportion of the channel signal
in the mix, and provides a clear visual indication of channel level.
(4) MIC/LINE INPUTS
The MIC Input is via an XLR connector. Please use a low imped-
ance microphone and a properly wired cable for best results.
The LINE Input connection is made via a 1/4” TRS jack. This In-
put Is balanced and can accommodate either a Mic or Line level
Input source.
(5) DIGITAL DELAY (DD)
This knob determines the signal level which will be sent to the
built-in DIGITAL DELAY Effect (6) control
(6) DIGITAL DELAY
The signal from the input channels, processed by the built-in
digital delay will feed to the master output. There are three knobs
here to control the effect of the delay.
(6a) SWITCH
This push button switches the delay effect ON/OFF.
(6b) LEVEL
This knob adjusts the mix level of the effect sound.
(6c) TIME (ms)
This knob selects 80ms, 120ms, 160ms, or 200ms of
delay as desired for your intended effect.
(7) POWER ON LED INDICATOR
Indicates when the unit is ON.
(8) TAPE IN CONTROL
This knob adjusts the level of signal from the TAPE IN (10) to the
Main bus.
(9) MASTER CONTROL
This adjusts the signal level of the Main bus. This is the signal
that is output to the speakers.
(7)
(8)
(6b)


