


5
5. Connecting the Audio Output
The UHF-4 receiver provides both a fixed mic level BALANCED MIC AUDIO OUTPUT
XLR (7) and an adjustable line level AUX AUDIO OUTPUT 1/4" jack (10).
(Note: As when making any connection, make sure the amplifier or mixing board
volume is at the minimum level before plugging in the receiver to avoid possible
sound system damage.)
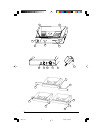
Microphone Connection
(using the UB-4 transmitter with either a headworn or lavalier microphone or the
UH-4 handheld microphone transmitter) For microphone use, either the BALANCED
MIC AUDIO OUTPUT XLR (7) or the 1/4" line level AUX AUDIO OUTPUT (10) can be
used. The XLR output is set at a non-adjustable microphone level, similar to hardwired
mic levels. Plug an XLR connector into the XLR output socket on the rear of the unit
and plug the other end into your amplifier or mixing board. Make sure the phantom
power on your mixing board is turned off and the volume is turned down when
making connections. For your convenience, the XLR output level is preset at the
factory and is not adjustable with the receiver volume control.
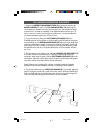
To use the 1/4" AUX AUDIO OUTPUT socket, follow the instructions for the Instrument
Connection (above), except start the receiver volume at 1/2 MAX and adjust until the
volume level is optimal. If the volume control is set too high, you may overload your
mixer or amp.
The UHF-4 receiver is equipped with a 5 segment LED AF LEVEL DISPLAY (14).
Occasional flickering of the top AF Peak LED indicator on loud inputs to the
transmitter is normal. If this LED lights continuously, decrease the volume to the
transmitter or overload distortion may result.
UHF4_man 2/15/05, 4:10 PM5