


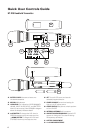

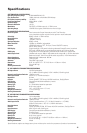

Buttons Function
The Power Button (12) is used to turn the
receiver on or off. When the button is
pressed, the lit blue backlight on the
LCD Display (2) indicates the receiver is on.
Press the Power button again to turn off
the receiver. The backlight on the LCD
will turn off indicating the receiver is off.
At power-off the W-1KU receiver will store
the last settings entered and re-display
them at power-on. It can be reprogrammed
to any new Group/Channel, or Volume level.
The default factory setting is Group 08,
Channel 00, and Volume 63.
When the Set Button (8) is repeatedly
pressed the LCD main menu will cycle
in this order:
MAIN MENU
>
VOLUME
>
GROUP
>
CHANNEL
>
repeat
The selected function will flash for 20
seconds before returning to the main menu.
The (Up) or (Down) Buttons (9) are
active while in the Set mode, or can be used
to change Volume Level (6) at anytime.
The IR Sync Button (11) is used to transfer
the frequency-selected info from the
receiver to the transmitter being used for
easy synchronization prior to use. Press
the IR Sync Button while the main menu
is displayed, and the IR LED (10) will flash
quickly. This LED indicates IR transmission
is in progress. Press the SET Button
again to stop the flashing or it will halt in
20 seconds automatically.
Selecting the W-1KU Receiver
Volume Level / Group / Channel
See RF Interference and Finding Open
Channels. This section will also aid in finding
desired channel(s) of operation when setting
up your system(s).
8
System Operation
W-1KU Receiver
Press the (Up) or (Down) Buttons once
or the Set button once prior to pressing
or for single stepping through the
Volume Levels (6). Or hold continuously for
faster level selection. Select one of 63 levels
from the Volume menu and advance to Exit
Set Up Mode by pressing the Set Button (8).
Choose the W-1KU operating frequency
by selecting one of ten Groups (4) and one
of 100 Channels (5) that are determined to
be desirable open channels. Press the Set
button twice to skip the volume setting and
enter the Group setup mode, then press
the or buttons once for single stepping
through the groups. Or hold continuously
for faster group selection. Select one of ten
groups available from the Group menu and
then advance to Channel Setup Mode by
pressing the Set button. Or, press the Set
button twice to exit without changing the
channel. Press the or buttons three
times or press the Set button again after
group setting to enter the Channel setup
mode. Press the or buttons once for
single stepping through the channels,
or hold continuously for faster channel
selection. Select one of 100 channels
available from the channel menu or press
the Set button again to exit.
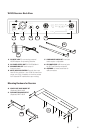
Rack-mounting the Receiver
There are two options available for rack
mounting the W-1KU: single or side-by-side
with another W-1KU receiver.
Single Unit Rack Mount Kit (20): Attach the
optional RMK-1KUS Rack Kit ears to each
side and tighten with supplied screws.
Dual Unit Rack Mount Kit (21): Attach the
optional RMT-1KUD Dual Receiver Rack Tray
to bottom of both receivers and tighten with
supplied screws.
Note: Do not mount the receiver on a rack directly
above an amplifier or other source of high heat.
This could degrade the performance of the
W-1KU. Always ensure adequate airflow and
heat dissipation in any rack configuration.