


DM3001X
- The Leader in DJ Technology
©2001 Industries - 7 - http://www.numark.com
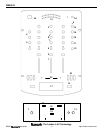
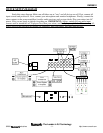
MIXER FEATURES
INPUTS
1. Input faders - control individual source levels in the mix.
2.
Input Toggle Switch (Transform) - selects which source will be live to
that channel based on what you have connected to the rear panel input
section. By removing the face panel the switch can be rotated into any
of eight positions.
3.
Pre-fader Gain Control – adjusts the pre-fader volume for cleaner
sound. Use this in conjunction with the PFL Meter to adjust the audio to
an optimum level.
4.
Channel EQ – adjusts the Treble, Middle, and Bass frequencies
respectively of the channel audio. Full rotation to the left creates a
“CUT” effect eliminating most of the sound from that frequency area.
MICROPHONE
5. Mic Gain Controls – controls the DJ Mic volume for the Neutrik™
“Combo” connector on the front panel.
6.
Treble and Bass Controls – for fine-tuning the tone of your voice on
both mics through the sound system. The controls are detented for
setting tone "flat". For best results, use a dynamic cardioid microphone.
7.
¼” input connector - allows connection of a 1/4” microphone jack
directly into the mixer.
HEADPHONE CUEING
8. Channel PFL/Cue Assign - are used to route Pre Fader Level (PFL)
channel audio to the Monitor Section. The channel faders do not control
the Cue volume.
9.
PFL Meter Indicator – lights when PFL audio is not being sent to the
LED meter. When the LED is off the channel audio the sent to the meter
display for PFL matching. Accurately match channel levels with the
Pre-fader gain controls before mixing them together. The idea is to
properly match PFL inputs, not the input with the stereo output meter!
10. Headphone Mix - controls the mix of PFL and PGM signals to your
headphones. When the slider is moved to the left, all you will hear is the
cue source. When the slider is all the way to the right, you will hear what
is playing through the master output. By blending, beats can be matched
exactly and segues can be smooth when a song is cued.
11.
Headphone Level – adjusts cue volume.
12.
Split/Blend Cue – controls how PFL and Program audio are sent to your
headphones. In split mode, the PFL audio can be heard in your left ear
and PGM audio can be heard in your right ear. In blend mode, both PFL
and PGM can be heard in both ears.
13.
Headphone output – for your 1/4” or 1/8” headphones.
OUTPUTS
14. Master Fader – controls the overall output level.
15.
Stereo Auto Peak Hold Level Indicator- quickly and accurately tracks
level of audio output. The red LEDs show output overload. When using
as a master output meter, set the crossover, equalizer and power amp
inputs to avoid distortion at each step in the audio chain. Will also act
as PFL meter when PFL/Cue buttons are pressed.
16.
Zone Output - controls output zone level for monitors or extra sound
system.
CROSSFADER
17. Crossfader - achieves clean segues between the two input channels
selected by the Crossfader Assign.
18.
Crossfader Slope – determines how quickly the audio from the
opposing side of the crossfader activates. A tight curve (right position)
turns on the opposing audio signal with very little crossfader movement.
A loose curve (left position) makes very long and smooth segues in
transition.
19.
Hamster switch with Off position – reverses the direction of the
crossfader. In the center position the crossfader is deactivated.
20.
Crossfader Assign – channels 1 or 2 can be assigned to the left.
Channels 2 and 3 can be assigned to the right. If for example channels 1
and 3 were selected then "Hard left" selects Channel 1 and "Hard right"
selects Channel 3. With the crossfader centered, both assigned channels
are live. Use the crossfader for fast and seamless segues from one
selected channel to the other.
Note: If channel 2 is selected on both sides, the crossfader will turn off
channel 2 in the left position and turn it on in the right position
Note: The crossfader is user replaceable in case of failure. Simply
unscrew the two large screws that hold it in place, lift it out and
disconnect its cable. Re-attach the new crossfader and screw the
mounting plate back onto the unit - you’re back in business!
21.
Beat Lights – Indicate when strong bass beats are present to allow more
accurate beat mixes.
22.
Push Button transforms – By pressing these button the crossfader
channel will respond as determined by the transform assign
23.
KILL switches - By moving these toggle down or up the marked
frequency area will be removed. For instance is BASS is pressed the
bass beat will be removed, Highs might remove cymbals, and middle
might remove vocals.
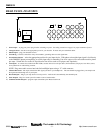
OTHER ITEMS
24. Power Switch – Actives mixer power. Always turn on input devices
first, the mixer second, and amplifiers last!
25.
Light Connector – for attaching a 12V BNC style gooseneck light.