


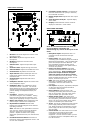
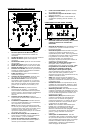

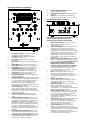
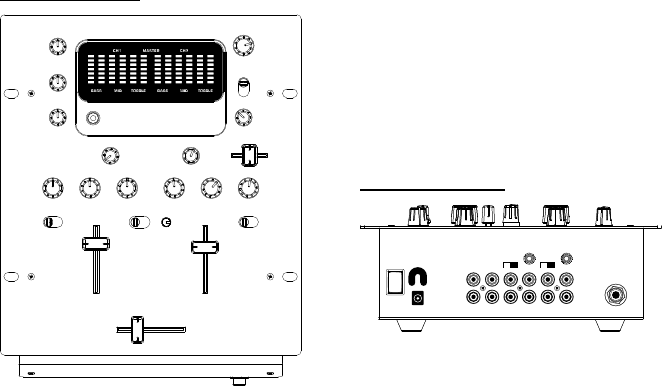
FRONT PANEL FEATURES
1
2
3
4 4
567 567
8
9
8
9
14
1615
11
10
13
17
18
19
12
1. Mic Gain: This knob adjusts the volume of the
microphone input.
2. Mic Treble: Adjusts the high-tone of the
microphone.
3. Mic Bass: Adjusts the low-tone of the
microphone.
4. Channel Gain: Adjusts the pre-fader input
level.
5. Channel Treble: Adjusts the high-tone level.
6. Channel Middle: Adjusts the middle-tone level.
7. Channel Bass: Adjusts the low-tone level.
8. Input Selector: Selects what input source is
routed to the channel from the rear panel
connected units.
9. Channel Fader: Adjusts the level sent to
program mix.
10. Headphone Volume: Adjusts the volume level
of the headphone output.
11. Headphone Jack: Your headphones can be
connected to this ¼” terminal. The volume
should always be set at its lowest setting while
connecting and disconnecting headphones to
prevent damage to headphones and/or your
hearing.
12. Cue Slider: Channels 1 and 2 can be
previewed using this mini-crossfader. Sliding
this to the left plays the left “channel-1” and
sliding to the right plays the right “channel-2”.
13. Master Cue Selector: When selected only the
master output is heard in the headphones.
14. Replaceable Crossfader: Blends audio
between the channels assigned to the left and
right assign switches.
Note: This fader is user replaceable if it should
ever wear out. Simply remove the facepanel
and then remove the screws holding it in
position. Replace the fader with a quality
authorized replacement from your local Numark
retailer.
15. Crossfader Direction Button: Activation of
this switch reverses the assignment of CH-1 and
CH-2 on the crossfader.
16. Crossfader Contour Control: The position of
this knob determines how quickly or intensely
the crossfader will blend.
17. Master Output Knob: Adjusts the main output
volume.
18. Audio Spectrum Analyzer: Spectral display
of the audio.
19. Display: Selects between various modes of
display for Channels 1-2 and master
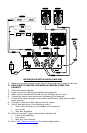
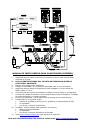
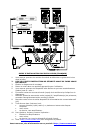
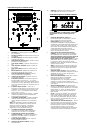
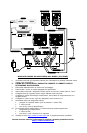
REAR PANEL FEATURES
2
1
2 5
44
33
567
8
9
Note: It is recommended that the mixer be
turned off before connecting and
disconnecting any sources to the inputs of the
mixer.
1. Microphone Input: Microphones with a ¼”
connector can be connected to this input
terminal.
2. Phono Inputs: This input is used for
connecting your turntables through the sensitive
RIAA phono preamplifiers. Only turntables with
phono level output should be attached. Line
level turntables and other devices may be
attached if the Phono/Line rear panel switch is
set to the line position.
3. Phono/Line Source Switch: This switch
activates and deactivates the sensitive RIAA
phono preamplifiers. Only turntables with
phono level output should be assigned
when the switch is in the phono position.
Some turntables offer line level output. To use
these turntables and other line devices like CD
players, switch the input to Line.
4. GND: This screw connector should be used to
secure any turntables or other devices
connected to the mixer that need to be
grounded.
5. Line Inputs: CD players, Tape Decks, Samplers
or other line level input devices should be
connected to these inputs.
6. Record Output: This RCA output is for
connecting a recording device such as a tape
deck or CD recorder. The level of the record
output is based upon pre-master levels.
7. Master Output (RCA): This output is for
connecting an external monitoring device such
as a PA system, powered monitors or a home
stereo. The level of the master stereo output
signal is controlled by the master fader.
8. AC In: This mixer is designed to work with the
power supply assembly that comes with the
unit. While the power is switched off, plug the
power supply into the mixer first, then plug it
into the outlet.
9. Power Switch: Use this switch to turn on the
mixer after all input devices are already
connected to prevent damage to your
equipment. Turn the mixer on before you turn
on amplifiers and turn of amplifiers before you
turn off the mixer.