


8
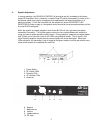
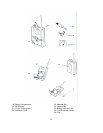
MIC CORD (24) as desired. To secure the connection, insert locking mini-XLR into the jack. To
unplug, reverse the process.
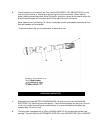
Slip the transmitter into a pocket or CLIP (28) it on to your clothes or instrument strap (if using it
as an instrument transmitter). The CLIP can be rotated 90 degree if the transmitter is to be
attached horizontally (instead of vertically) by loosening the screws holding the clip.
3. Turn on the body pack transmitter by sliding the OFF/STANDBY/ON SWITCH (26) to the
STANBY position (transmitter on, audio mute or the ON position (transmitter and audio both on).
The BATTERY INDICATOR LED (25) will give a single quick flash, indicating usable battery
strength.
In the case of a dead or low battery, the LED either will not illuminate at all or will stay on
continuously, indicating that the battery should be replaced. To preserve battery life, turn the
transmitter off when not in use. The transmitter is now ready to use. The A and/or B
DIVERSITY LED INDICATORS (2) on the receiver should now be lit, indicating a received signal
from the transmitter.
4. Instrument Use
Plug the ¼” phone plug from the INSTRUMENT CORD (22) into the instrument. As the cord to
the instrument also serves as the antenna, be sure to extend if fully for maximum range. Rolling
up or shortening the cord may reduce the effective operating range. When ready to play, slide
the audio OFF/STANDBY/ON SWITCH (26) to the ON position. Adjust the volume of the receiver
as per the audio Output Instrument Connections section of the above UHF receiver instructions.
(Note: Levels should be adjusted with the volume control of your instrument.)
The AF PEAK LED INDICTOR (3) on the UHF receiver will light for all loud input signals.
Occasional flickering on and off during use is normal, however if the LED stays on continuously,
turn down the instrument volume or noticeable distortion may result.
(Note: Scratchy noises can sometimes occur when some electric guitars with dirty pots or
connections are used with any wireless system. Therefore, the supplied INSTRUMENT CORD
(22) has a factory installed capacitor inside the ¼” plug. This capacitor provides first order
filtering of the RF signal from the cord into the guitar and eliminates virtually all scratchy noises.
Should your equipment still give you scratchy noises, we suggest these steps to eliminate them:
a) Make sure all guitar volume and tone pots are clean and all contacts are soldered, this is
very important.
b) A 47pf capacitor soldered across the hot to ground terminals of the guitar’s volume and
tone pots will provide extra filtering.
5. Microphone Use (with either a lavalier or headset microphone)
Secure the connection from the LAVALIER (24) or HEADSET MIC CORD (23), to secure the
connection, insert locking mini-XLR into the jack. To unplug, reverse the process.