3
8. Check the VIRTUAL DJ LE is lunched and close it.
================================
For Mac OS X Users
When installing Virtual DJ LE on Mac, the current Virtual DJ LE is
required to be uninstalled. Follow the instructions below from Step
1 to uninstall it.
When first installed on your computer, proceed to step 3.
1. Open [Finder] and delete the following folders and files to
[Trash].
・Virtual DJ folder in [Document] from [username]
・Virtual DJ LE icon in [Application] folder.
・The file in [Preferences] from [User name] > [Library]:
com.atomixproductions.virtualdj.plist
— If the [Library] folder is hidden, select [username] and select [Go]
while pressing the [option] key on the key board.
2. Reboot your computer
3. Double-click the downloaded file to install.
4. Once the VIRTUAL DJ LE installer is launched, click
[Continue].
5. Read the contents of the license agreement carefully,
click [Continue] and then click [Agree] to accept the license
agreement.
― If you do not agree to the license agreement, click [Disagree] to
cancel installation.
6. Select the type of installation for VIRTUAL DJ LE, then
click [Install].
— To select standard installation, click [Install].
— To install in a different location, click [Change Install Location...]
and choose the place of installation.
Installation begins.
The installation completed screen appears once installation is
completed.
7. Click [Close].
This completes the installation procedure.
Audio Setup for VIRTUAL DJ LE
If you want to output the sound from Master and Headphone of
XDJ-R1, sound configuration should be selected depending on
your computer.
― Connect the computer and XDJ-R1 using a USB cable while the
power of the unit is turned on.
― Please refer to [Using the DJ Software] in the [Operating
Instructions] of XDJ-R1 for details. After selecting [PC] as [MIXER
MODE], press the [MIDI] button to enable MIDI control.
Notice: VIRTUAL DJ LE cannot be used when [XDJ-R1] but [PC] is
selected as [MIXER MODE].
================================
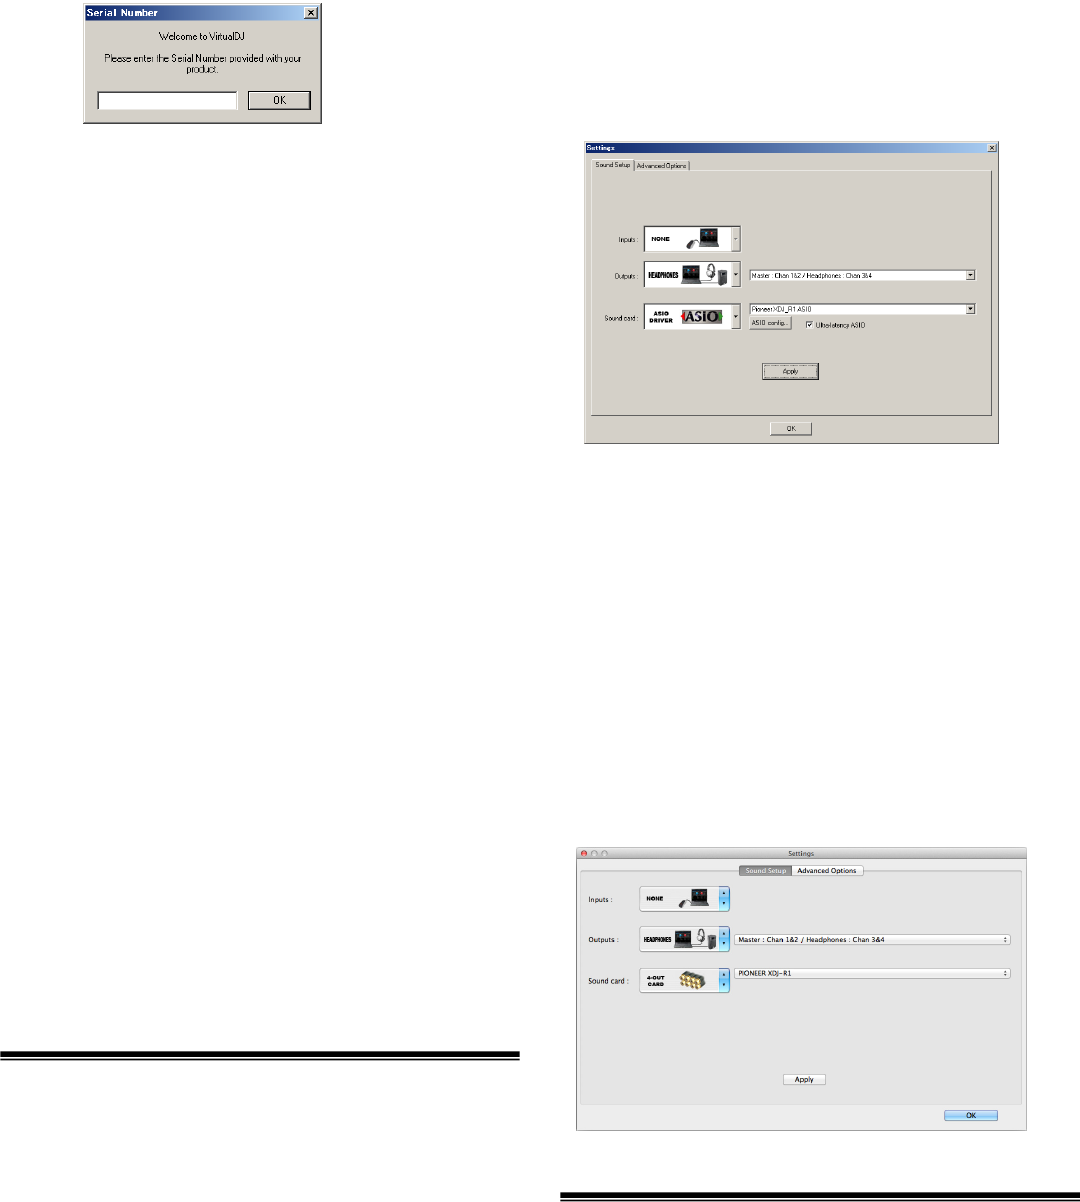
For Windows Users
1. From the Windows [Start] menu, click the [All Programs]
> [VirtualDJ] > [VirtualDJ LE (XDJ-R1)] icon.
Click [VirtualDJ LE (XDJ-R1)] tile on the Start screen for Windows 8.
2. Click [CONFIG] in the top right of the computer’s screen.
The [Settings] screen appears.
Settings should be selected on the [Sound Setup] tab in the follow-
ing order:
- [Inputs]: Select [NONE].
- [Sound card]: Select [ASIO DRIVER] and [Pioneer DDJ_R1 ASIO].
- [Outputs]: Select [HEADPHONES] and
[Master: Chan 1&2 / Headphones: Chan 3&4].
- [Ultra-latency ASIO]: Tick it.
3. Click [Apply], then click [OK].
================================
For Mac OS X Users
1. In Finder, open the [Application] folder, then doubleclick
the [VirtualDJ LE] icon.
When VIRTUAL DJ LE is launched the first time, a screen for entering
the serial number appears.
Input the serial number printed on this unit’s bottom panel (XXXX-
XXXX-XXXXX/XDJR1), then click [OK].
2. Click [CONFIG] in the top left of the computer’s screen.
The [Settings] screen appears.
Settings should be selected on the [Sound Setup] tab in the follow-
ing order:
- [Inputs]: Select [NONE].
- [Sound card]: Select [4-OUT CARD] and [PIONEER XDJ_R1].
- [Outputs]: Select [HEADPHONES] and
[Master: Chan 1&2 / Headphones: Chan 3&4].
3. Click [Apply], then click [OK].
About trademarks and registered
trademarks
・Pioneer is a registered trademark of PIONEER CORPORATION.
・VirtualDJ LE is registered trademarks of Atomix Productions.
・Microsoft®, Windows Vista®, Windows® and Internet Explorer® are either
registered trademarks or trademarks of Microsoft Corporation in the
United States and/or other countries.
・Apple, Macintosh, Mac OS, Safari, iTunes, and Finder are trademarks of
Apple Inc., registered in the U.S. and other countries.
・Intel and Intel Core are trademarks of Intel Corporation in the U.S. and/or
other countries.
・ASIO is a trademark of Steinberg Media Technologies GmbH.
The names of companies and products mentioned herein are the trademarks
of their respective owners.
© 2013 PIONEER CORPORATION.
All rights reserved.
PIONEER CORPORATION
1-1, Shin-ogura, Saiwai-ku, Kawasaki-shi, Kanagawa 212-0031, Japan


