


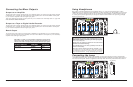


Using the Microphone
Incorporating Voice into the Mix
Talkover mode allows a voice to be heard clearly through the microphone by attenuating all the other
audio input sources. This mode is engaged by setting the Talkover Switch to the TALKOVER position.
Talkover Mode
To blend voice from the microphones with the audio program material, first be sure the MIC/TALKOVER
switch is set to the ON position. (In this position, the MIC channel is mixed into the program like
any other audio input source.)
Then adjust the corresponding MIC level controls to increase or decrease the microphone level (this
will not affect the main volume inputs). When a microphone is not in use, set the MIC/TALKOVER
switch to OFF.
These BASS and TREBLE controls, permit you to tailor the tone frequencies of the MIC inputs processed
through the mix. Left in their center positions, the sound is unaffected (”flat”).
Microphone Tone Controls
The independent MIC1 and MIC2 controls permit you to increase or decrease the levels of these
microphones within the mix.
Microphone Level Controls
Monitoring (”Cueing”) the Inputs
1. Set the CUE ASSIGN switch of the input source (MIC , CH1, CH2, CH3 or CH 4) you wish to
monitor.
2. Adjust the Headphone Level control to a comfortable listening level.
3. The Headphone CUE/PGM control permits you to switch easily from listening to CUE material to
the playing PROGRAM sound. You can also listen to both simultaneously by moving the Headphone
CUE/PGM control to a point midway between the two ends.
PYD 3008: This model has an additional CUE on the sampler module for you monitor the sampled
signal being applied. To monitor a sampled signal, press the SAMPLE ASSIGN button for the
channel to which the sample has been saved, and then press the SAMPLE CUE button to audition
this sound.
Using the Mixer Controls
Turning on the Mixer
1. Turn on the output amplifier and temporarily set its volume to the minimum setting.
2. On the mixer, turn ON the power switch. The adjacent power LED will illuminate.
3. Turn on the audio input sources you wish to mix, and set them to play (or talk continuously into
the microphone).
4. To monitor the audio input sources so that you can decide when to mix in each input, see “Monitoring
‘Cueing’ the Inputs.”
5. To mix the audio input sources so that you can play them through your amplifier system or record
them on your tape deck, see “Mixing the Inputs.”
Adding Equalization to the Mix
You can further tailor the sound processed through the mixer to match your acoustic surroundings
or suit your personal preferences by using the ten frequency sliders for each channel. To engage
the equalization module, press the Equalization On/Off Switch.
Each one of the sliding controls boosts or cuts the selected frequency by up to 12 dB. If you leave
a slider at the center (”0”) position, the corresponding frequency range for that stereo channel will
be left unaffected (”flat”). Please note that in order to provide a smooth range of control, the frequency
ranges overlap slightly. Therefore, for example, if you raise the level in the 1K range, the 400 and
2.4K ranges are also slightly affected.
Pyle Pro Mixer Owner’s Manual – 98 – Pyle Pro Mixer Owner’s Manual
Mixing the Inputs
There are a maximum of ten input sources available at one time, including two microphone inputs.
Both microphone input sources are always available as part of the mix, if desired. Each of the four
audio channels can be linked to two different input sources, and one of these sources for each channel
is available for mixing.Turn on all the available audio sources and be sure they are providing sound
before continuing.
1. Select the Channel Input Selectors for each channel, choose the audio sources you want to mix
for each channel (i.e., choose PHONO1/LINE1 or LINE2).
2. Set the Mic and Channel Level controls all to within the 8 - 10 range.
3. Slide the MASTER volume control toward 10 until you get an average reading of 0 on both Output
Level LED Meters. The output level displayed in the meters represents the TOTAL output from all
the channels supplying audio to the mix. NOTE: Once you set this level, we suggest you do not
change it!
4. If you add or change input sources, adjust the corresponding MIC1, 2 or CH1, CH2, CH3 or CH4 level
control(s) to maintain the average reading of 0 on the LED meters.
5. To change the overall sound level, adjust the RECEIVER/AMPLIFIER (NOT THE MIXER) volume
control to the desired volume.