


Pyle Pro Mixer Owner’s Manual – 8 9 – Pyle Pro Mixer Owner’s Manual
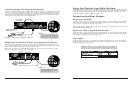
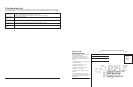
If you wish to intall a console lamp
(not supplied), simply insert the
plug end of an appropriate 12V/3W
gooseneck style or similar lamp into
the lamp socket provided in the
upper right corner of the mixer
control panel. Power is supplied to
this lamp when the mixer power
switch is turned on.
Connecting the Lamp
12V/3W lamp
Plug a pair of stereo headphones (not supplied) with a 1/4” jack into the Phones input. Using
headphones not only affords you the opportunity to listen privately, but also enables you to monitor
(”cue”) the incoming audio sources so you can locate an exact passage or section before mixing it
in. It also gives you the opportunity to set up the relative volume level of the upcoming passage
before it joins the mix.
Using Headphones
Do not listen at extremely high volume levels. Extended,
high-volume listening can lead to permanent hearing loss.
Follow these guidelines to protect your hearing, especially
when using headphones.
Always start by setting the volume level to the lowest
possible level before listening.
Put headphones on, and then gradually increase the
volume as necessary.
Once you set the volume level do not increase it. Over
a period of time, your ears adapt to a volume level and there
is a temptation to increase it. Even though such an increase
may not cause discomfort, it might still damage your hearing.
Listen Safely! Please observe the following:
Stereo Headphones
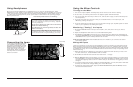
Monitoring (”Cueing”) the Inputs
1. Set the CUE ASSIGN switch of the input source (MIC , CH1, CH2, CH3 or CH 4) you wish to
monitor.
2. Adjust the Headphone Level control to a comfortable listening level.
3. The Headphone CUE/PGM control permits you to switch easily from listening to CUE material to
the playing PROGRAM sound. You can also listen to both simultaneously by moving the Headphone
CUE/PGM control to a point midway between the two ends.
PYD-1932 and PYD-1942:
These models also have an F/X CUE for you to monitor the sound
effect being applied.
Using the Mixer Controls
Turning on the Mixer
1. Turn on the output amplifier and temporarily set its volume to the minimum setting.
2. On the mixer, turn ON the power switch. The adjacent power LED will illuminate.
3. Turn on the audio input sources you wish to mix, and set them to play (or talk continuously into
the microphone).
4. To monitor the audio input sources so that you can decide when to mix in each input, see
“Monitoring ‘Cueing’ the Inputs.”
5. To mix the audio input sources so that you can play them through your amplifier system or record
them on your tape deck, see “Mixing the Inputs.”
Mixing the Inputs
There are a maximum of ten input sources available at one time, including two microphone inputs.
Both microphone input sources are always available as part of the mix, if desired. Each of the four
audio channels can be linked to two different input sources, and one of these sources for each channel
is available for mixing.Turn on all the available audio sources and be sure they are providing sound
before continuing.
1. Select the Channel Input Selectors for each channel, choose the audio sources you want to mix
for each channel (i.e., choose PHONO1/LINE1 or LINE2).
2. Set the Mic and Channel Level controls all to within the 8 - 10 range.
3. Slide the MASTER volume control toward 10 until you get an average reading of 0 on both Output
Level LED Meters. The output level displayed in the meters represents the TOTAL output from all
the channels supplying audio to the mix. NOTE: Once you set this level, we suggest you do not
change it!
4. If you add or change input sources, adjust the corresponding MIC1, 2 or CH1, CH2, CH3 or CH4 level
control(s) to maintain the average reading of 0 on the LED meters.
5. To change the overall sound level, adjust the RECEIVER/AMPLIFIER (NOT THE MIXER) volume
control to the desired volume.