


Pyle Pro Mixer Owner’s Manual – 76 – Pyle Pro Mixer Owner’s Manual
Monitoring (”Cueing”) the Inputs
1. Set the CUE ASSIGN switch of the input source (CH1, CH2, CH3,CH4 or CH 5) you wish to
monitor.
2. Adjust the Headphone Level control to a comfortable listening level.
3. The Headphone CUE/PGM control permits you to switch easily from listening to CUE material to
the playing PROGRAM sound. You can also listen to both simultaneously by moving the Headphone
CUE/PGM control to a point midway between the two ends.
Using the Mixer Controls
Turning on the Mixer
1. Turn on the output amplifier and temporarily set its volume to the minimum setting.
2. On the mixer, turn ON the power switch. The power LED will illuminate.
3. Turn on the audio input sources you wish to mix, and set them to play (or talk continuously into
the microphone).
4. To monitor the audio input sources so that you can decide when to mix in each input, see
“Monitoring
‘Cueing’ the Inputs.”
5. To mix the audio input sources so that you can play them through your amplifier system or record
them on your tape deck, see “Mixing the Inputs.”
Adding Equalization to the Mix
Using the Microphone
Incorporating Voice into the Mix
Talkover mode allows a voice to be heard clearly through the microphone by attenuating all the
other audio input sources. This mode is engaged by setting the Talkover Switch to the TALKOVER
position.
Talkover Mode
To blend voice from the microphones with the audio program material, first be sure the MIC/TALKOVER
switch is set to the ON position. (In this position, the MIC channel is mixed into the program like
any other audio input source.)
Then adjust the corresponding MIC level controls to increase or decrease the microphone level (this
will not affect the main volume inputs). When a microphone is not in use, set the MIC/TALKOVER
switch to OFF.
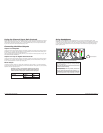
These HIGH, and LOW controls, permit you to tailor the tone frequencies of the MIC inputs processed
through the mix. Left in their center positions, the sound is unaffected (”flat”).
Microphone Tone Controls
The independent MIC1 controls permit you to increase or decrease the levels of these microphones
within the mix.
Microphone Level Controls
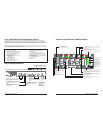
Mixing the Inputs
There are a maximum of ten input sources available at one time, including two microphone inputs.
Both microphone input sources are always available as part of the mix, if desired. Each of the four
audio channels can be linked to two different input sources, and one of these sources for each channel
is available for mixing.Turn on all the available audio sources and be sure they are providing sound
before continuing.
1. Select the Channel Input Selectors for each channel, choose the audio sources you want to mix
for each channel (i.e., choose PHONO1/LINE2 or LINE3).
2. Set the Mic and Channel Level controls all to within the 8 - 10 range.
3. Rotary the MASTER volume control toward 10 until you get an average reading of 0 on both Output
Level LED Meters. The output level displayed in the meters represents the TOTAL output from all
the channels supplying audio to the mix. NOTE: Once you set this level, we suggest you do not
change it!
4. If you add or change input sources, adjust the corresponding MIC1 or CH1, CH2, CH3, CH4 or CH5
level control(s) to maintain the average reading of 0 on the LED meters.
5. To change the overall sound level, adjust the RECEIVER/AMPLIFIER (NOT THE MIXER) volume
control to the desired volume.
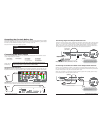
Using the Crossfader with the Assign Switches
For crossfading effects, you can assign any of the five channels to either A or B sides of the crossfader
mix using the Crossfader assign knobs.
When the crossfade slider is in the center position, the two assigned channels play equally. Sliding
the control towards the A position will increase the level of A and fade out B proportionally to the
distance from center. Likewise, sliding the control towards the B position will increase the level of
B and fade out A.
These high, mid and low 3 band equallzation controls, permit you to tailor the tone frequency of
the each channels inputs processed through themix. left in their center positions, the sound is
unaffected.