


Using Auto Accompaniment
7
•
Standard Fingering
— lets you play
chords on the accompaniment keys
using standard chord formations of
three or four notes (see “Standard
Fingering”).
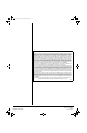
%10%'46"%*14&
The concert chord method lets beginning
keyboard players easily select and play a
chord.
The number of accompaniment keys you
press determines the type of chord that
plays. This chart shows the chord type that
plays when you press one, two, three, or
four accompaniment keys at the same time.
The lowest note you play determines the
key of the chord. For example, if the lowest
note is C, the keyboard plays a C chord.
±
1. Set
POWER/MODE
to
CONCERT CHORD
.
2. Enter a two-digit auto-rhythm number.
3. To start the auto-rhythm before the auto
accompaniment, press
START/STOP.
Or, to synchronize the start of the
selected auto-rhythm with your
accompaniment, press
SYNCHRO/FILL-
IN
.
4. Begin the accompaniment at the
desired interval by pressing the desired
accompaniment key(s).
To play a melody along with the
accompaniment, press any key(s) to
the right of the accompaniment keys.
5. Adjust
TEMPO
¼
¼¼
¼
or
¹
¹¹
¹
and
VOLUME
¼
¼¼
¼
or
¹ý
¹ý¹ý
¹ý
to the desired level.
6. To change chords without interrupting
the rhythm, simply press the auto
accompaniment key(s) required to form
the new chord.
7. To stop auto accompaniment and the
auto-rhythm, press
START/STOP
.
56#0&"(+0)'4+0)
The standard fingering method uses
standard formations of three or four notes,
and lets the experienced musician play a
wider variety of accompaniment chords.
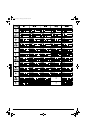
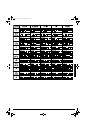
±
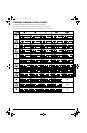
This chart shows the 15 chord types you
can play on your keyboard by using
standard fingering.
1. Set
POWER/MODE
to
FINGERED
.
2. Select and enter an auto-rhythm.
3. To start the auto-rhythm before your
auto accompaniment, press
START/
STOP
.
Or, to synchronize the start of the
selected auto-rhythm with your
accompaniment, press
SYNCHRO/FILL-
IN
.
4. Begin the accompaniment at the
desired interval by pressing at least
three accompaniment keys to play the
desired chord.
To play a melody along with the
accompaniment, press any key(s) to
the right of the accompaniment keys.
5. Adjust
TEMPO
¼
¼¼
¼
or
¹
¹¹
¹
and
VOLUME
¼
¼¼
¼
or
¹ý
¹ý¹ý
¹ý
to the desired level.
6. To change chords without interrupting
the rhythm, simply press the auto
accompaniment keys required to form
the new chord.
7. To stop auto accompaniment and the
auto-rhythm, press
START/STOP
.
C D E F G A B C D E F
C D E F G A B C D E F
C D E F G A B C D E F
C D E F G A B C D E F
±
"016'"
±
"
Concert Chord
You can press
any
labeled note(s) to the right
of the lowest note in the chord to produce a
minor, a dominant seventh, or minor seventh
chord.
Standard Fingering
• You do not have to press the key marked
with parentheses on the keyboard in the
chart to produce a 7, m7, M7, mM7, add9,
or madd9 chord.
• Although the chart shows only one possible
fingering position for each chord, it is
possible to play a chord using several
different positions. For example, the
following three positions produce the same
C chord.
• When you play an aug, 7
–
5
, or dim7 chord,
the lowest note you play determines the
root of the chord. Be sure that your
fingering correctly defines the root you
want.
• See “Standard Fingering Chord Charts” on
Page 11 for all the chords you can play on
your keyboard using standard fingering
accompaniment.
42-4057.fm Page 7 Thursday, April 25, 2002 9:37 AM