


SS70A • 9
SS70A ASSEMBLY INSTRUCTIONS
1. First, install switches S1, S2, and S3. Be sure that all legs fit through
the circuit board before soldering. Solder all the pins.
2. Install the volume control pot, R11. Solder the three component
connections as well as the mounting pins.
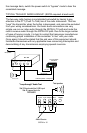
3. Moving to the back of the PC board, install connector J5, the power
connector. Be careful to insert all three of the connection tabs through
the PC board.
4. Install the four 3.5 mm phone jacks J1, 2, 6, and 7.
5. Install R1, 100 ohm (brown-black-brown).
6. Install R3, 470 ohm (yellow-violet-brown).
7. Install R6,10 ohm (brown-black-black).
8. Install the 1N4148 diode D1 (red/orange glass component with a black
band). The black line around one end of the component denotes the
"cathode" and must be oriented as shown in the parts diagram.
9. Install diode D2, another 1N4148. Observe the correct polarity!
10. Install jumper JMP3. From a scrap component lead, form this jumper
and install as you would a resistor. Jumpers act like small “bridges” to
route traces to the top side of the board and over obstacles (other
traces.) You will notice that jumpers are normally not found on the
schematic but are necessary for proper circuit operation.
11. Install C3, a .1 uF disc capacitor (marked .1 or 104).
12. Install R14, 470 ohm (yellow-violet-brown). It's located over by jacks
J1 and J6.
13. Install the remaining 1N4148 diodes, D3 and D4 (red/orange glass
body with black band). Make sure the bands are oriented as shown in
the parts diagram.
14. Install C16, a .1 uF disc capacitor (marked .1 or 104).
Now that wasn't so hard, was it? You've just completed the inputs for the
transmit and receive paths and voltage divider for the speaker level input.
Take a moment to recheck your work, looking closely for parts placement
and orientation. Check your soldering job also, and "touch up" any
connections that are less than perfect.
15. Locate and install Q2, a 2N3904 transistor. Transistors have three
"legs" and must be mounted correctly. Notice that the part contains a
"flat" side with the writing imprinted on it. Be sure to follow the parts
diagram for correct placement. To install, slide the legs through the
circuit board and push the component as close to the board as possible