


Windows XP/2000Windows Vista
2
Prepare for the installation
Insert the included CD-ROM into your computer.
Start up the installer for the Windows driver.
Choose [start] — [My Computer].
Double-click “DVD/CD-ROM drive.”
Double-click the “DRIVER” folder.
Double-click the “SETUP” icon within the “XP2K” folder.
Click [Next] as directed by the “Driver Setup” dialog box.
The “Driver Setup” dialog box will open; click [Next] as directed in the
screen.
To begin the installation, click [Next] once again.
If a dialog box regarding Windows logo testing appears, click
[Continue Anyway].
If a dialog box with the message “Digital signature Not Found”
appears, click [Yes].
If you are unable to continue, click the [OK] button, and refer to
“Troubleshooting” in the Readme le included with the driver.
A dialog box with the message “Ready to install the driver” will ap-
pear.
You are now ready to install the driver.
1
2
1.
2.
3.
4.
3
1.
2.
3.
Install the driver and make connections
Connect the PCR to your computer using the USB cable.
Set the PCR’s power switch (POWER) to the “OFF” position.
Use the USB cable to connect the PCR to your computer.
Turn on the power of the PCR.
Set the PCR’s power switch (POWER) to the “USB” position.
The message “Found New Hardware” will appear near the taskbar,
then the “Found New Hardware Wizard” will open.
If the Found New Hardware Wizard asks whether you want to
connect to Windows Update, choose “No, ...” and then click [Next].
Choose the installation method.
Choose “Install the software automatically (Recommended),” and
click [Next].
If a dialog box regarding Windows logo testing appears, click
[Continue Anyway].
If a dialog box with the message “Digital signature Not Found”
appears, click [Yes].
Click [Finish] to complete the installation.
Make sure that “EDIROL PCR” is shown, and click [Finish].
In the “Driver Setup” dialog box, click [Close].
If the “System settings have changed” dialog box appears, click [Yes]
to restart Windows.
Driver installation is now complete.
1
1.
2.
2
1.
2.
3
1.
4
1.
2.
3.
1
SONAR
Logic
Control Map
Cubase
:
:
etc...
2
3
?
3
4
Windows XP/2000
Windows Vista
Connections and installation
(Windows Vista/XP/2000)
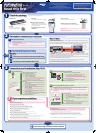
Prepare for the installation
Insert the included CD-ROM into your computer.
Start up the Windows driver installer.
Choose [Start] — [Computer].
Double-click the “DVD/CD-ROM drive.”
Double-click the “DRIVER” folder.
Double-click the “Vista” folder.
Double-click the “Setup” icon.
If a user account control window appears, click [Continue].
The screen will indicate “EDIROL PCR Driver will be installed on your computer.”
Click [Next].
If any other message appears, proceed according to the content of that
message.
To begin the installation, click [Next].
If a Windows Security-related dialog box appears, click [Install].
The screen will indicate “EDIROL PCR driver has been installed.”
If any other message appears, proceed according to the content of that
message.
You are now ready to install the driver.
1
2
1.
2.
3.
4.
5.
3
4
1.
2.
3.
Install the driver and make connections
Connect the PCR to your computer using the USB cable.
Set the PCR’s power switch (POWER) to the “OFF” position.
Connect the PCR to your computer using the USB cable.
Switch on the PCR’s power.
Set the PCR’s power switch (POWER) to the “USB” position.
The indication “Installing device driver software” will appear near the
taskbar, and the driver will be installed automatically.
If any other message appears, proceed according to the content of
that message.
When the message “Device driver software was installed successfully”
appears, installation is complete.
Click [Close] to complete the installation.
In the “Driver Setup” dialog box, click [Close].
If the “System settings have changed” dialog box appears, click [Yes]
to restart Windows.
Driver installation is now complete.
1
1.
2.
2
1.
2.
3
1.
2.
Install the Cakewalk Production Plus Pack and play the sounds (Windows Vista/XP only)
Following the instructions in “Installation” in the “Cakewalk Production Plus
Pack Installation,” install SONAR 6 LE, Project 5 LE, and Dimension LE.
Make MIDI device settings.
Start up SONAR 6 LE.
Choose Options | MIDI Devices to open the MIDI Devices dialog box.
Select the devices as shown in the illustration at left, and then click [OK].
Specify the PCR as the control surface for SONAR 6 LE.
In SONAR 6 LE, choose the Options | Control Surfaces menu to open the
Controllers/Surfaces dialog box.
Click the Add new controller/surface button.
For [Controller/Surface], choose “Edirol PCR-300”. For [Input Port], choose
“EDIROL PCR 2”. For [Output Port], choose “EDIROL PCR”. Then click [OK].
Click [Close].
Create a new project.
Choose the File | New menu to access the New Project File dialog box.
In the [Template] eld, choose “Normal”. In the [Name] eld, enter the
name of your project. Then click [OK].
1
2
1.
2.
3.
3
1.
2.
3.
4.
4
1.
2.
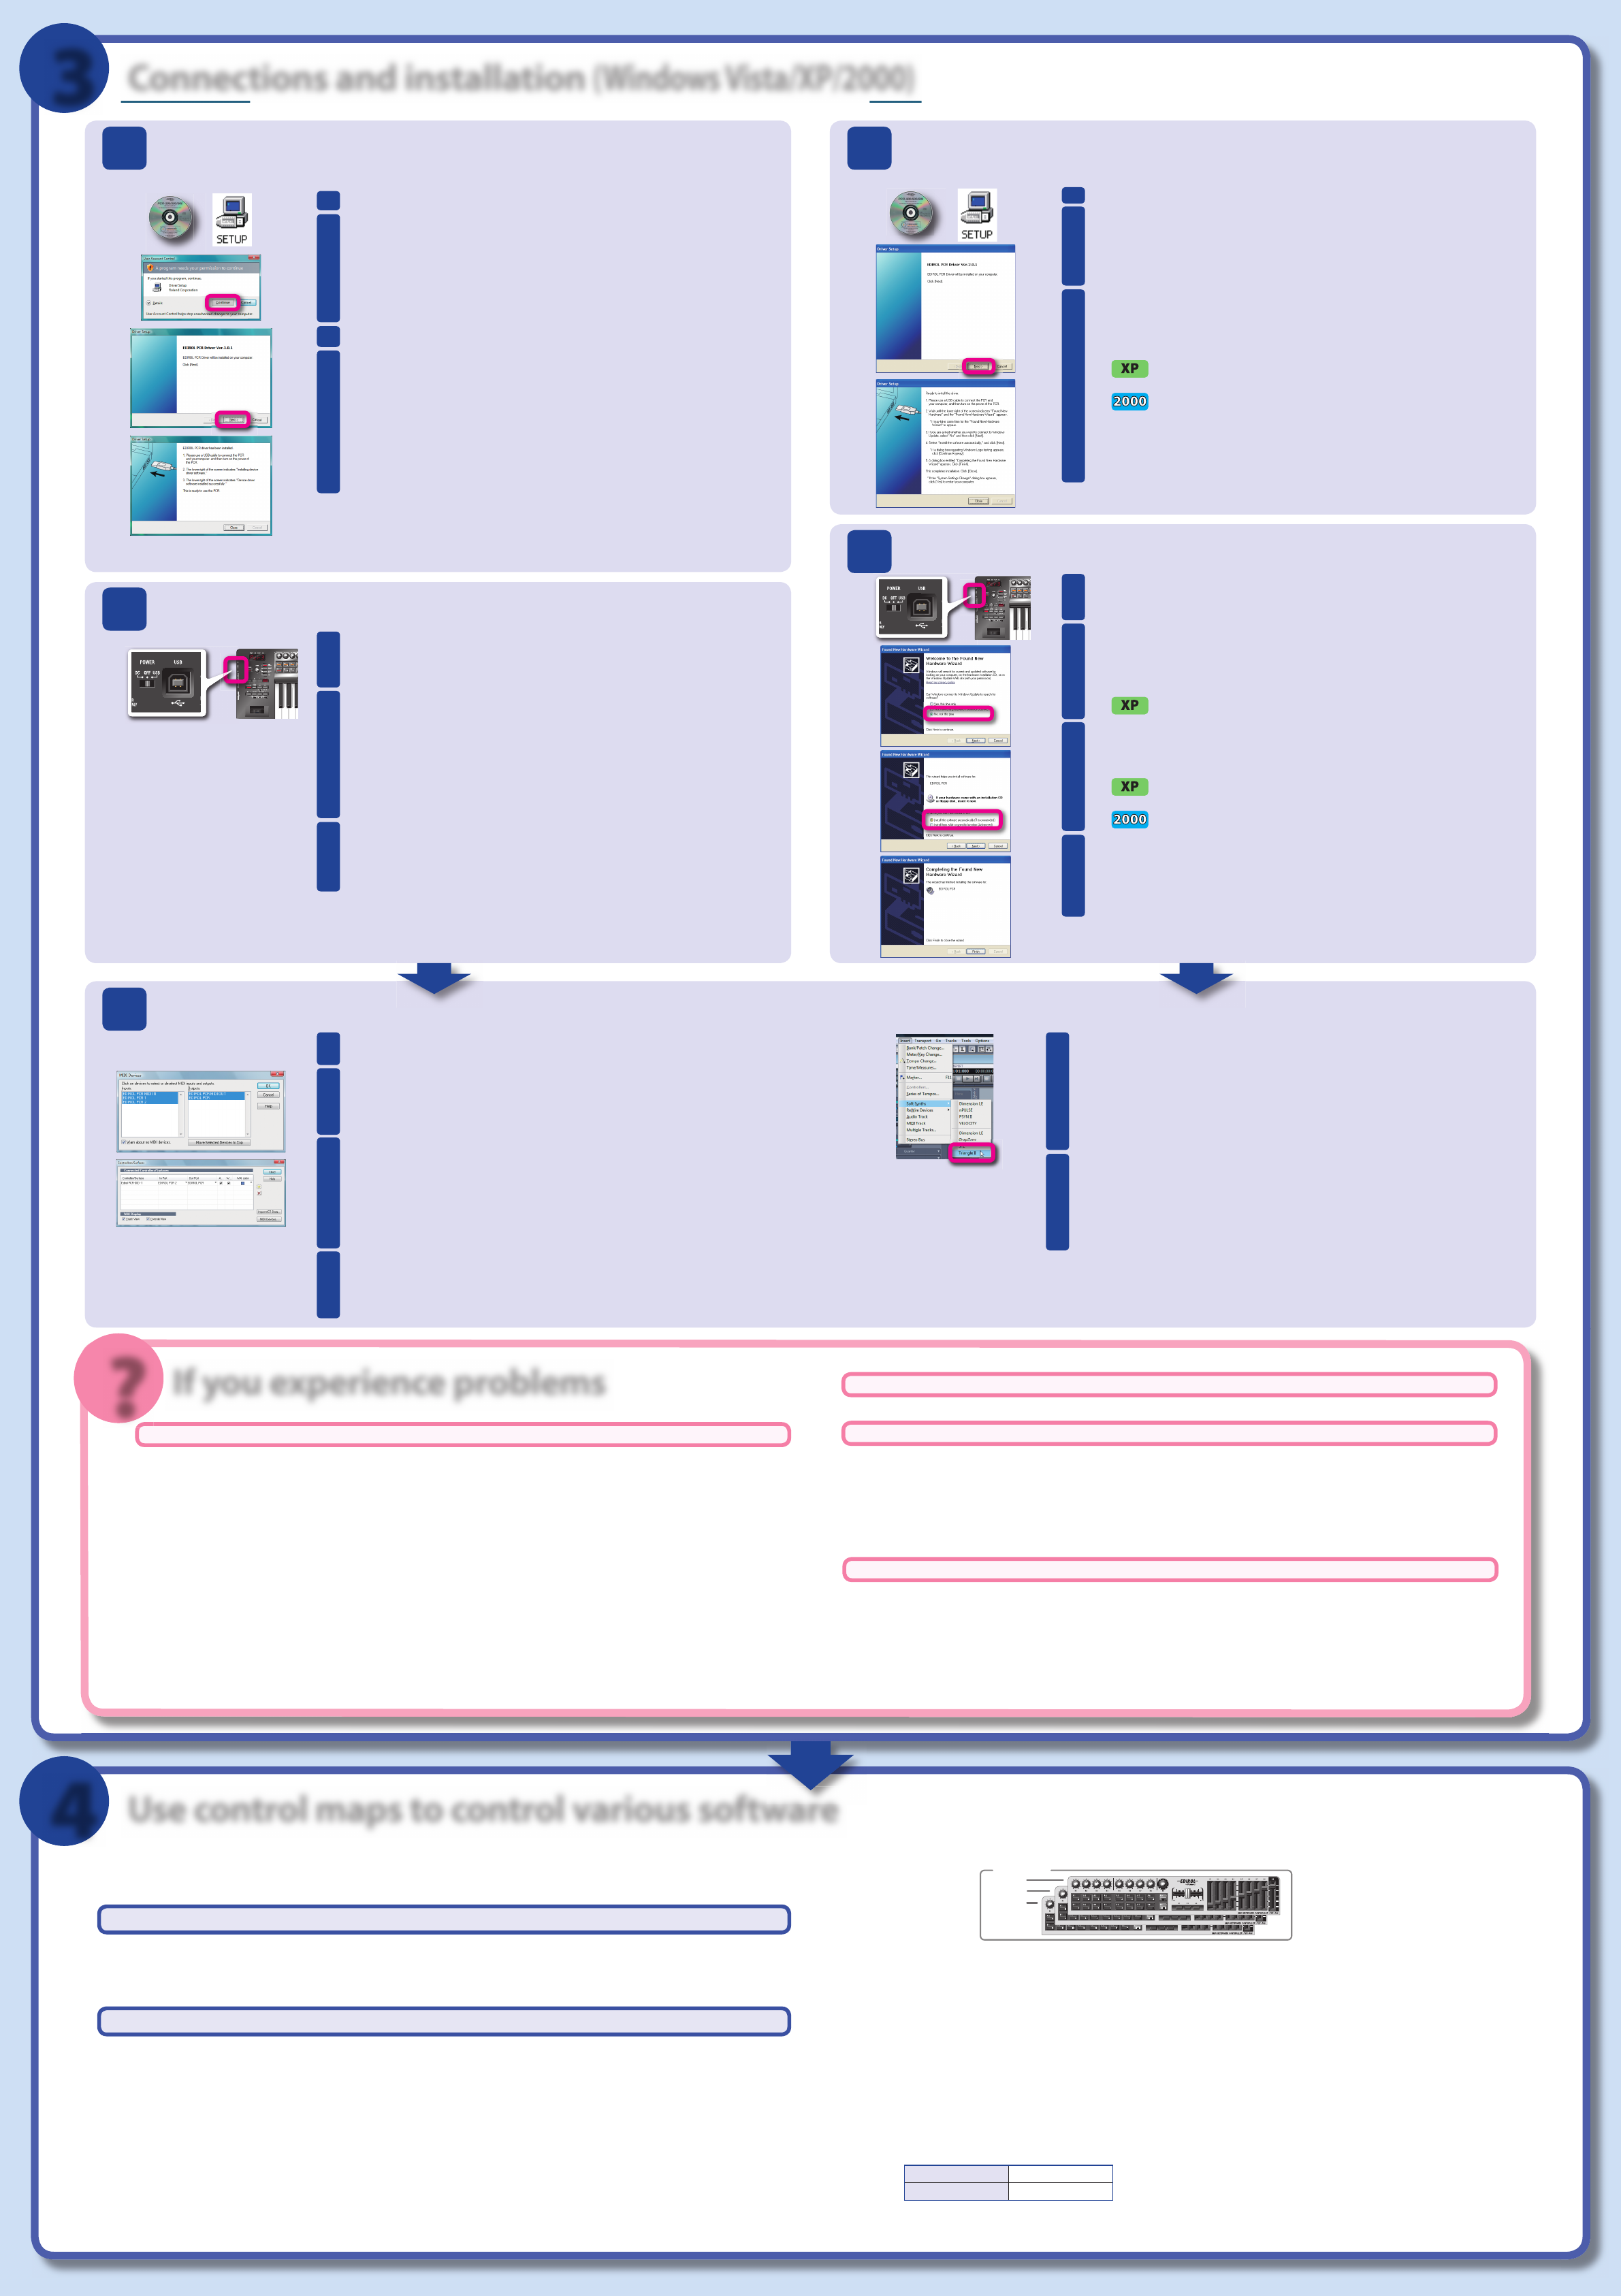
Insert a plug-in synth.
From the Insert menu, choose Soft Synths | Triangle II.
In the “Insert Soft Synth Options” dialog box, in the [Open These Windows]
area, select the “Synth Property Page” check box, and click [OK].
Right-click on the Triangle II screen, and choose “ob9”.
Play the keyboard of the PCR. If you hear the synth sound, the PCR is cor-
rectly connected to your computer.
Use DYNAMIC MAPPING to control SONAR.
On the PCR, press the [DYNAMIC MAPPING] button; the SONAR 6 LE [ACT]
window will appear.
Click the mouse on the Triangle II screen, and while playing the keyboard
of the PCR, try operating the PCR’s R1 knob. The synth sound will change
as you operate the knob.
In this way, DYNAMIC MAPPING lets the PCR control the parameters that are appro-
priate for the SONAR 6 LE window you’ve selected with the mouse.
5
1.
2.
3.
4.
6
1.
2.
If you experience problems
If your system does not work as you expect, or if you don’t hear sound, check the following items.
Can’t install the driver!
Could another USB device be connected?
Be sure to disconnect all USB devices (other than a mouse and/or keyboard) when you perform the installation. When you connect the
PCR, connect it directly to a USB connector located on the computer itself; don’t connect it to a USB hub.
Could other software or background software (such as antivirus programs) be running?
The installation may not occur correctly if other programs are running. Be sure to exit all other programs before you perform the installation.
●
●
No sound!
Is the PCR connected correctly?
Re-connect the PCR’s USB cable to your computer.
Is the PCR’s power switch set correctly?
Make sure that the PCR’s power switch is set to the USB position.
Could the volume of your computer be turned down or muted?
Windows Vista:
In Control Panel, choose Hardware and Sound, and then click Adjust system volume in the Sound section.
In Volume Mixer, adjust the Device volume. If Mute is on, click the button once again to turn it o .
Windows XP:
In Control Panel, choose Sounds and Audio Devices, and open Sounds and Audio Devices Properties.
Select the Volume tab, and adjust the Device volume. If the Mute check box is selected, clear the check box.
Are you using headphones?
Make sure that your headphones are correctly connected to the headphone jack of your computer.
Is an audio interface connected to your computer?
Refer to the owner’s manual for your equipment to check whether the audio interface is set correctly.
Is the appropriate track selected?
In SONAR 6 LE’s track view, click to select the track Track 4 that is assigned to the plug-in synth, and then play it.
●
●
●
●
●
●
For more detailed information, refer to Troubleshooting in the owner’s manual.
You can play sounds, but something’s wrong?
Is there a delay from when you play the note until you hear sound?
From SONAR LE’s [Options] menu, choose [Audio], and in the [Audio Options] window, adjust the [Mixing Latency] bu er size.
Decreasing the bu er size will shorten the time lag, but noise or crackles may occur if the bu er size is too small. Set this as low as possible
without causing problems with the sound.
If you’re using an external audio interface rather than the built-in sound functionality of your computer, refer to the owner’s manual of the
equipment you’re using.
●
Use control maps to control various software
The PCR provides fty controllers, and lets you freely assign MIDI messages to each controller. The MIDI settings
assigned to the controllers are collectively called a “Control Map”. By using control maps, you can easily switch to
settings appropriate for a particular software package or setup.
For details, refer to “Using Control Maps” in the owner’s manual.
Download additional control maps
You can download the most recent additional control maps from the following website.
Roland support website
http://www.roland.com/
You’ll need to use PCR Editor in order to load a downloaded control map into the PCR.
Using PCR Editor to create a control map
PCR Editor lets you easily create a control map suitable for your setup by assigning MIDI messages to the PCR’s controllers. You can also use it to
load into the PCR one of the additional control maps you’ve downloaded, or to save your original control map as a le.
Installing PCR Editor (Windows users)
Start up the installer.
If you’re using Windows Vista, navigate to the CD-ROM’s [EDITOR] – [Vista] folder, and double-click “SETUP”.
If you’re using Windows XP/2000, navigate to the CD-ROM’s [EDITOR] – [Xp2k] folder, and double-click “SETUP”.
The “Welcome to the InstallShield Wizard for PCR Editor V2 Setup” screen will appear. Click [Next].
When the “Please read” screen appears, read the contents, and if you accept the terms, click [Yes]. You cannot install PCR Editor unless
you accept these terms.
Choose the installation destination. Normally, you can simply click [Next].
Verify the contents shown in the “Con rmation of installation” screen, and click [Next]. Copying of the les will begin.
When copying is completed, click [Finish].
This completes installation of PCR Editor.
*
●
1.
1.
2.
2.
3.
4.
5.
6.
Here’s how to install the PCR driver in your computer. If you’re using Windows Vista/XP, this section
explains how to install the included Cakewalk Production Pack and connect the PCR to your computer.
1
Installing PCR Editor (Mac OS X users)
From the CD-ROM’s “Editor” folder, drag and drop the [PCR Editor V2] folder into your computer’s [Applications] folder to copy it.
This completes installation of the PCR Editor.
Starting up PCR Editor and making settings
Start up PCR Editor.
Windows users:
Choose [Start] – [All Programs] – [PCR Editor V2] – [PCR Editor V2].
Mac OS X users:
From the Finder, navigate to the [Applications] – [PCR Editor V2] folder, and double-click the “PCR Editor V2” icon.
Perform the MIDI device settings.
In PCR Editor, select [MIDI Devices...] in the [Options] menu.
In the MIDI Devices dialog box, make the following settings and click [OK].
Input Port EDIROL PCR 2
Output Port EDIROL PCR
This completes settings for PCR Editor.
For details on using PCR Editor, refer to “Using PCR Editor” in the owner’s manual.
●
1.
●
1.
2.
1.
2.
You must log on to Windows as a user whose account has administrative privileges. You must log on to Windows as a user whose account has administrative privileges.
Sound is interrupted!
Make “Performance Options” settings as described in the Readme le for the driver.