


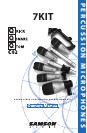


7
Application Guide
The following section will describe some basic miking techniques for the various drums in
your kit. Use this as a guideline, but remember every sound system, every room, every
drum kit and every drummer is slightly different, so experiment around until you find the
sound that’s right for you.
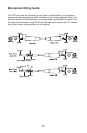
Snare drum
When you mount the QSNARE on your snare drum rim you’ll be well on your way to getting
a great sound due to the close placement of the mic. You can experiment by changing the
angle of the microphone to change sound. If you want to get more stick attack try lifting the
mic slightly so that it is pointing bit way from the rim and aim it more in the direction
towards the center of the drum head. You can use the proximity effect to your advantage to
increase the low-end response by pointing the mic further downward. For recording and
advanced live sound applications try a second QSNARE under the snare drum to pick up
more of the sound from the snares. When using the second QSNARE under the drum, be
sure to reverse the phase polarity on the mic input, otherwise some of the sound will actu-
ally cancel.
Bass Drum
The QKICK is perfectly happy positioned outside the bass drum for more of an ambient
sound, which is sometimes desired for recording, or inside the bass drum for a tighter
sound like in live sound applications.When positioning the QKICK you will notice that
changing the distance the microphone is placed from the head will have an effect on the
low frequency response.You can use the proximity effect to your advantage by moving the
microphone closer to the head if the sound is too boomy, or try moving the QKICK back a
bit to add more low end. If you want more of the click attack sound from your bass drum,
try aiming the QKICK directly at the beater.
Tom-toms
When you mount the QTOM on your tom-tom rim you’ll be well on your way to getting a
great sound thanks to the close placement offered by the DMC100 clip. You can experi-
ment by changing the angle of the microphone to change sound. If you want to get more
stick attack try lifting the mic slightly so that it is pointing bit way from the rim and aim it
more in the direction towards the center of the drum head.You can use the proximity effect
to your advantage to increase the low-end response by pointing the mic further downward.
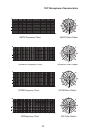
Overhead Drum Kit
Because of it’s extended high frequency response and fast transient response the C02 per-
forms outstandingly when used as an overhead cymbal microphone.You can position one
C02 on a boom mic stand directly above the kit pointing from front to back. For stereo mik-
ing, use two C02’s placed over the drum set at a distance of three to five feet.You can
experiment with the exact placement depending on the size of the room and whether you’re
looking for an ambient or close-miked sound. In general, when miking a drum kit it’s a good
idea to start with the overhead mics. Even though you use the overhead mics mostly for the
cymbals, try to get the entire kit to sound great in the overheads.Then it will be easier to
just bring up your individual mics for more attack and thickness in the overall sound.
Hi Hat
The C02 is a perfect microphone for miking Hi Hats thanks to its smooth top end and the
ability to capture fast attack transients. Try placing the microphone over the edge of the top
cymbal. Experiment by moving the mic further over the cymbal to produce more of a stick
sound, but keep in mind it may pick up more of the kit. Remember that the C02 has a car-
dioid frequency response, so position the microphone in the direction of the Hi hat, but for
increased separation, be sure to point the mic away from other drums or cymbals whenever
possible.
Using the 7KIT