


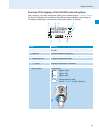

Putting the devices into operation
15
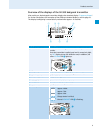
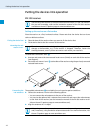
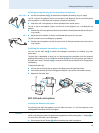
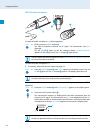
Attaching and positioning the corresponding microphones
ME 2/ME 4 ̈ Use the microphone clip ƽ, to attach the microphone to clothing (e.g. tie, lapel).
The ME 2 clip-on microphone (shown on the right in the diagram) has an omni-directional
pick-up pattern. It is therefore not necessary to position it precisely.
̈ Attach the ME 2 microphone as close as possible to the sound source.
The ME 4 clip-on microphone (shown on the left in the diagram) has a cardioid pick-up
pattern.
̈ Position the ME 4 microphone so that its sound inlet is directed towards the sound source
(e.g. mouth).
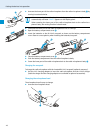
ME 3 ̈ Adjust the ME 3 headmic so that a comfortable and secure fit is ensured.
The ME 3 headmic has a cardioid pick-up pattern.
̈ Position the microphone so that its sound inlet is directed towards the sound source
(e.g. mouth).
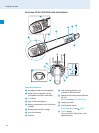
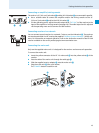
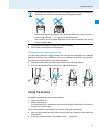
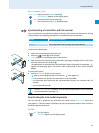
Attaching the bodypack transmitter to clothing
You can use the belt clip ƾ to attach the bodypack transmitter to clothing (e.g. belt,
waist-and).
The belt clip is detachable so that you can also attach the transmitter with the antenna
pointing downwards. To do so, withdraw the belt clip ƾ from its fixing points and attach it
the other way round. The belt clip ƾ is secured so that it cannot slide out of its fixing points
accidentally.
To detach the belt clip:
̈ Lift one side of the belt clip as shown in the diagram on the right-hand side.
̈ Press down the belt clip at one fixing point and pull it out of the transmitter housing.
̈ Repeat for the other side.
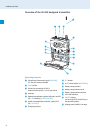
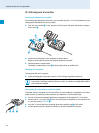
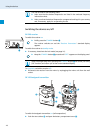
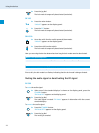
SKM 300 radio microphone
Inserting the batteries/accupack
For powering the radio microphone, you can either use two 1.5 V AA size batteries or the
rechargeable Sennheiser BA 2015 accupack.
ƽ
ƾ
CAUTION!
Danger of damage to the radio microphone!
When unscrewing the radio microphone during operation while pressing the MIC button » at
the same time, the latter can be damaged.
̈ Do not press the MIC button » while unscrewing the radio microphone.