


Battery Installation
To install batteries in the transmitter:
Slide open the battery door cover.
Insert 2 AA batteries in the battery
compartment as shown at right. Be
sure to follow the polarity markings
indicated in the compartment.
Replace battery door
1.
2.
3.
To install batteries in the receiver:
Slide open the battery door cover.
Insert 2 AAA batteries in the battery
compartment as shown at right. Be
sure to follow the polarity markings
indicated in the compartment.
Replace battery door
1.
2.
3.
Operation of SDW-150 Wireless Digital Microphone
System link:
When using the SDW-150 for the rst time, you must establish a communications link between
the transmitter and receiver. Before starting, make sure each unit has batteries.
Set the POWER switch to the ON position on both the transmitter and receiver units.
The “STATE” LED of both the transmitter and receiver will light up and ash while the two
units link together. When the system links successfully, the light will then remain on steady.
The next time you use the SDW-150, the system will link automatically. Note: If the receiver is
out of range, the LED will ash slowly to indicate loss of signal. Bring the receiver closer to the
transmitter, and push the LINK button until the LED remains steady.
1.
Step 1
Low battery
The LED of each unit will ash frequently when power is at a low level. Please
change batteries for the units as needed. The transmitting range will be reduced
when the battery power is low.
Step 1
Step 2
Step 3
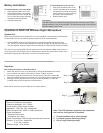
Operation:
After linking the system as described above:
Attach the receiver unit to your camcorder by sliding the adjustable shoe mount
on the receiver unit into the camcorder’s hot shoe. Tighten to secure.
Connect the audio jack of the receiver unit into the mic input of the camcorder.
Slide the POWER switch on the receiver unit to the ON position as shown above.
Insert the microphone jack into the mic jack on the transmitter unit. Slide the
POWER switch to the ON position as shown above.
Attach the tie clip to the mic and locate the mic where desired.
1.
2.
3.
Specications:
Electronic Condenser microphone
Frequency response: 100 – 10KHz
Sound quality: 22KHz mono channel
Impedance: 1.5K Ohm, 30% unbalanced
Effective output level: -50dB +/- 5dB unbalanced
Power requirement:
Receiver: AAA x 2pcs
Transmitter: AA x 2pcs
Power Consumption: 60mA (both transmitter and receiver)
Runtime: 12 to 15 hrs - transmitter
4 to 5 hrs - receiver
Effective range - 30 to 40 feet
Note: The LED indicators located on the transmitter
and receiver units perform 3 functions.
Communications link is intact (steady)
Low battery power (ashing quickly)
Out of range (ashing slowly)
1.
2.
3.