


11
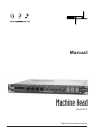
Machine Head
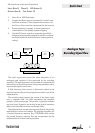
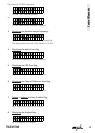
Storing a preset:
Depress S
TORE for1 sec.,
LED flashes;
use U
P/DOWN to select
preset no.;
depress S
TORE again,
LED goes out, preset is
stored
Applying a preset:
Depress A
PPLY for1 sec.,
LED flashes;
use U
P/DOWN to select
preset no.;
depress A
PPLY again,
LED goes out, preset is
applied
Operation safety:
Presets can not be changed
by accident
9
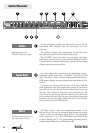
The DRIVE LEVEL metering shows the recording level of the
“virtual tape machine”. The display range is -10dB to +21dB.
The D
RIVE LEVEL ist adjusted with the DIRVE control (see 3).
The O
UTPUT PPM meters show the peak level after the OUTPUT
GAIN control (see 5).
The first LED in each I
NPUT and OUTPUT PPM meter is a signal
(S
IG.) LED to indicate that a valid digital source is connected and
detected. This LED helps you to verify the signal flow within a
digital processing chain. If one S
IG. LED is not illuminating you
have a first indication of a faulty digital signal flow.
The last LED of each INPUT and OUTPUT PPM meter is a CLIP
LED. The LED illuminates if the digital signal is too hot causing
digital distortion.
The M
ACHINE HEAD allows you to store up to 99 presets, which
can be changed by MIDI program change command.
If you want to store a new adjustment, depress STORE for one
second. The LED starts to flash indicating that the S
TORE mode
has been activated. The LC-display now shows the values of the
presets (including the B
OOST function) before the MACHINE HEAD
was switched off the last time. Use UP and DOWN to select a
new preset number. The status-LED flashes shortly to indicate
that the input (depressing U
P or DOWN) is accepted. Keeping UP
or DOWN depressed will let you jump through the preset list in
steps of 5 presets. Once a new preset location is found depress
S
TORE again. The STORE LED goes out. The preset is stored at the
new location.
In case you want to quit the STORE mode without storing the
new adjustments simply press A
PPLY.
If you want to apply various presets depress A
PPLY for one
second. The A
PPLY LED starts to flash indicating that the APPLY
mode is activated. You can step through the preset list with UP
and DOWN. Once you have a preset that you want to apply
depress A
PPLY again. The APPLY
LED goes out indicating that the
preset is applied.
In case you want to quit the A
PPLY mode without applying the
new preset simply press S
TORE.
NOTE: To increase operation safety it is impossible to apply
presets by simply depressing U
P or DOWN. The UP and DOWN
status-LEDs will not flash indicating that the input is not
accepted. You have to depress S
TORE or APPLY for one second in
order to activate the U
P and DOWN buttons.
Presets
Control Elements