


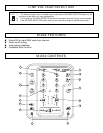
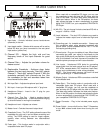

M.202 CONTENTS
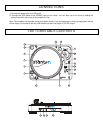
1) Input fader - Controls individual source levels/volume
(channels) in the mix.
2) Input toggle switch - Selects which source will be active
based on what you have connected to the rear panel
input section (phono/line).
3) Channel EQ - Adjusts the high, mid and low
frequency levels of the input channels for good
sound.
4) Channel Gain – Adjusts the pre-fader volume for
cleaner sound.
5) Replaceable Crossfader - Achieves clean fades
between the two input channels. "Hard left" selects
Channel 1. "Hard right" selects Channel 2. With the
crossfader centered, both channels are live. Use
the crossfader for fast and seamless fades from
one channel to the other.
6) Mic Input Gain – Adjusts microphone input level.
7) Mic Input – Insert your Microphone with ¼” plug here.
8) Headphone Output – Insert in the ¼” plug for your
headphones here.
9) Channel Cue / Cue Pan - Used to preview channel
audio to your headphones. Listen here before bringing
up channel faders or moving the crossfader.
10) Headphone Level – Adjusts cue volume.
11) Master Level - Controls the overall output level.
12) Crossfader Curve – The CUT setting allows the use of the
crossfader for quick cut in and out when scratching and
mixing. The FADE setting is used for longer segues,
typically when mixing between two beat-matched
sources.
13) Fader start – This function works in conjunction with a
compatible fader start CD player.
When used with a compatible CD player, you can use
the crossfader to start and stop the CD player with the
slide of the fader. The fader start switch activates the
fader start feature. When in the ON position, the fader
start allows the fader to return automatically to preset
digital CUE POINTS on your compatible STANTON DJ
CD Player.
14) Mic EQ – The mic channel include a two-band EQ with a
range of +10dB to –10dB.
15) Level Indicators – The dual LED indicators are used to
indicate the master output level of channels Right and
Left.
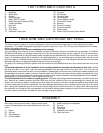
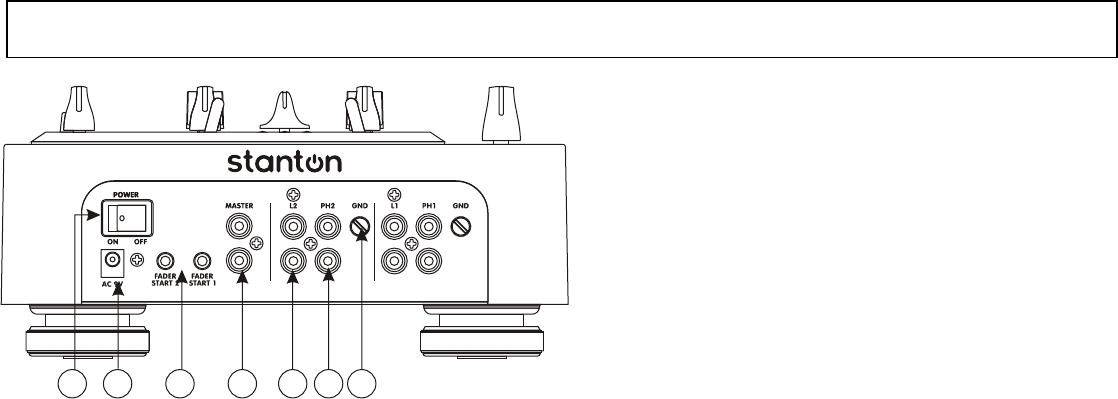
16) Grounding post - for turntable connection. Always use
this connection when using standard turntables with
ground cable. (Some turntables like the T.80 / T.120 do
not require grounding wire)
17) Phono Inputs – Plug your turntables in here. When these
connectors are used, your signal is fed directly to the
high-quality RIAA phono pre-amplifiers. Use this position
only for turntables. Line level sources will overload
the
sensitive phono pre-amps and will cause distortion.
18) Line Inputs - Unbalanced RCA jacks for connecting
stereo audio from line level sources such as CD players,
HiFi VCRs, cassette decks, DAT machines, laser discs,
tuners, even synthesizers or other mixing consoles.
NOTE: Plug mono audio sources into both Left and
Right inputs using a "Y" cable connector.
19) Master Output - Unbalanced RCA connectors controlled
by the Master level.
20) Fader Start – This function works in conjunction with a
compatible fader start CD player. When used with a
compatible CD player, you can use the crossfader to
start and stop the CD player with the slide of the fader.
The fader start switch activates the fader start feature.
When in the ON position, the fader start allows the fader
to return automatically to preset digital CUE POINTS on
your compatible STANTON DJ CD Player.
21) Power Connector - Plug in the included power supply
here.
22) Power Switch – turns unit off and on. Note*** Remember
to turn ALL volume levels down when turning the unit
on/off.
1920
2122 18
17
16