CLEANING A P&G FADER:
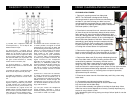
1. Remove 2 mounting screws from fader plate.
(NOTE: The P&G fader is designed with floating
mounting threads for precise mechanical centralizing of
the fader. If you desire to keep your fader`s current
mounting position we suggest that you make 2 marks
on both ends of the fader on the fader plate to indicate the
P&G fader position.) See Figure 1.
2. Once fader is removed from unit, remove the two screws
(A) from the end of the fader body where the wires exit the
fader casing. Pull away the end block. Withdraw the dust
cover (B). Taking great care, remove the slider assembly (C),
ensuring that the wiper contacts (D) are not damaged as
this will affect the operation of the fader. Clean the slider
assembly by gently wiping the wiper contacts and slider
bearings (E) using a tissue or cotton bud. If slider bear-
ing are excessively worn, as indicated by excessive slid-
er rocking then contact Stanton for replacement.
3. Remove the single upper screw on the opposite end
block to remove the guide rail. Clean the guide rail (F) with a
tissue or cloth, removing all traces of dirt and contamination.
4. Remove the fader track (G) by slowly withdrawing from the
unit. Place fader track on desk or working surface with black
contacts facing upwards. If necessary, the track can be
washed in warm water, wiped gently then dried thoroughly
using a dry cloth. Use a lint free cloth or swab to wipe the
tracks and check for marks along the track. (Note: Lint free cloth should be
used to avoid dust and fibers being deposited on the track). If the track
appears excessively worn, or if cleaning does not improve operation,
replacement may be necessary.
5. Examine the center channel of the fader body and if dirty, clean using
cotton buds.
6. Re-assemble and lubricate the fader as follows:
6.1) Secure the end block and guide rail onto the fader body.
6.2) Insert track into the fader body.
6.3) Insert slider assembly onto guide rail and into the fader body. Move
slider from end to end to disperse the oil evenly. Carefully wipe away any
excess oil using a tissue or cloth.
6.4) Lubricate the guide rail by placing one drop of silicon liquid oil onto the
guide rail (F).
DESCRIPTION OF FUNCTIONS
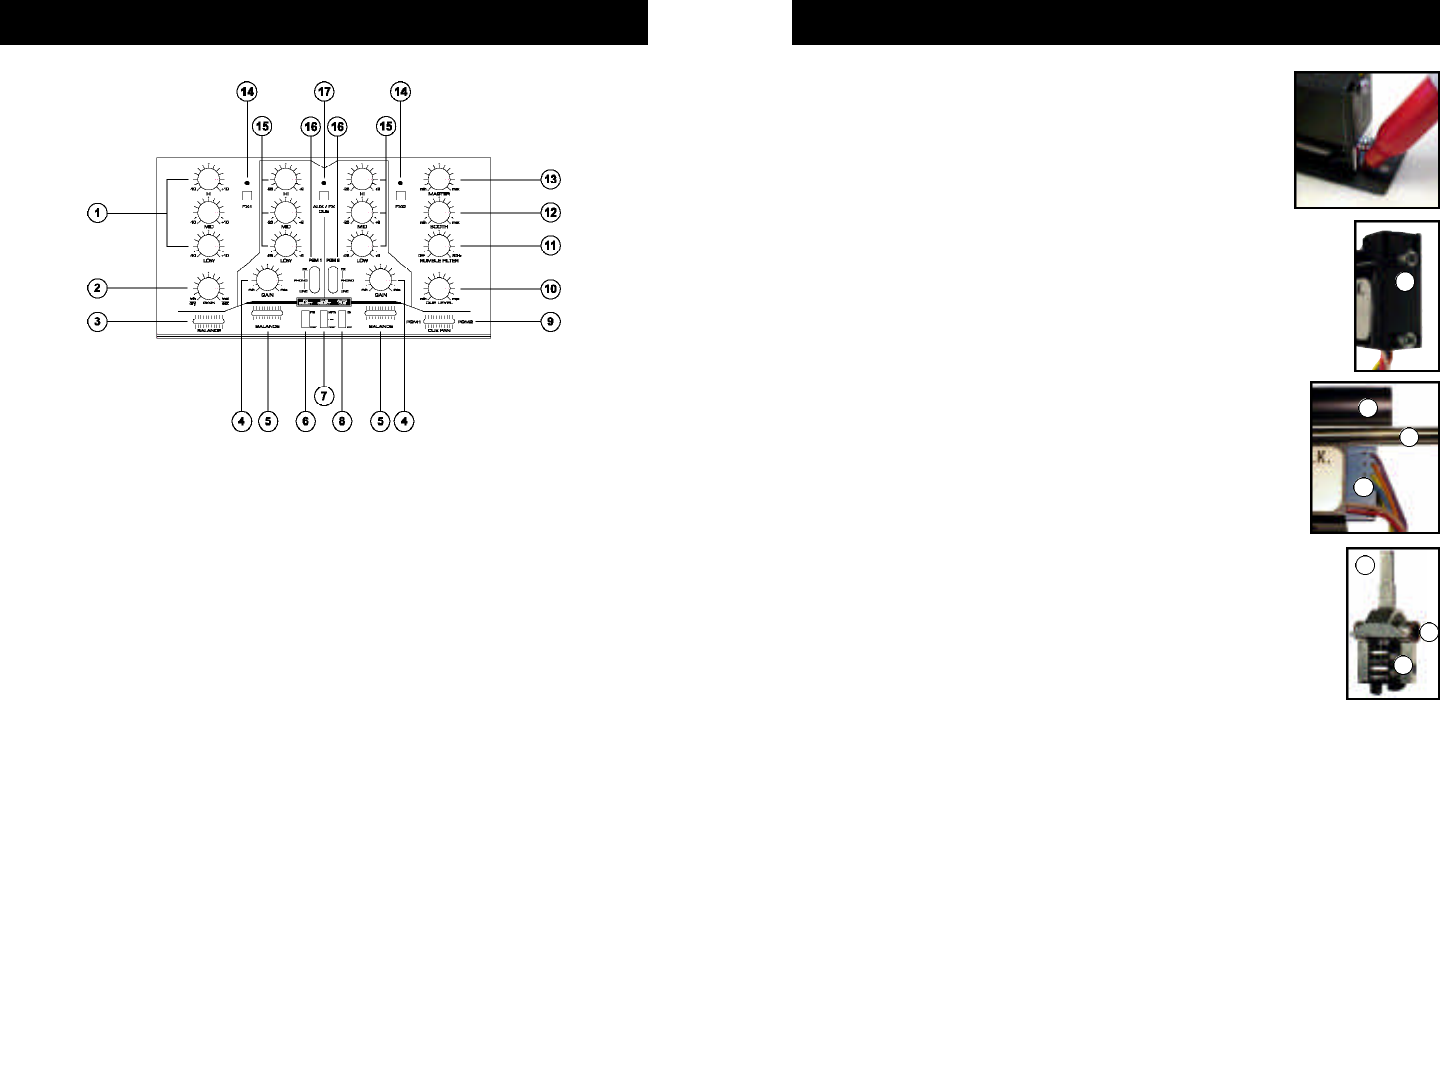
(1) Hi, Mid, Low – Adjusts Hi, Mid, and
Low frequencies (+ 10/-10 dB) for the
AUX/FX Return Input.
(2) Aux/FX Gain – Controls gain of
AUX/FX inputs (35, 36). While AUX/FX
switch (37) is placed in AUX, the gain
control can be used to adjust the level
of the incoming AUX input (36). While
the AUX/FX switch (37) is placed in FX
the gain control becomes a wet/dry
control for the FX return (35).
(3) Aux/FX Balance – Controls the
left/right output balance of the AUX/FX
inputs (35, 36).
(4) PGM1 & 2 Gain – Controls the gain
level of each input channel (38, 39).
(5) PGM1 & 2 Balance – Controls the
left/right output balance of each chan-
nel.
(6) FX Pre/Post – Assigns FX SEND
signal to either pre-fader or post-fader.
In PRE position the external effects
processor is sent a pre line fader (19)
and crossfader (21) signal via the FX
SEND output. In POST position the FX
device is sent a post line fader & cross-
fader signal via the FX SEND output.
(7) Cue Select – On this feature, PRE
and POST refer to the crossfader (21).
In “PRE” position, the signal of control
selected by the Cue-pan (9) fader will
be monitored (pre-line fader, pre-cross-
fader) as a stereo signal in the head-
phones. The “POST” position, is some-
what similar to the “PRE” position,
except the signal is post crossfader
(21) (pre-line fader, post-crossfader),
so if the cue pan fader is centered, the
signal received in the headphone
depends on the position of the cross-
fader (21). In “MASTER” position, the
signal monitored will be pre-master vol-
ume (post-faders), meaning the signal
will still be present in the headphone
even if the master volume is turned
down.
(8) Auto Cue – Auto cue is an automat-
ic cueing system that is controlled by
the position of the crossfader (21). If
the crossfader were placed on PGM1,
PGM2 would be heard through the
headphones and vice versa. The auto-
cue function disables all other Cue set-
tings and functions.
(9) Cue pan: Fades the headphone
output between channels 1 and 2,
effectively allowing the user to preview
a mix while in “PRE” cue mode.
A
B
C
D
E
F
G
FADER CLEANING AND REPLACEMENT


