


7
◊
◊
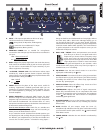
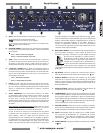
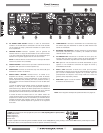
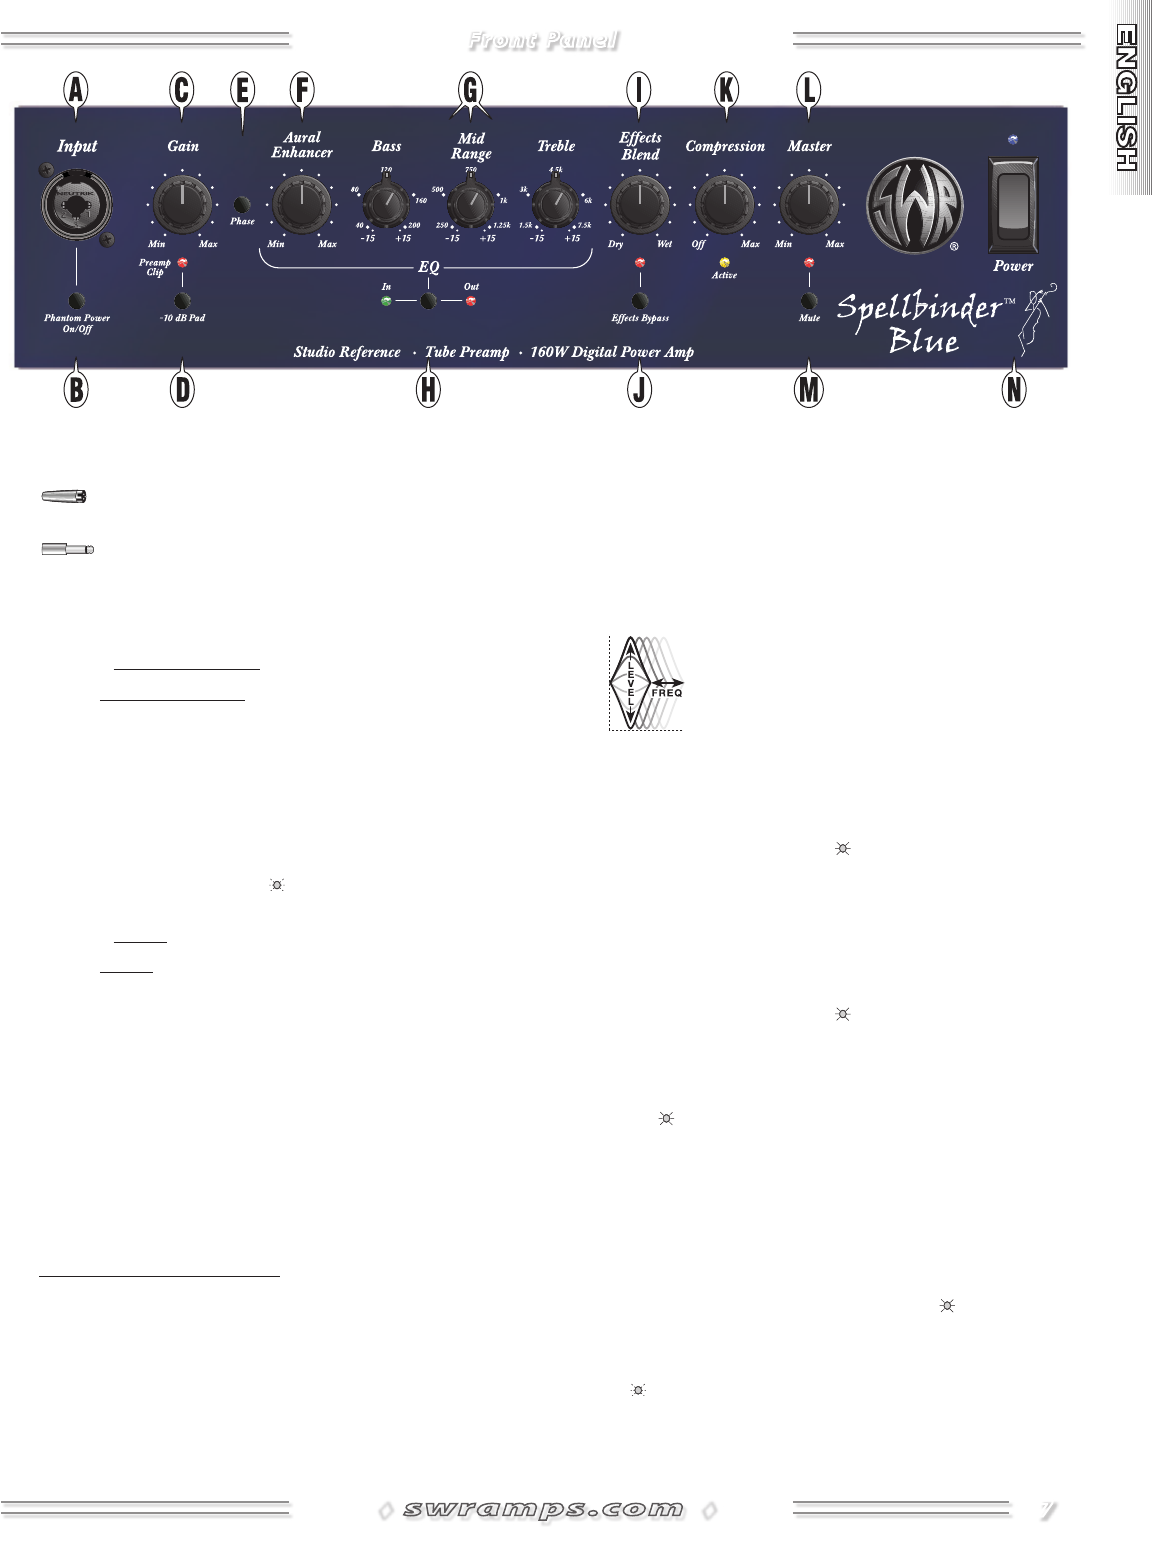
A. INPUT This input accepts either an XLR or /" plug:
The XLR connection is a balanced input:
(Pin 1=ground, Pin 2=positive, Pin 3=negative)
The /" connection is an unbalanced "TS" input:
(Tip=positive, Sleeve=ground)
B. PHANTOM POWERUse as needed for microphones
connected to the XLR input {A}. This button does not affect the
/" input.
Out—Phantom Power off
In—Phantom Power on
C. GAINAdjusts the preamp signal level. Gain is also the primary
level control for the Effects Send {S} jack on the rear panel and
can be used to accommodate the input sensitivity of your
effects equipment, if necessary.
D. – dB PAD / PREAMP CLIP—The Pad button reduces input
sensitivity by –dB to provide cleaner response with high
output sources. Use Pad if the Preamp Clip LED indicates that
the input buffer is being overdriven.
Out—Pad off
In—Pad on
E. PHASEReverses the phase of the input circuit, useful for
reducing "regenerative" feedback generated when you are
standing at a particular distance from the amplifier. You can
also reduce feedback by changing your position or distance
from the amplifier.
F. AURAL ENHANCER A trademark SWR® feature, the Aural
Enhancer brings out the fundamental low notes of the bass,
brightens high-end transients and reduces certain frequencies
that mask the fundamentals. The ultimate effect is a more
transparent sound that opens up the sibilance characteristics of
all instruments without being harsh.
How the Aural Enhancer works: Think of it as a variable tone
control that changes frequency range and level according to
where you set the Aural Enhancer control:
As you rotate the control clockwise from the Min position, you
are elevating low, mid, and high frequency levels in ranges that
are different, yet complementary to the Bass and Treble tone
controls. The “ o’clock” position—a favorite for many players—
brings out both low end fundamentals and crisp highs, while at
the same time, adds a little lower midrange helping you to
cut through the band. Then, as you rotate further clockwise,
selected mids will drop off—specifically, a group of frequencies
centered around Hz. While apparent, the Aural Enhancer
is gentle compared to the extreme response curves you can
create with the EQ tone controls.
G. BASS / MID / TREBLEThree semi-parametric tone controls
that allow you to boost or cut signal levels at the
frequencies you choose. Select a frequency range
center point using the outer knob, then adjust
signal level in that range with the inner knob. Mid
range adjustment is critical for most instruments
and what sounds good will depend on your situation—what
sounds harsh while playing alone may sound just right in a
crowded room, or on a recording.
H. EQ BYPASSPuts the tone control circuits in or out of the
signal path as indicated by the LEDs.
I. EFFECTS BLENDFunctional only when a plug is inserted into
the Effects Return {S} jack, this knob sets your effects level by
controlling the amount of "wet" effects loop signal blended
into the "dry" preamp signal.
J. EFFECTS BYPASSTakes the effects loop circuit out of the
signal path as indicated by the LED.
K. COMPRESSIONAdjusts the level of signal compression.
Rotate fully counterclockwise for no compression and rotate
clockwise to increase the ratio of compression. The brightness
of the LED indicates the active amount of compression
moderating peak signal levels.
L. MASTER VOLUMEUse to set the loudness output from the
speakers after all other levels are set, including any external
effects levels.
M. MUTEDisables all unit outputs except the Tuner {T},
Headphones {R} and Effects Send {S} jacks. Useful when tuning
your instrument and for quiet sessions. The LED illuminates
when Mute is active.
N. POWER SWITCHSwitches the unit ON-OFF as indicated by
the LED.
Front Panel