8
MIX SERIES FEATURES
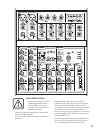
CHANNEL INPUTS
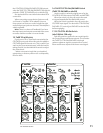
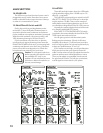
1. MIC (MICROPHONE) INPUTS
The MIX Series is equipped with one or more
rugged, low-noise, phantom-powered microphone
preamplifi ers, providing up to 50 dB of crystal-clear
amplifi cation. Their balanced circuitry rejects all
manner of extraneous interference. Professional
condenser, dynamic, and ribbon mics all sound
excellent through these XLR inputs.
You can plug in almost any kind of balanced mic
that has a standard XLR-type male mic connector.
See Appendix B for more information on XLR
connectors.
The MIX Series provides +48 VDC phantom
powering on pins 2 and 3 of the mono channels’ XLR
MIC inputs (except Mix.50). This can be turned on
and off using the PHANTOM (19) switch.
CAUTION: DO NOT connect a line-
level device to a MIC input with the
phantom power switched on. This
could damage the device. Use the
LINE IN (2) jacks instead.
Do not use phantom power with tube or ribbon
microphones, as this may cause damage.
2. LINE INPUTS
These inputs can accept 1/4" TRS balanced and TS
unbalanced plugs from any line-level instrument, eff ects
device, or tape player. They can be driven by virtually
any line-level signal, from –45 dBu up to +18 dBu.
There are two line-inputs for each stereo channel,
a left and a right. When connecting a stereo device
(two cords), use both the left (mono) input and the
right input.
When connecting a mono device (just one cord),
always use the left (mono) input and plug nothing
into the right input. A trick called “jack normalling”
causes the signal to appear on both sides.
3. GAIN CONTROL
If you haven’t already, please read “SET THE
LEVELS” on page 4.
The GAIN control adjusts the input sensitivity of
the MIC and LINE inputs. This allows signals from
the outside world to be adjusted to optimal internal
operating levels.
The GAIN control provides 50 dB of gain with the
knob fully up.
4. PEAK LED
This handy LED (Light Emitting Diode) lets you
know that the signals going into the mixer are
adjusted to the correct level, not too strong to cause
distortion and not too weak to be lost in noise.
After you connect a microphone or line-level
component to the mixer, do a sound test and adjust
the GAIN control until this handy LED fl ickers just
occasionally. If it is glowing constantly, turn the GAIN
down. If the LED is doing almost nothing, turn it up.
CHANNEL CONTROLS
The channel strips have various controls,
depending on the model and whether it is a mic/line
(mono) channel or a stereo channel.
The output from each channel strip passes on to
the left and right main mix. An auxiliary signal can
be tapped off and sent to monitors or processors
(except Mix.50). The block diagrams on pages 19-22
show how the signal fl ows through each mixer.
1
LINE
MIC
INPUT
INPUT
BA
BA
L/UNBA
L/UNBA
L
MIC
INPUT
INPUT
BA
BA
L/UNBA
L/UNBA
L
2
LINE
MIC
INPUT
INPUT
3/4
MONO
MONO
L
R
LINE
5/6
MONO
MONO
L
R
LINE
BA
BA
L/UNBA
L/UNBA
L
BA
BA
L/UNBA
L/UNBA
L BA
BA
L/UNBA
L/UNBA
L
MONO
MONO
CTRL RM
OUT
OUT
L
R
L
STEREO AUX
RETURN
RETURN
R
MAIN
OUT
OUT
L
R
PHONES
AUX SEN
SEN
D
GAIN
0
GAIN
0
1 1
2
2
3
3
2
2


