11
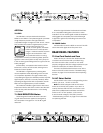
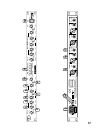
15. OUTPUT
Two types of connectors are provided for the
outputs — male XLR and 1/4” TRS (Tip-Ring-Sleeve).
These balanced outputs are in parallel, and provide
exactly the same signal.
You can connect either a balanced TRS connector
or an unbalanced TS connector to the 1/4” output
jack. See “Appendix B: Connections” on page 14 for
information on output connection wiring.
16. INPUT
Two types of connectors are provided for the inputs
— female XLR and 1/4” TRS (Tip-Ring-Sleeve). These
balanced inputs are in parallel, so do not connect
more than one signal at a time to the input jacks for
each channel.
You can connect either a balanced or an unbalanced
signal to the 1/4” input jack. A servo-circuit detects when
there is an unbalanced signal and automatically adjusts
the input level by 6 dB to compensate for the lower
level. See “Appendix B: Connectors” on page 14 for
information on output connection wiring.
17. SIDE CHAIN
This 1/4” TRS connector serves as an insert point
to control the compressor. When a 1/4” TRS plug is
connected to the SIDE CHAIN jack, the tip sends out
a pre-compressor version of the signal, which can
be passed through a processor like an equalizer or
de-esser, and then returned via the ring of the plug.
Special “Insert” Y-cords are available for this type of
Send/Return insert jack.
It’s important to note that the signal at the SIDE
CHAIN SEND (Tip) is not the actual signal passing
through the compressor, but a buffered duplicate of
the signal that can be processed externally to tailor
the control signal.
Here are some examples of common ways to use
the SIDE CHAIN connection:
Frequency-dependent compression: Connect the
SIDE CHAIN SEND to the input of a graphic equalizer,
and the output of the equalizer to the SIDE CHAIN
RETURN. Boost the low frequencies with the graphic
equalizer to trigger the compressor off the bass drum.
Time-shifted compression: Split the audio signal
prior to the SQ•2 and route one signal directly
to the SIDE CHAIN RETURN (no connection to the
SIDE CHAIN SEND). Route the other signal through
a delay processor and then to the SQ•2 input. By
experimenting with the delay time, the compressor
can anticipate the signal at its input and trigger the
compression slightly ahead of the actual peaks.
Ducking: Use a microphone to trigger the
compressor and reduce the level of the audio signal
while an announcement is being made over a PA
system. Connect the microphone signal to the SIDE
CHAIN RETURN (no connection to the SIDE CHAIN SEND).
GENERAL PRECAUTIONS AND
CONSIDERATIONS
Rack Mounting
The SQ•2 is designed to be mounted
in a
standard rack. It requires only a single rack space
(1U = 1.75”).
It also requires 7.5” depth inside the
rack,
not counting the front knobs or rear connectors.
When
designing your rack, put the heavier items at
the bottom and the lighter items toward the top.
Secure the front panel of the SQ•2 to the front of
the rack using four screws with soft washers to prevent
scratching the panel.
Thermal Considerations
Avoid mounting the SQ•2 directly over devices
that produce heat, such as power amplifi ers. As with
all electronic components, it is best to provide cool
air circulation around the SQ•2 to avoid overheating.
The ambient temperature should not exceed 113˚ F
(45˚ C).
AC Power Considerations
Be sure the SQ•2 is plugged into an AC outlet that
is able to supply the specifi ed voltage, and the AC
Select switch is set to the correct voltage.
Be sure the AC outlet can supply enough current
to allow full power operation of all the components
plugged into it, especially if there are power amplifi ers
plugged in. The outlet should be a three-prong socket
that matches the power cord.
WARNING: Bypassing the plug’s
safety ground pin can be
dangerous. Don’t do it!


