


2
After indicating that data is being loaded, the Clavinova will
begin to install the new version of the firmware. The following
message is displayed at this time. Upgrading of the firmware
takes approximately 5 minutes.
The USB flash memory device must not be unplugged and the
instrument must not be turned off while the firmware is being
installed. Failure to observe this precaution may render the
Clavinova unfit for use.
The following message is displayed upon completion of the
firmware installation process.
4. Turn off the Clavinova and unplug the USB flash
memory device.
After any firmware upgrade, it is recommended that you confirm
the current version once again as described below.
1. Turn on the Clavinova.
This can be done by pressing the Power switch located at
the right of the front panel.
2. Confirm the instrument’s current firmware
version as follows.
2-1 Press the [FUNCTION] button.
2-2 Press the [J] (UTILITY) button.
2-3 Using the TAB [E] / [F] buttons, select the OWNER tab
and display the Owner setting screen.
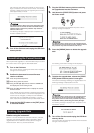
2-4 Press the [7▲] (VERSION) button to display the current
firmware version.
If the upgrade process has been completed successfully,
version 1.10 will be shown in the window displayed. If the
version has not changed, it is likely that the installation
procedure was not completed successfully. In such a
case, repeat the procedure carefully as described herein.
3. Press the [8▲] (EXIT) button or the [EXIT] button
to close the window.
Deletion using the instrument:
Version 1.10 of the firmware for Clavinova CVP-501, CVP-503,
CVP-505, and CVP-509 models makes it possible to delete
upgrade data from a USB flash memory device using the
instrument itself. To do so, proceed as follows.
1. Plug the USB flash memory device containing
the upgrade data into the Clavinova.
2. Hold down the [START/STOP] button and press
the Power switch.
Continue to hold down the [START/STOP] button until the
following message is displayed.
The USB flash memory device must not be unplugged and the
instrument must not be turned off at this time. Failure to observe
this precaution may render the Clavinova unfit for use.
3. Press the [BREAK] button to delete the upgrade
data.
The following confirmation message will be displayed.
4. To delete the upgrade data, release the [START/
STOP] button and then press it once again.
The Clavinova will begin deleting the upgrade data. The
following message is displayed at this time.
The USB flash memory device must not be unplugged and the
instrument must not be turned off while the upgrade data is
being deleted. Failure to observe this precaution may result in
the USB flash memory device being permanently damaged.
The following message is displayed upon completion of the
data deletion process.
5. Turn off the Clavinova and unplug the USB flash
memory device.
This can be done by pressing the Power switch located at
the right of the front panel.
Reconfirming the Current Version
Deleting Upgrade Data