


NOTE:
8. Power-ON, Low
Battery LED Indicator
9. LCD Contrast
Control
10. ID Function
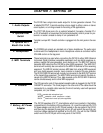
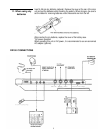
When setting up your system, be sure to turn the DX100 and any effects units
used on BEFORE turning the main amplifier system on. This will prevent the
initial power-on shock surge from possibly damaging your amplifier and
speaker system.
The DX100 features a Power-ON LED indicator, located immediately to the right
of the LCD indicator on the top panel. It glows when the Power switch on the rear
panel is turned ON. Additionally, it flashes to warn of low battery power should
such an occasion arise (batteries provide approximately 10 hours of continual use.)
An LCD Contrast Control, located on the back panel immediately behind the LCD
indicator, is provided in the DX100 to provide a clearly visible readout under most
lighting circumstances.
It is possible to change the “Welcome to DX!” message which appears when the
power is first switched ON to anything you like-your name, for example. To change
the ID, hold the KEY SHIFT button while turning the power ON. The current ID
message will be displayed with a cursor over the first character.
<Welcome to DX!>
The cursor can then be moved to any character position on the display by suc-
cessively pressing the KEY SHIFT button.
<Welcome to DX!>
Choose the position to enter a new character, then using the DATA ENTRY slider
or buttons, select the new character from the available character set.
Move the cursor to the next character position and enter the next character as
described above. When your new ID message is complete, simply press any button
other than the KEY SHIFT, DATA ENTRY, STORE or FUNCTION buttons to enter
the normal operation mode. The new ID message you have entered will now be
displayed every time you turn the instrument ON.
4