


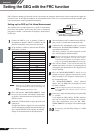

Setting the GEQ with the FRC function
EMX5016CF Owner’s Manual
31
Reference
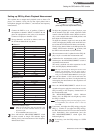
Setting up GEQ by Music Playback Measurement
This explains how to output music playback (such as from a CD
player) via channels 15/16, pick up that signal picked from a
microphone plugged into channel 1, and measure the frequency
characteristics.
1
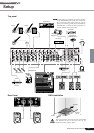
Connect the EMX to a set of speakers. Connect a
microphone to channel 1 INPUT A or INPUT B, and
place the microphone at the point to be measured.
Connect a CD player to channels 15/16.
2
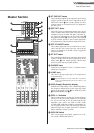
Set up channels 1 and 15/16 as follows, and lower
the ST Master fader all the way down.
● Channel 1
● Channels 15/16
* Adjust these settings in step 4.
• Make sure that all faders other than channels 1 and
15/16 are set to their minimum and that no other
signals are input.
• Set the POWER AMP switch to L/R.
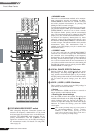
3
Press and hold the MEASURE/CORRECT switch
for three seconds or longer. The indicator begins
flashing slowly, and measurement of the frequency
characteristics starts.
4
To adjust the playback level of the CD player, turn
on the channel 15/16 PFL switch, adjust the GAIN
control so that the LEVEL meter 0 flashes occasion-
ally, set the channel faders to the 0dB position, and
then adjust the ST Master fader.
To adjust the channel 1 input level, turn on the PFL
switch, and adjust the [26dB] switch and GAIN con-
trol so that the LEVEL meter 0 flashes occasionally.
Finally set the channel faders to the 0dB position, the
channel 1 EFF2 knob to nominal (“ ” position), and
the EFF1 knob on channels 15/16 to nominal.
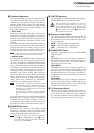
5
The measurement result is updated on the GEQ dis-
play every five seconds after measurement starts.
6
Confirm that the measurement result is consistent,
and then press the MEASURE/CORRECT switch to
suspend the measurement.
The result is retained even after suspension. At this
time, the GEQ display indications flash.
This step is also handy for altering the location of the
speakers and microphone, since the noise output is
muted during the suspension. To resume the measure-
ment, press the MEASURE/CORRECT switch again.
7
Turn off the channel 1 ON switch and lower the
channel fader all the way down. Leaving the fader up
and stopping the measurement in the step below can
result in howling.
8
Press the MEASURE/CORRECT switch for two
seconds or longer to apply the correction curve to the
GEQ according to the frequency characteristics of
the measurement result.
The MEASURE/CORRECT switch indicator
flashes. Also, the GEQ ON switch lights up so that
the GEQ is enabled.
To prevent clipping at the power amp stage by exces-
sive equalization, the correction curve is never set
over ±6dB.
9
If necessary, and adjust the GEQ settings using the
GEQ +/– switches. If you adjust the GEQ settings,
the FRC indicator turns off. To restore the correction
curve immediately after measurement, press the
FRC MEASURE/CORRECT switch again. The
indicator lights up.
10
If necessary, store the GEQ settings to a USER
switch.
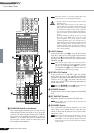
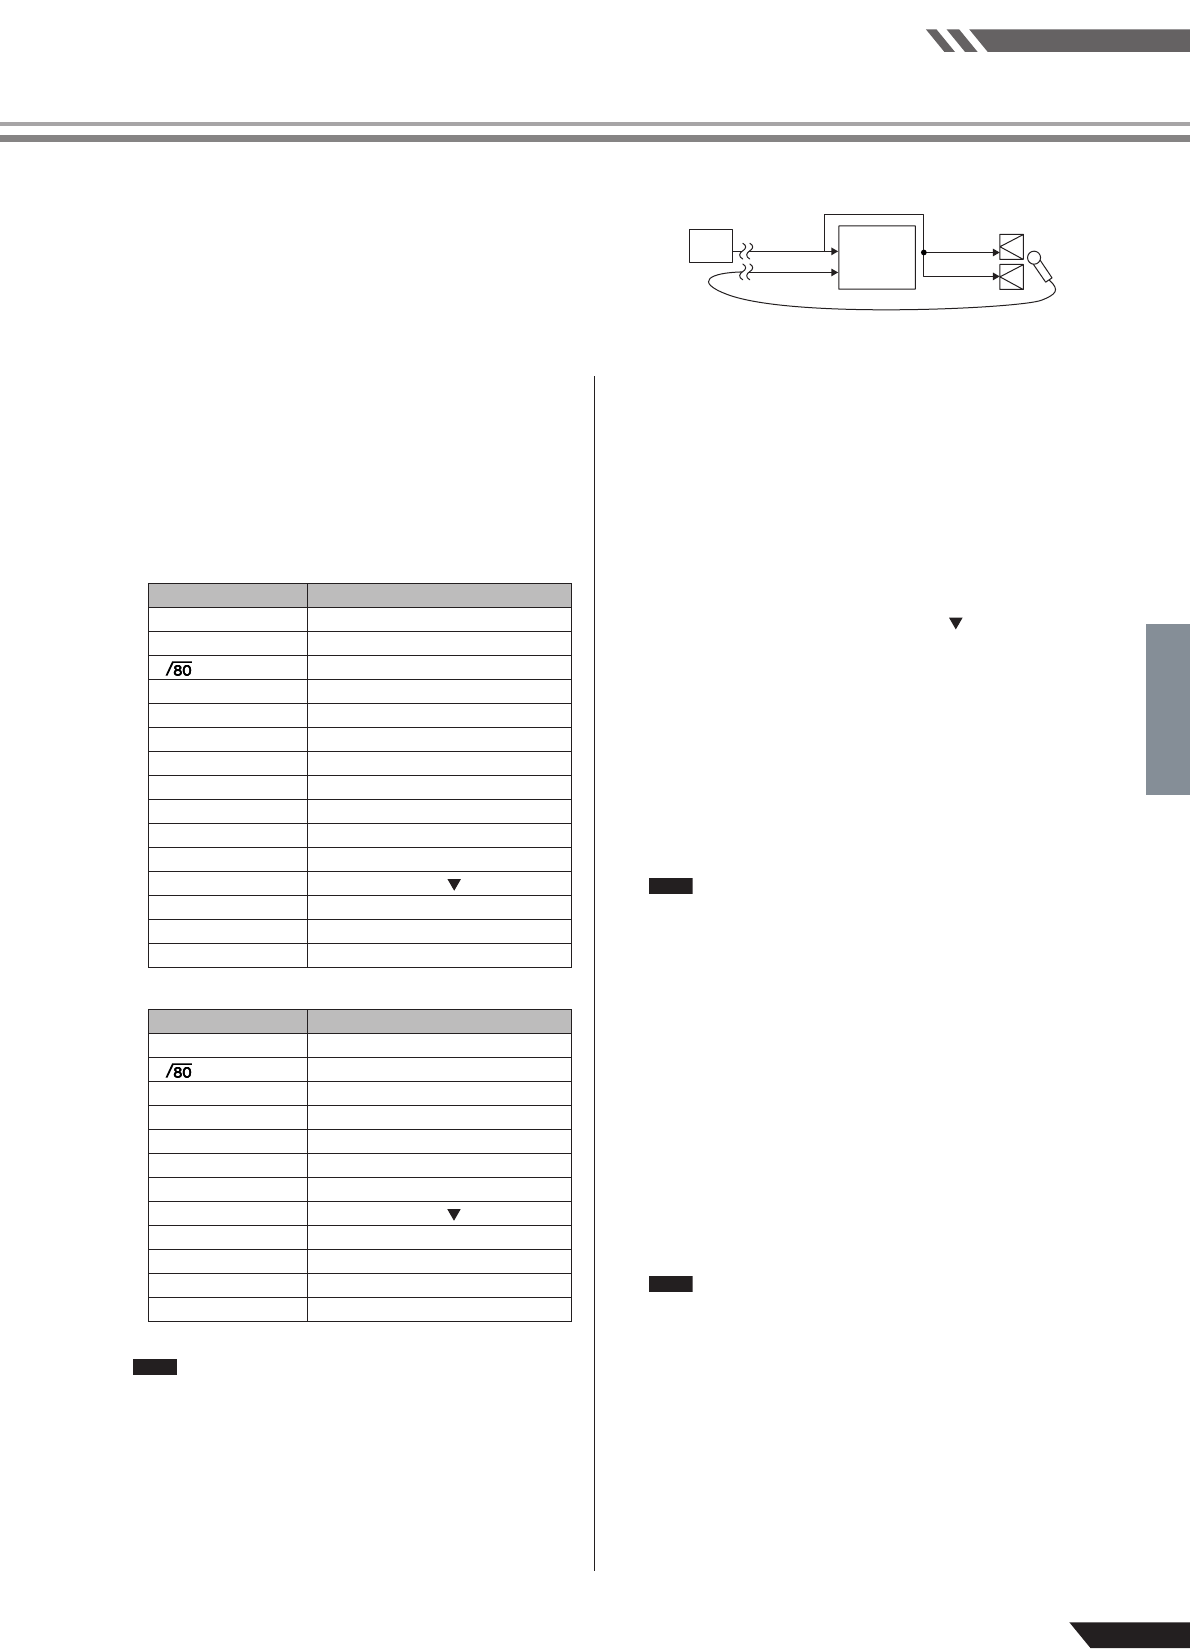
[Block Diagram of Music Playback Measurement]
Sound
Source
EFFECT1
EFFECT2
ST OUT L
R
FRC Music
Playback
Measurement
Controls Settings
[26dB] switch Proper level*
GAIN control Proper level*
switch Off
COMP knob 0
HIGH 0dB
MID F —
MID 0dB
LOW 0dB
AUX1 knob —
AUX2 knob —
EFF1 knob 0
EFF2 knob 0 (→→
→→
Nominal “” position)*
PAN control Center
ON switch On
Channel fader –∞ (→ 0dB)*
Controls Settings
GAIN control Proper level*
switch Off
HIGH 0dB
MID 0dB
LOW 0dB
AUX1 knob —
AUX2 knob —
EFF1 knob 0
(→→
→→
Nominal “” position)*
EFF2 knob 0
PAN control Center
ON switch On
Channel fader –∞ (→ 0dB)*
NOTE
NOTE
NOTE