


1
2
2
3
X
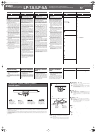
Fix the pedal unit to the keyboard stand.
Remove the caps on the bottom of stand part
B
, then attach the
pedal unit there using the large screws.
• If you have difficulty in fitting the pedal unit into the keyboard stand, light-
ly loosen the screws attached to stand part A.
X
Befestigen Sie die Pedaleinheit am Key-
board-Stativ.
Entfernen Sie die Kappen unten am Stativ-Teil
B
, und bringen Sie
dann mit den großen Schrauben die Pedaleinheit dort an.
• Falls Sie Schwierigkeiten haben, die Pedaleinheit in das Keyboard-Sta-
tiv einzupassen, drehen Sie die an Stativ-Teil A angebrachten Schrau-
ben wieder etwas heraus.
X
Fixez le pédalier au pupitre du clavier.
Retirez les capuchons sur le bas de la partie du pupitre
B
, puis
fixez le pédalier à l'aide des grandes vis.
• Si vous éprouvez des difficultés à fixer le pédalier au pupitre, desserrez
légèrement les vis fixées à la partie A.
X
Sujete la unidad de pedal al soporte del te-
clado.
Retire los tapones de la parte inferior de la parte
B
del soporte y
después acople la unidad de pedal con los tornillos grandes.
• Si tuviera dificultades para acoplar la unidad de pedal en el soporte del
teclado, afloje ligeramente los tornillos colocados en la parte A del so-
porte.
X
X
B
•
A
NOTE
HINWEIS
NOTE
NOTA
NOTE
A
BB
C
Schließen Sie das Pedalkabel am Key-
board an.
C
-1
Stecken Sie den Stecker des Pedalkabels in die Buchse
[PEDAL UNIT] an der Keyboard-Rückseite.
C
-2
Bringen Sie die Kabelbefestigungen an der Rückwand an,
und klemmen Sie dann das Kabel in die Befestigungen.
• Informationen zur Montage des Keyboards finden Sie in der mit dem
Keyboard mitgelieferten Bedienungsanleitung oder in der mit dem Key-
board-Stativ mitgelieferten Montageanleitung.
C
Connectez la fiche du cordon du pédalier
au clavier.
C
-1
Insérez la fiche du cordon du pédalier dans la prise [PE-
DAL UNIT] (Pédalier) située à l'arrière du clavier.
C
-2
Placez les supports de cordon sur le panneau arrière, puis
insérez-y le cordon.
• Pour plus d'informations sur l'assemblage du clavier, reportez-vous au
mode d'emploi fourni avec le clavier ou aux instructions d'assemblage
fournies avec le pupitre du clavier.
C
Conecte el enchufe del cable del pedal al
teclado.
C
-1
Inserte el enchufe del cable del pedal en la toma [PEDAL
UNIT] de la parte posterior del teclado.
C
-2
Coloque los soportes del cable en el panel posterior, des-
pués encaje el cable en los soportes.
• Para información sobre el montaje del teclado, consulte el manual de
instrucciones que se suministra con el teclado o las instrucciones de
montaje que se facilitan con el soporte del teclado.
C
C
-1
C
-2
C
C
-1
[PEDAL UNIT]
C
-2
•
HINWEIS
NOTE
NOTA
NOTE
1
2
C
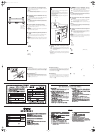
Connect the pedal cord plug to the key-
board.
C
-1
Insert the pedal cord plug into the [PEDAL UNIT] jack on
the rear of the keyboard.
C
-2
Attach the cord holders to the rear panel, then clip the cord
into the holders.
• For information on keyboard assembly, refer to the Owner’s Manual sup-
plied with the keyboard, or the Assembly Instructions supplied with the
keyboard stand.
NOTE
• The location or the angle of the [PEDAL UNIT] jack may differ
depending on your keyboard.
• Die Position oder der Winkel der Buchse [PEDAL UNIT] kann je
nach Keyboard variieren.
• L'emplacement et l'angle de la prise [PEDAL UNIT] peuvent va-
rier selon le clavier.
• La ubicación o ángulo de la clavija [PEDAL UNIT] puede variar
en los distintos teclados.
•
•
[PEDAL UNIT]
Large screws
Große Schrauben
Grandes vis
Tornillos grandes
V
Secure
22
22
.
Move the instrument to the place you intend to use it, then while
holding down the pedals so that
2
comes in firm contact with the
floor, firmly tighten the screws you temporarily fastened in step
Z
.
V
Befestigen Sie
22
22
.
Bewegen Sie das Instrument an die Stelle, an der Sie es verwen-
den möchten. Während Sie die Pedale nach unten drücken, so dass
2
in Kontakt zum Boden kommt, ziehen Sie die Schrauben, die Sie in
Schritt
Z
eingesetzt haben, fest an.
V
2
2
Z
V
22
22
2
Z
4
V
Fixez la partie
22
22
.
Positionnez l'instrument à l'emplacement où vous souhaitez l'uti-
liser, puis maintenez les pédales enfoncées de sorte que la partie
2
soit bien appuyée au sol et resserrez fermement les vis que vous aviez
temporairement fixées à l'étape
Z
.
V
Asegure
22
22
.
Lleve el instrumento al lugar donde prevea usarlo, después man-
tenga presionados los pedales de forma que
2
esté firmemente en
contacto con el suelo y apriete bien los tornillos que colocó provisio-
nalmente en el paso
Z
.
lp7a_m.fm Page 2 Tuesday, June 24, 2008 4:56 PM