


6
■
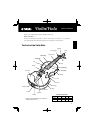
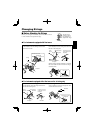
Winding the Strings
Insert the string into the hole on its corresponding tuning peg and wind the string onto the peg as
shown below. Apply some pressure (push in) to the peg as you turn it.
(Fig. A)
■
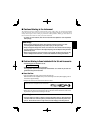
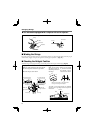
Checking the Bridge’s Position
While tuning or changing the strings, check the position and angle of the bridge.
(Fig. B)
1st & 2nd strings
3rd string
Rotate the
peg as shown
Rotate the
peg as shown
4th string
1st string
2nd string
Make sure the strings
are seated in their cor-
responding notches on
the bridge.
Make sure the side of the bridge with
the logo is facing the tailpiece.
Make sure the bridge
is positioned between
the notches in the “f”
holes as shown below.
The side of the bridge facing the tailpiece
should be at a right angle to the body of the
instrument.
Bad
Bad
Correct
Right Angle
(Fig. B)
(Fig. A)
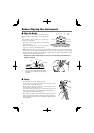
Changing Strings
Make two winds towards the end of the peg and
the remaining winds towards the peg handle.
Wind the string as shown below.
3rd & 4th strings
4th
2nd
3rd
1st
●
For instruments equipped with a tailpiece with set-in adjusters
At the tailpiece, hook the string’s ball end onto the fine tuner’s notch.
Tailpiece
Ball End
Ball End
Fine Tuner
String
Fine Tuner
String