


Epson PowerLite 835p
10/04 Epson PowerLite 835p - 13
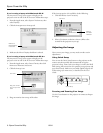
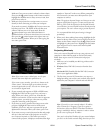
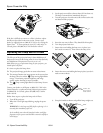
Make sure
Easy connect mode is selected, as shown above.
If not, use the pointer button on the remote control to
highlight the checkbox next to
Easy connect mode, then
press
Enter to select it.
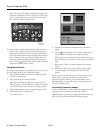
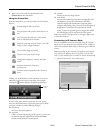
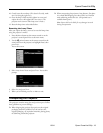
5. Make sure the projector has a unique name, so you can
identify it when connecting to it from your computer.
If you need to rename it, highlight the
Projector name text
box then press
Enter. The outline of the text box turns
yellow to indicate you are in input mode. Press the
pointer button up to select individual letters in
alphabetical order, or down to select letters in reverse order;
then press the pointer button to the right to move to
the next character position. When you’re done typing the
new name, press
Enter.
Note: If you want to enter a blank space, use the space
character that comes before the capital letter A.
If you want to enter numbers, press the
Num button on the
remote control. The button lights up to indicate that the
numeric keypad mode is active. Press the
Num button again
to exit numeric keypad mode.
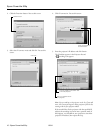
6. If your network card supports an SSID or ESSID name,
highlight the
ESSID text box, press Enter, and enter a
name. When you’re done, press
Enter. Note that the
ESSID is case-sensitive (if you enter the name in uppercase
on the projector, you must type it the same way on the
computer connecting to the projector).
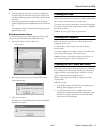
7. If you want to create a password for remote access to the
projector, highlight the
Password for WEB control
checkbox, press
Enter, and enter a password of up to 8
alphanumeric characters. When you’re done, press
Enter.
8. If you want to set up a security keyword so that only people
who are in the same room as the projector can access it,
turn
Projector keyword on. Then when you want to
connect to the projector, it displays a randomized four-digit
number or “keyword” on the screen. When prompted by
NS Connection, you must enter the keyword on your
computer to connect.
Note: The projector keyword changes each time you turn the
projector off and then on again, or remove and reinsert the
802.11g card. Check the keyword on the EasyMP Network
screen whenever you start EasyMP and enter that keyword on
your computer. You can’t connect using a previous keyword.
It is recommended that the keyword setting is changed
periodically.
9. When you’re done making these settings, highlight the
OK
button at the top of the screen (you can either press the
Esc
button on the remote control or use the pointer button
to highlight it), then press
Enter. Highlight the OK button
again and press
Enter to return to the main EasyMP
Network Screen.
Projecting Wirelessly
Once you’ve started EasyMP and set up your projector and
computer in either Ad Hoc mode or Access Point mode,
follow these steps to start NS Connection and project
wirelessly.
1. Make sure you’ve installed your 802.11g wireless card in
your projector.
2. Windows: Select
EMP NS Connection from the Start
menu.
Macintosh OS X: Double-click the
EMP NS Connection
icon in your Applications folder.
3. The first time you start NS Connection, you may see a
dialog box asking you to select your network. Select the IP
address for your computer’s network card and click
OK.
Note: If you don’t see your network adapter’s IP address,
allow a minute for it to appear. If your access point or
AirPort base station uses DHCP (Distribute IP addresses
setting is enabled for AirPort), sometimes it takes a minute
for the server to pick up the IP address.
Once you’ve selected the IP address for your network adapter,
you won’t see the Switch network dialog box when you start