Installation Instructions (cont'd)
Water Piping
AWARNING
HOTTERWATERCAN SCALI_.Water heatersam intendedto
producehotwater.Waterheatodto a W.._yhi_ *dll
satisfydod_ washln&dishwashin&andothersanitizingneeds
(an scaldandpermanentlyInjureyouuponcontact.Somepeo-
_earemorelikelyto bepenmanentlyinjuredbyhotwaterb_an
otherL Theseincludetheeklerl_chlldmrktheinfirm,or physical-
ly/mentallyhandicapped.Ifanyoneusinghotwaterinyourhome
fitsintooneulthese greupsorIf thereisalocal€odeor statelaw
requiringacertaintemperaturewaterat_ hotwaterta_ then
mumusttakespecialpmceutienLIn addidouto usingtbelowest
x_ibin temperaturesettingthatsallsfiesyourhot waterneeds,
Lmeanssuchasa mixingvalve,shouldbeusedat the hotwater
tapsusedbythese peophor at thewaterheatenMixingvalves
areavailableat plumbingsupplyorhardwarestore_Followman-
ufacturersinstructions for installationof the valves.Before
changingthe factory setting on the thermostat, read the
_l'emperatore Regulation"sectioninthismanual.
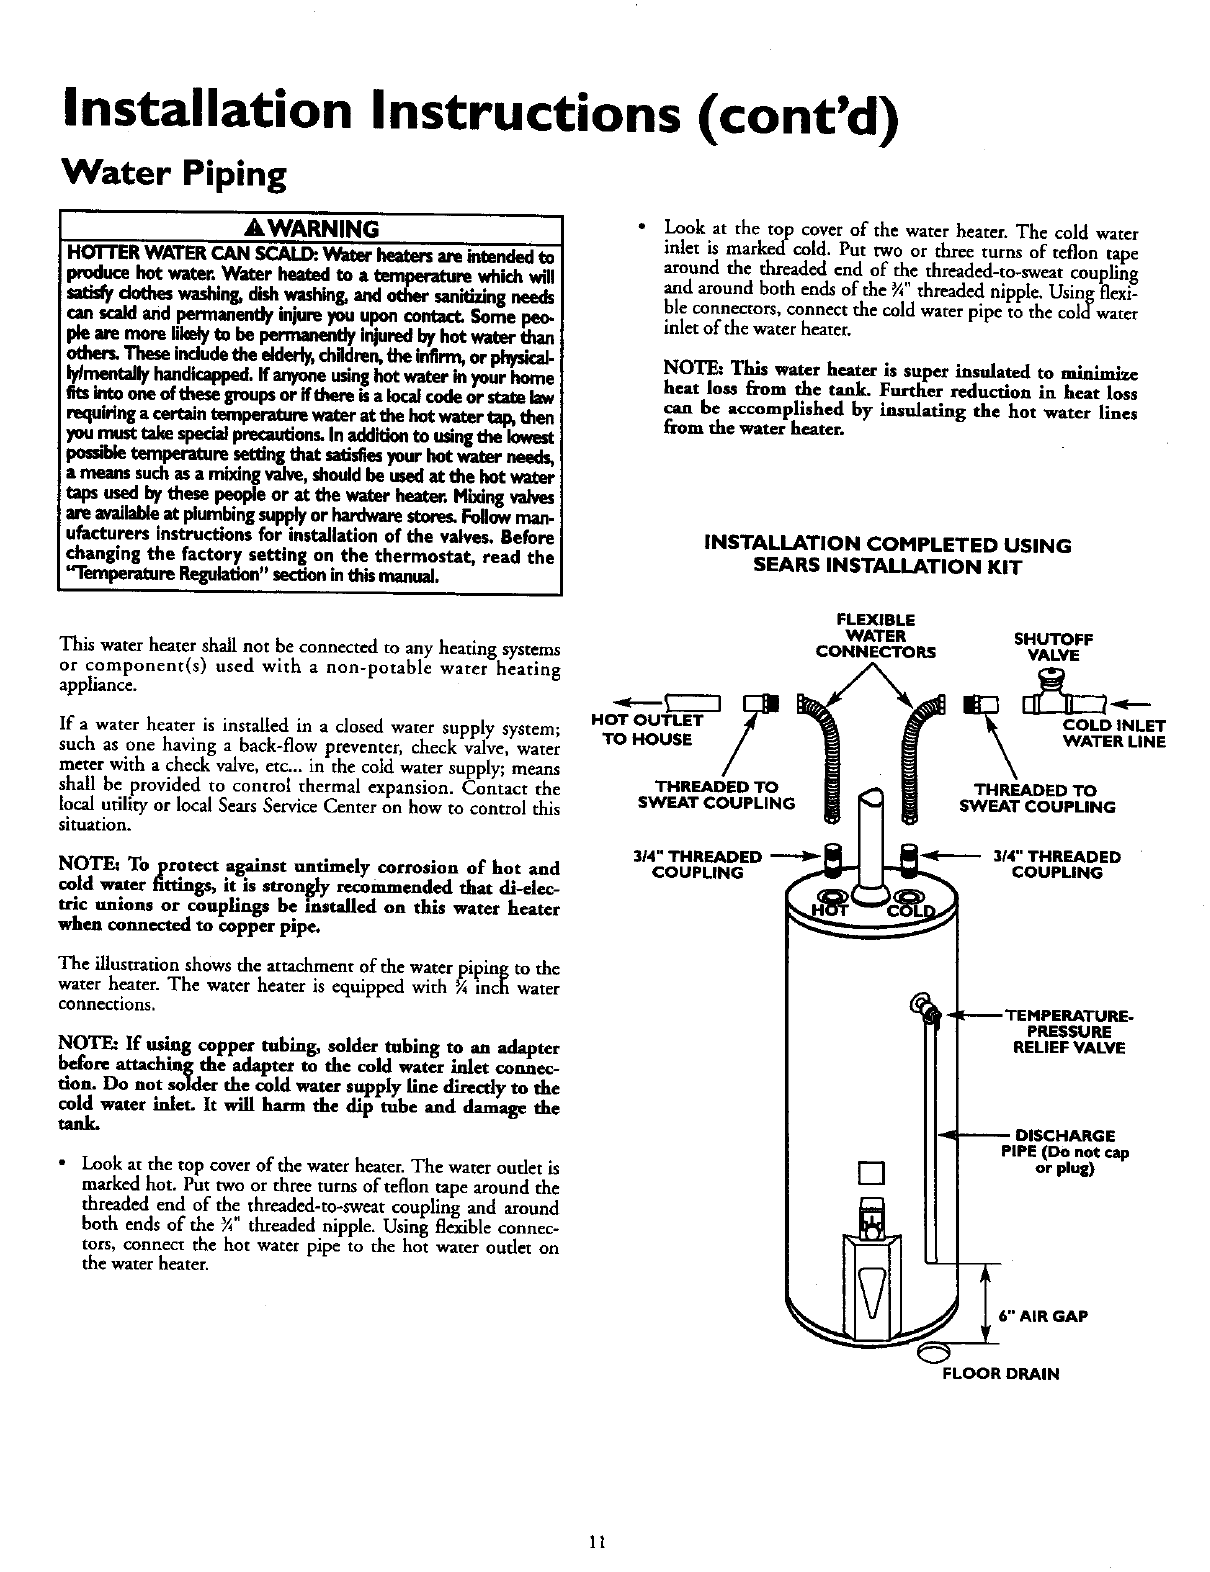
• Look at the top cover of the water heater. The cold water
inlet is marked-cold. Put two or three turns of teflon tape
around the threaded end of the threaded-to-sweat coupling
and around both ends of the ¾"threaded nipple. Using flexi-
ble connectors, connect the cold water pipe to the coldwater
inlet of the water heater.
NOTE: This water heater is super insulated m
heat loss from the tank. Further reduction in heat loss
can be accomplished by insulating the hot water lines
from the water heater.
INSTALLATION COMPLETED USING
SEARS INSTALLATION KIT
This water heater shall not be connected to any heating systems
or component(s) used with a non-potable water heating
appliance.
If a water heater is instal|ed in a dosed water supply system;
such as one having a back-flow preventer, check valve, water
meter with a check valve, etc.., in the cold water supply; means
shall be provided to control thermal expansion. Contact the
local utility or local Sears Service Center on how to control this
situation.
NOTE: Toprotect against untimely corrosion of hot and
cold water fittings, it is strongly recommended that all-elec-
tric unions or couplings be installed on this water heater
when connected to copper pipe.
The illustration shows the attachment of the water pipin_ to the
water heater. The water heater is equipped with ¼ inch water
connections.
NOTE: If using copper tubing, solder tubing to an adapter
before attaching _e adapter to the cold water inlet enunec-
tion. Do not solder the cold water supply line directly to the
cold water inlet. It will harm the dip tube and damage the
tank.
• Look at the top cover of the water heater. The water oudet is
marked hot. Put two or three turns of teflon tape around the
threaded end of the threaded-to-sweat coupling and around
both ends of the ¾ threaded nipple. Using flexible connec-
tors, connect the hot water pipe to the hot water oudet on
the water heater.
HOT OUTLET
TO HOUSE /
THREADED TO
SWEAT COUPLING
314" THREADED
COUPLING
FLEXIBLE
WATER
CONNECTORS
[]
SHUTOFF
VALVE
COLD INLET
WATER LINE
THREADED TO
SWEAT COUPLING
314" THREADED
COUPLING
PRESSURE
RELIEF VALVE
PiPE (Do not cap
or plug)
6" AIR GAP
FLOOR DRAIN
11
