18
Getting Ready
If you place the VR-700 on a stand, you must use the KS-G8 (sold separately).
• When placing the VR-700 on the stand, be careful not to pinch your fingers between the instrument and the stand.
• When lifting the VR-700 onto the stand, make sure to enlist the help of at least one other person.
• Using the VR-700 with any other stand may produce an unstable situation, possibly causing the instrument to fall or overturn, and
resulting in injury or damage.
• For details on how to assemble the stand, refer to the owner’s manual that accompanied the stand.
fig.VKvsKS-G8.eps
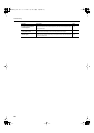
1.
Place the VR-700 in the position shown in the illustration.
• Position rubber feet “A” on the outside of the stand’s rubber pads.
• Position rubber feet “B” directly above the stand’s arms.
• Position rubber feet “C” so that they contact the inside of the stand’s rubber pads.
* Make sure that the VR-700’s six rubber feet (A–C) are not resting on the stand’s rubber pads.
1.
Before you begin making connections, confirm the following.
• Is the volume level of the VR-700 or connected amp turned all the way down?
• Is the power to the VR-700 or connected amp turned off?
2.
Connect the supplied power cord to the AC Inlet of the VR-700, and plug the other end into an AC outlet.
fig.ConnectPowerCoad.eps
Placing the VR-700 on the KS-G8 Stand
Connecting the Power Cord
A
B
C
A
B
C
Front (keyboard) side
Top view
Rear panel side
Rear panel
VR-700_e.book 18 ページ 2009年11月18日 水曜日 午前9時24分