ASSEMBLY
SAW BLADE CONFIGURATION
Cutting Une Head and BrashTri-Blade configurationsare
located beforethis section.
DANGER:THE METAL BLADE SHIELD MUST BE
PROPERLY INSTALLED ON THE UNIT
ANYTIME THE UNIT IS USED WITH THE
BLADE. THE FORWARD, TIP ON THE MET-
AL BLADE SHIELD HELPS TO REDUCE
TIlE OCCURRENCE OF BLADE THRUST
WHICH CAN CAUSE SERIOUS INJURY
SUCH AS AMPUTATION TO THE OPERA-
TOR OR BYSTANDERS.
THE BLADESAR_SNARP AND C=AN:CUT
YOU. BE SURE_TO;WEAR_GLOVE_WHIIJE
WORKING WITH BL_4DES. "_ ' i
PRE-INSTALLATION
Ifthe plastic linetrimmershield isinstalled onthe unit,you
must first remove the dualline cutting head beforeinstal-
ling the blade, supportflange, nut and metal blade shield.
• To remove (See Figure-7), place lockingpinthroughthe
gearbox and ddvingdiskto preventthe arbor shaftfrom
turning and removethe dual line head by turning clock-
wise with blade nut/sparkplug wrench. Save parts re-
moved for future use.
• Remove 4 screws with hex key holding the plastic line
trimmer shield. Save these 4 screws for installationof
the metal blade shield.
• Go to=Installing The Metal Blade Shield" beforeproceed-
ing.
If you have already configured your unitfor brushtri-blade
use, you have alreadyinstalledthemetai blade shieldand
should remove thebrush fri-blade.
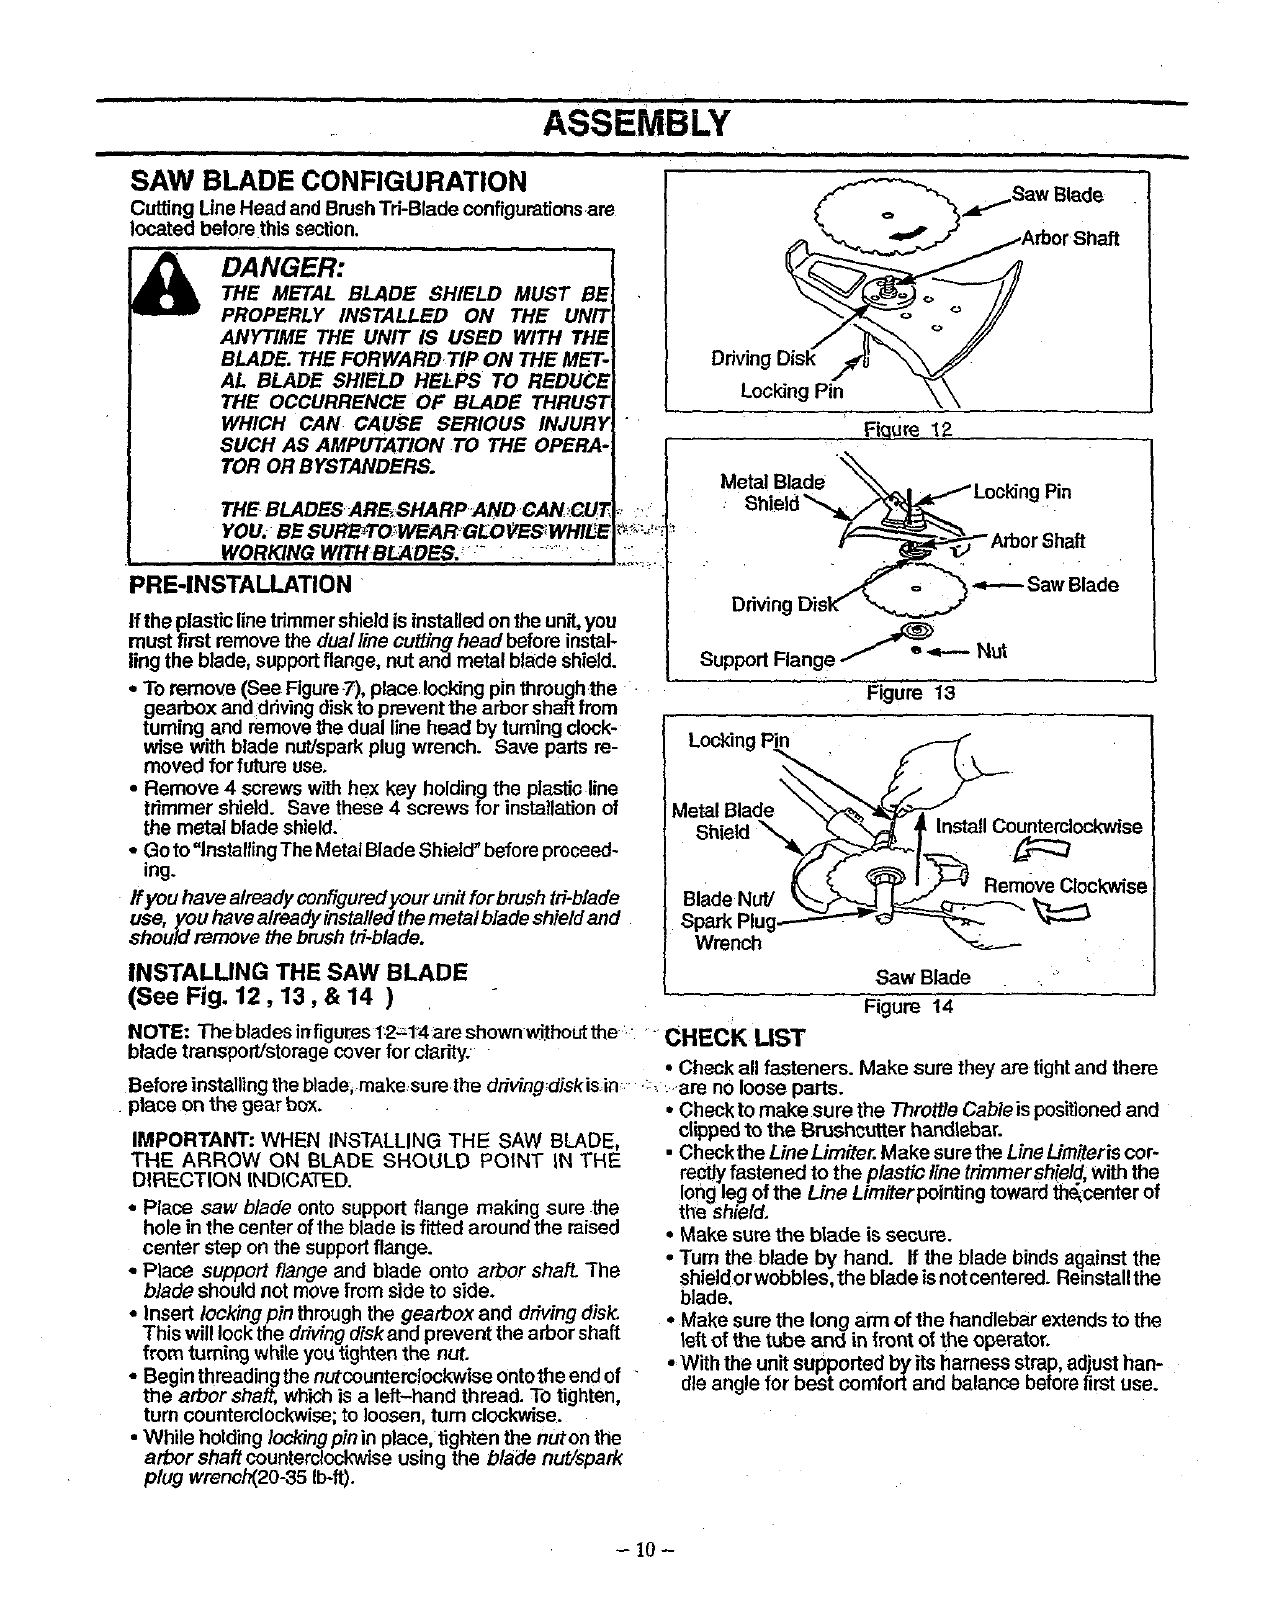
INSTALUNG THE SAW BLADE
(See Fig. 12,13, & 14 )
,SawBlade
Driving Disk
Locking Pin
Fiqure 12
Metal Blade =gPin
Saw Blade
Driving
Support Flange -_'1"__"=-'- Nut
Figure 13
Metal Blade __
Shield InstallCounterclockwise
BlaoeN.V
Saw Blade =
Figure 14
NOTE: The blades inf gul:esl:2-_1:_4areshownwithout the _ • CHECK LIST
blade transport/storagecover for clarity.
• Check all fasteners. Make sure they are tightand there
Before installingthe blade, make surethe driving;diskis'm :, are noloose parts.
place on the gear box. • Check to make sure the Throttle Cableis positionedand
IMPORTANT: WHEN INSTALLING THE SAW BLADE,
THE ARROW ON BLADE SHOULD POINT iN THE
DIRECTION INDICATED.
• Place saw blade onto support flange making sure the
hole in the center of the blade is fitted aroundthe raised
center step on the support flange.
• Place support flange and blade onto arbor shaft. The
blade should not move from side to side.
• Insert locking pin through the gearbox and drivingdistc
This will lock the drivfng disk and prevent the arbor shaft
from turning white you tightenthe nut.
• Begin threading the nutcountere!ockwise ontothe end of "
the arbor shaft, which is a left-hand thread. To tighten,
turn counterclockwise;to loosen, turn clockwise.
• While holding locldng pin in place, tighten the nuton the
arbor shaft counterclockwise using the blade nut/spark
plug wrench(20-35 Ib-ft).
clippedto the Brushcutter handlebar.
• Check the Line Limiter. Make sure the LineUmferis cor-
rectly fastened to the plastic line trimmersh_eld, with the
long leg of the Une Limiterpointing toward the_center of
the shield.
• Make sure the blade is secure.
• Turn the blade by hand. If the blade binds against the
shield or wobbles, the blade isnot centered. Reinstall the
blade.
• Make sure the long arm of the handlebar extends to the
leftof the tube and in front ofthe operator.
• With the unitsupported by itsharness strap,adjusthan-
dle angle for best comfort and balance beforefirst use.
- 10-


