


4
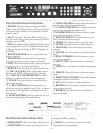
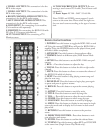
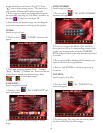
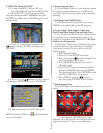
Front Panel Functions and Operation
1. POWER: Press this button to toggle the KOD-
1100 on and o. Turning o the power on the player’s
front panel will not allow it to be powered on by the
remote control.
2. SD : is interface allows the KOD-1100 to ac-
cess SD cards as long as they are formatted as FAT32
(Supports up to 16GB).
3. USB: is interface allows the KOD-1100 to access
mass storage devices such as USB/ash/thumb drives
as long as they are formatted as FAT32 (Supports up
to 16GB).
4. REMOTE SENSOR: Receive signals from the
remote controller.
5. PAUSE/PLAY: Press this button to begin play;
press again to pause and press it again to resume.
6. NEXT: Press this button to skip a playing song and
start playing the next song in the playlist.
7. REPLAY: Press this button to replay the last song.
8-9. MIC 1 & 2 JACKS: ese jacks connect micro-
phones to the KOD-1100 through 1/4 inch plugs.
10-11. MIC 1 & 2 VOLUME KNOBS: Use these
knobs to control the volume of the microphones.
12. VOCAL: Press this button to isolate the left or
right audio channel.
13-14. KEY CONTROL: Press these buttons to
adjust the tone of the karaoke singer. Press - to atten
the voice by a half step. Press + to sharpen the voice
by a half step.
15. ECHO CONTROL: Press to adjust the echo of
a karaoke singer during their performance.
16. TONE CONTROL: Press to adjust the tone of a
karaoke singer during their performance.
17-18. MUSIC VOLUME: Press to adjust the audio
output of the attached microphone units.
19 NUMERIC KEYS: Press these buttons to input
track selections and song numbers.
20. PAGE UP/DOWN: Press these buttons to ad-
vance or return to previous pages.
21. ARTIST: Press this button to search by artist.
22. GENRE: Press this button to search by genre.
23. LANGUAGE: Press this button to search by
language.
24. MY FAVS: Press this button to search by favorite
songs.
25. SONG NUMBER: Press this button to search
song by song number.
26. SONG TITLE: Press this button to search by
song title.
27. MENU: Press this button to display menu catego-
ries.
28. DELETE: Press this button to clear any wrong
inputs.
29. DIRECTION CONTROL: Press these buttons
to navigate selections and menus.
30. OK: Press this button to conrm selections.
31. RETURN: Press this button to return to the pre-
vious menu or last step.
32. RESERVE: Press this button to add selected-
songs into playlist.
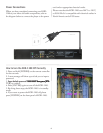
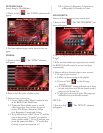
Back Panel Functions and Operation
1. MOUSE INPUT: For connectiong a PS/2 mouse.
2. COM1 INPUT: For touch screen, extension con-
trol panel & MCU updating.
3. COM2: For connecting a touch screen cable
(Touch Screen sold saparately).